
AI Warehouse (Tenstorrent TT-Loudbox) Deployment Guide
Deployment and operations guide for the AI Warehouse based on Tenstorrent TT‑Loudbox hardware.
This guide provides step-by-step instructions for setting up and configuring your Tenstorrent TT-LoudBox server after it has been installed in your server rack. It covers network configuration, connecting the Baseboard Management Controller (BMC), installing Ubuntu 22.04, and setting up Tenstorrent software and models. Please follow each section carefully to ensure a successful setup
Introduction
Thank you for purchasing the Tenstorrent TT-LoudBox, a high-performance system powered by Wormhole™ n300s Tensix Processors. This guide is intended for end-users responsible for configuring the TT-LoudBox after rack installation. The steps include setting up network connectivity, connecting the BMC, installing Ubuntu 22.04 LTS, and configuring Tenstorrent software for AI model deployment.
Safety Information:
-
Ensure the server is powered off and unplugged during any physical connections.
-
Follow all data center safety protocols when handling the server.
-
Verify that the server is properly mounted in the rack as per the SuperMicro SuperServer SYS-740GP-TNRT manual (Chapter 2).
Tenstorrent TT-LoudBox Setup Checklist
This checklist is designed for clients installing and configuring the Tenstorrent TT-LoudBox server. It ensures all necessary steps are completed for a successful rack installation and system setup. Please follow this checklist in conjunction with the full Tenstorrent TT-LoudBox End-User Documentation and coordinate with [ai]levate support as needed.
Rack Installation Checklist
-
Verify Rack Space Availability
- Confirm the data center rack has at least 4U of available space for the TT-LoudBox (T3000) 4U/Desktop Workstation system.
- Ensure the rack is stabilized or bolted to the floor to prevent tipping.
- Plan to install the server at the bottom of the rack for stability, if possible.
-
Inspect Package Contents
- Verify the presence of all components listed in the Package Contents section:
- Tenstorrent TT-LoudBox (T3000) system.
- C13 Power Cable (1.8m/6ft).
- 4U Rack-Mounting Kit.
- 2x QSFP-DD 400GbE Cables (0.6m/2ft) for TW-02002 configuration.
- Check for any visible damage to components. Contact [ai]levate support ([email protected]) if items are missing or damaged.
- Verify the presence of all components listed in the Package Contents section:
-
Prepare Power Requirements
- Confirm the power supply meets the minimum requirements:
- 200V input voltage required for TW-02002 configuration.
- Power usage: 1200W (100-127Vac), 1800W-2090W (200-240Vac), or 2200W (220-240Vac) with 1+1 Titanium Level PSUs.
- Ensure access to appropriate power outlets (C13-compatible) in the data center.
- Verify power redundancy with dual PSUs and test power connections.
- Confirm the power supply meets the minimum requirements:
-
Prepare for Rack Mounting
- Review Chapter 2 of the SuperMicro SuperServer SYS-740GP-TNRT Manual for detailed rack-mounting instructions.
- Gather necessary tools: Screwdriver (Phillips and flathead), rack lift (recommended), and M5 screws for rail installation.
- Remove the chassis top cover and feet as per the _Preparing the Chassis for Rack Mounting section:
- Slide the blue cover lock and lift off the top cover.
- Remove screws and foot lock tabs to detach chassis feet.
- Review Chapter 2 of the SuperMicro SuperServer SYS-740GP-TNRT Manual for detailed rack-mounting instructions.
-
Install Rack Rails
- Identify and assemble the inner and outer rail components from the 4U Rack-Mounting Kit.
- Attach inner rails to the chassis using provided screws.
- Secure outer rails to the rack, adjusting for a snug fit, and fasten with M5 screws.
- Slide the chassis (with inner rails) into the outer rails, ensuring rail locking tabs engage.
- Identify and assemble the inner and outer rail components from the 4U Rack-Mounting Kit.
-
Mount and Secure the Chassis
- Use a rack lift to safely position the TT-LoudBox into the rack.
- Confirm the chassis is securely mounted and stable, with no risk of overextension.
- Test the setup to ensure the server is firmly in place before proceeding.
- Use a rack lift to safely position the TT-LoudBox into the rack.
Post-Rack Installation Checklist
-
Connect Power Cables
-
Plug the C13 Power Cable into the TT-LoudBox’s PSU and a compatible power outlet.
- Verify the PSU indicator lights are active and confirm input voltage (minimum 200V for TW-02002).
-
-
Connect QSFP-DD Cables (TW-02002 Configuration)
-
Refer to the system topology diagram for port and slot numbering.
-
Connect one QSFP-DD 400GbE cable to Port 1 on Wormhole cards in Slots 1 and 4.
-
Connect the second QSFP-DD cable to Port 2 on Wormhole cards in Slots 3 and 2.
-
Verify connections by checking link status LEDs on QSFP-DD ports.
-
-
-
Connect Network Cables
-
Plug an Ethernet cable into the IPMI port (RJ45) for Baseboard Management Controller (BMC) access and connect to a network switch or router.
-
Connect Ethernet cables to one or both RJ45 10GBase-T ports for host system connectivity.
-
Record the MAC addresses of the RJ45 ports (found on the system label or via BMC interface).
-
-
-
Verify Environmental Conditions
-
Ensure the server is in a well-ventilated area with adequate airflow.
-
Maintain ambient temperatures within the recommended range for the Wormhole™ n300s Tensix Processors and SuperMicro SuperServer SYS-740GP-TNRT (refer to Environmental Specifications).
-
Avoid environments with excessive dust, moisture, or vibration.
-
-
-
Provide Network Information to [ai]levate
-
Compile the following details for submission to [ai]levate support ([email protected]):
-
BMC IP Address: Static IP assigned during BMC configuration.
-
BMC Credentials: Username and password from the system label.
-
Host Network Details:
-
Preferred static IP or DHCP confirmation for the 2x RJ45 10GBase-T ports.
-
Subnet Mask (e.g., 255.255.255.0).
-
Gateway (e.g., 192.168.1.1).
-
DNS Servers (e.g., 8.8.8.8, 8.8.4.4).
-
Server Name (e.g., loudbox01).
-
MAC Addresses of the RJ45 ports.
-
-
User Account Details:
-
Preferred username (e.g., admin).
-
Strong password (minimum 12 characters, including letters, numbers, and symbols).
-
-
Network Access:
-
Confirm internet access for the TT-LoudBox.
-
Verify firewall settings allow TCP ports 22 (SSH), 80/443 (HTTP/HTTPS), and any additional ports specified by [ai]levate.
-
-
Submit information securely via the [ai]levate support portal (http://www.ailevate.com/support ).
-
Coordinate with your network team to assist [ai]levate during remote setup.
-
-
-
Confirm Setup Completion
-
Await confirmation from [ai]levate that Ubuntu 22.04 LTS, Tenstorrent software, and the large language model (LLM) have been installed and configured.
-
Receive handover details, including:
-
vLLM API base URL (e.g., http://:8000/v1).
-
API key (e.g., somekey).
-
Model name (e.g., Qwen/Qwen3-32B).
-
Documentation for using the vLLM API with OpenAI-compatible endpoints.
-
-
Verify system stability and performance using the tt-smi command (coordinated with [ai]levate).
-
-
Safety and Support Notes
-
Adhere to Safety Protocols
-
Ensure the server is powered off and unplugged during physical connections.
-
Follow all data center safety protocols when handling the server.
-
Use a rack lift to avoid injury or equipment damage during installation.
-
-
-
Contact [Ai]levate Support for Issues
-
For any issues during setup, contact [ai]levate support:
-
Email: [email protected]
-
Support Portal: http://www.ailevate.com/support
-
Do not attempt hardware modifications or component replacements without [ai]levate guidance to avoid voiding the warranty.
-
-
Specifications, Requirements, and Setup
This section outlines the package contents, system specifications, operating system requirements, rack-mounting instructions, QSFP-DD connections, and environmental specifications for the Tenstorrent TT-LoudBox (T3000). Ensure all prerequisites are met before proceeding with network configuration and software installation.
Package Contents
The Tenstorrent TT-LoudBox (T3000) 4U/Desktop Workstation system package includes the following components:
-
Tenstorrent TT-LoudBox (T3000): 4U/Desktop Workstation system.
-
C13 Power Cable: 1.8m/6ft.
-
4U Rack-Mounting Kit: For optional rack installation.
-
2x QSFP-DD 400GbE Cables: 0.6m/2ft (included for TW-02002 configuration only).
Note: Upon receiving the package, inspect all components for damage. Contact Tenstorrent support if any items are missing or damaged (see Support and Contact Information).
System Specifications
The TT-LoudBox (TW-02002 configuration) has the following specifications:
| Component | Specification |
|---|---|
| CPU | 2x Intel® Xeon® Silver 4309Y (8 cores/16 threads each, up to 2.8 GHz, 105W) |
| Memory | 512GB (16x32GB) DDR4-3200 ECC RDIMM (12 slots free) |
| Storage | 3.8TB U.2 NVMe PCIe 4.0 x4 |
| Tensix Processors | 4x Tenstorrent Wormhole™ n300s Tensix Processors with 4x Warp 100 Interconnects |
| Cables | 2x QSFP-DD 400GbE Cable, 0.6m/2ft (for TW-02002) |
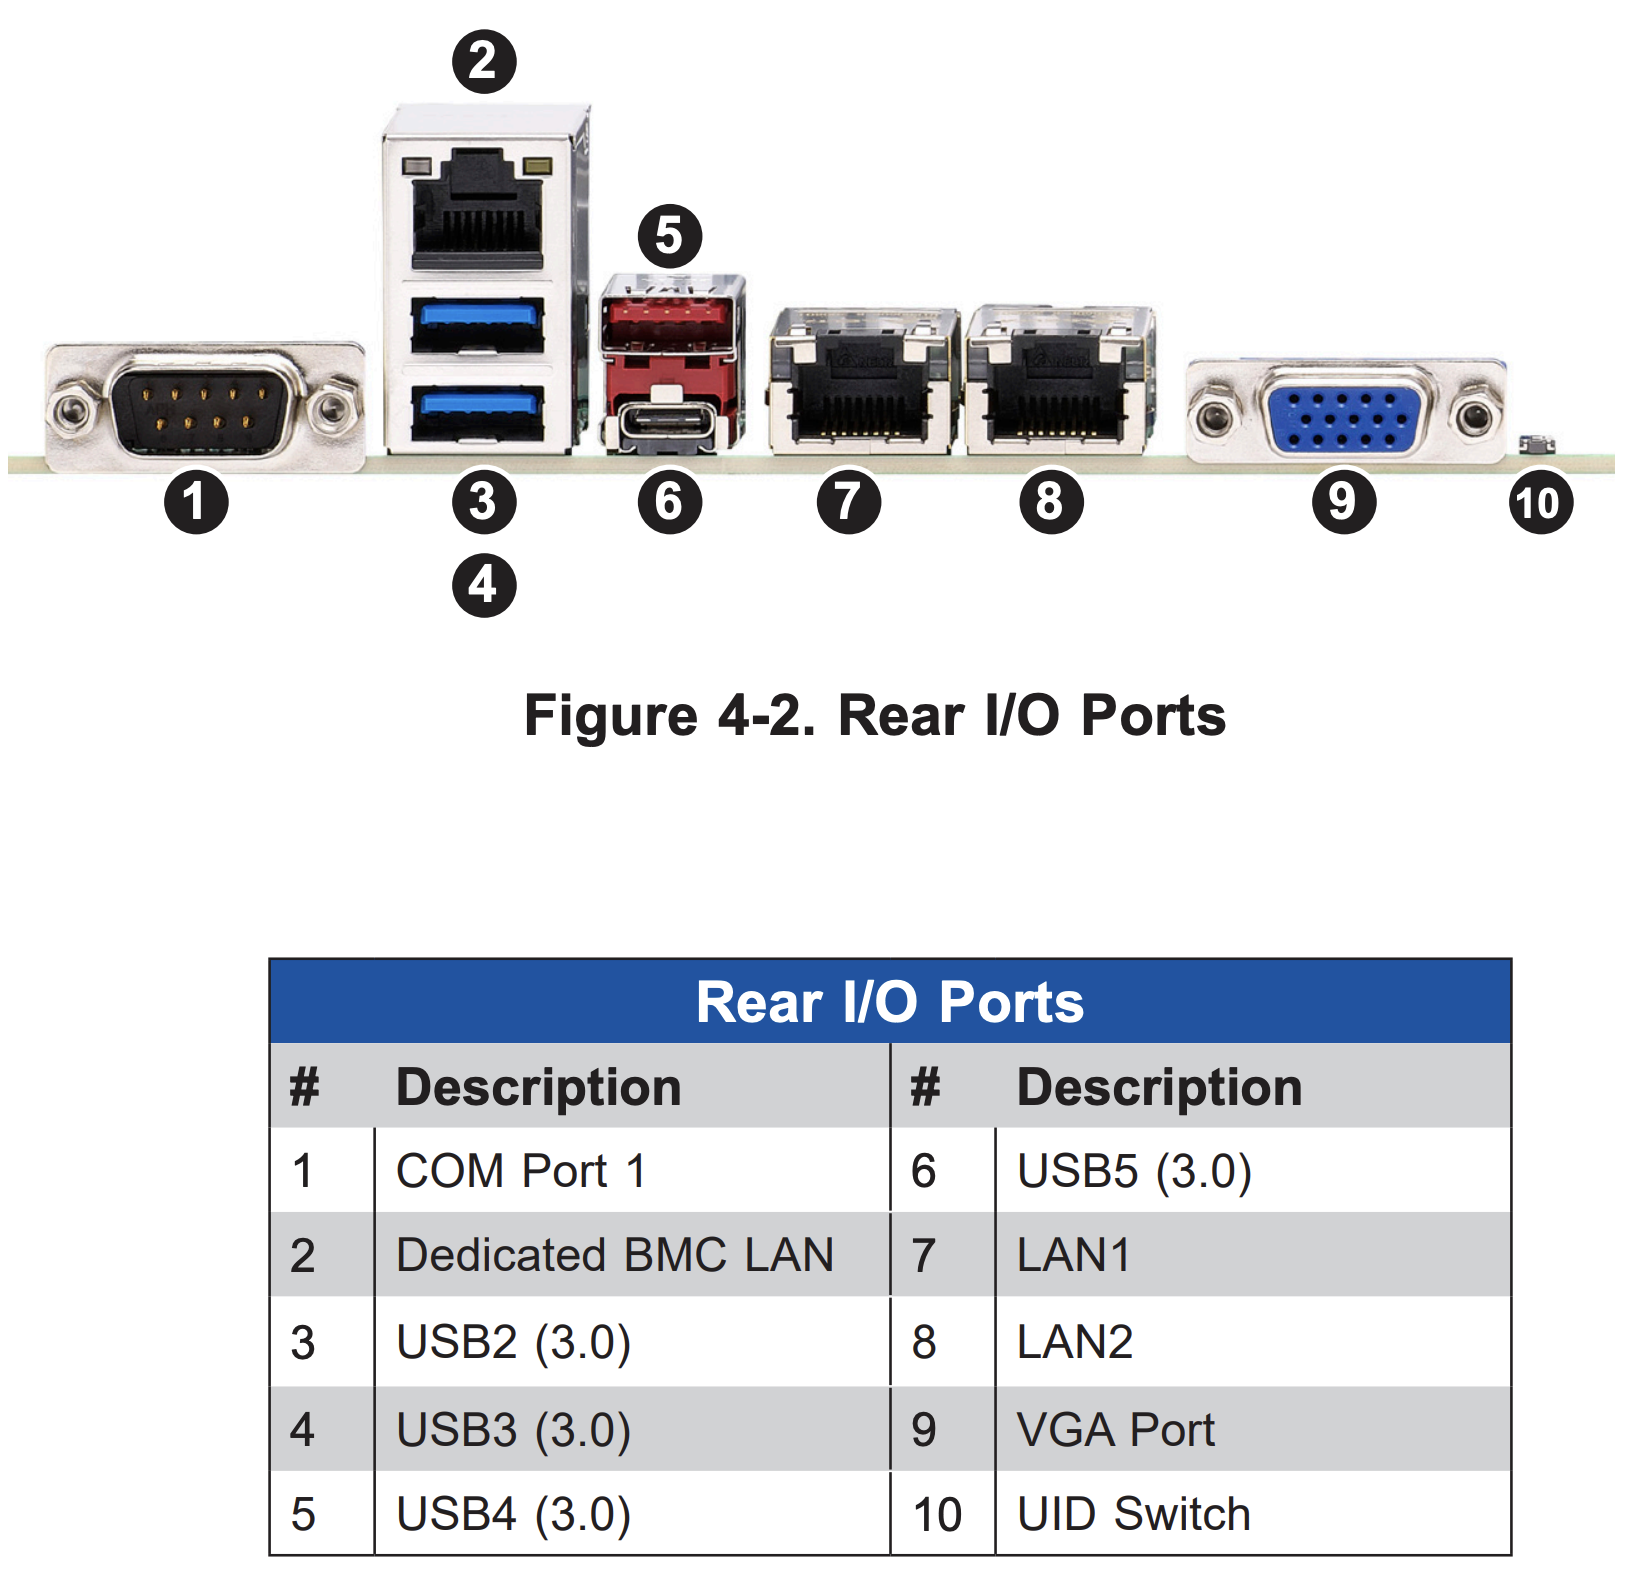
| Host System Connectivity | 2x RJ45 10GBase-T (Intel® X550-AT), 5x USB 3.1 Gen 1 Type-A (2x front, 3x rear), 1x USB 3.1 Gen 1 Type-C, 1x COM, 1x VGA, 1x IPMI |
| Tensix Processor Connectivity | 8x QSFP-DD Active 200G (2 per card, connects to other Wormhole Tensix Processors only) |
| Power Supply | 1+1 Titanium Level PSUs: 1200W (100-127Vac), 1800W-2090W (200-240Vac), 2200W (220-240Vac)* |
| Base System | SuperMicro SuperServer SYS-740GP-TNRT |
| Operating System | None (Ubuntu 22.04 LTS recommended, see below) |
Note: The TW-02002 configuration requires a minimum of 200V input voltage for operation.
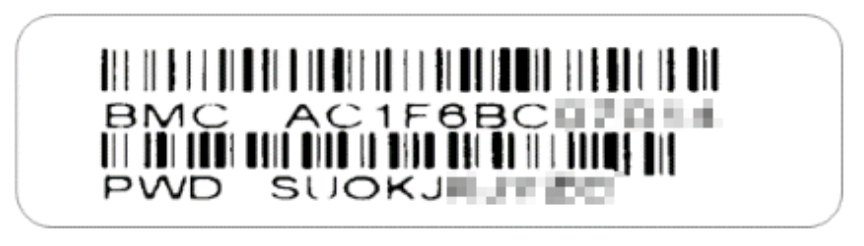
BMC Information: The Baseboard Management Controller (BMC) MAC address and default password are provided on labels located on the system chassis and motherboard. A slide-out tray with the label is accessible behind the front cover at the bottom of the system.
Operating System Requirements
The Tenstorrent TT-LoudBox (T3000) ships without an operating system installed. This End-User Guide provides instructions for setting up the Baseboard Management Controller (BMC) to enable network connectivity. Once the BMC is configured and network details are provided to Tenstorrent, our [ai]levate support team will remotely install and configure Ubuntu 22.04 LTS (Jammy Jellyfish), the recommended operating system for optimal performance with Tenstorrent Wormhole™ n300s Tensix Processors.
4U Rack-Mounting Instructions
The TT-LoudBox ships in a desktop configuration but can be installed in a 4U rack using the included rack-mounting kit. Follow these steps to prepare and mount the system in a rack, as detailed in Chapter 2 of the SuperMicro SuperServer SYS-740GP-TNRT Manual.
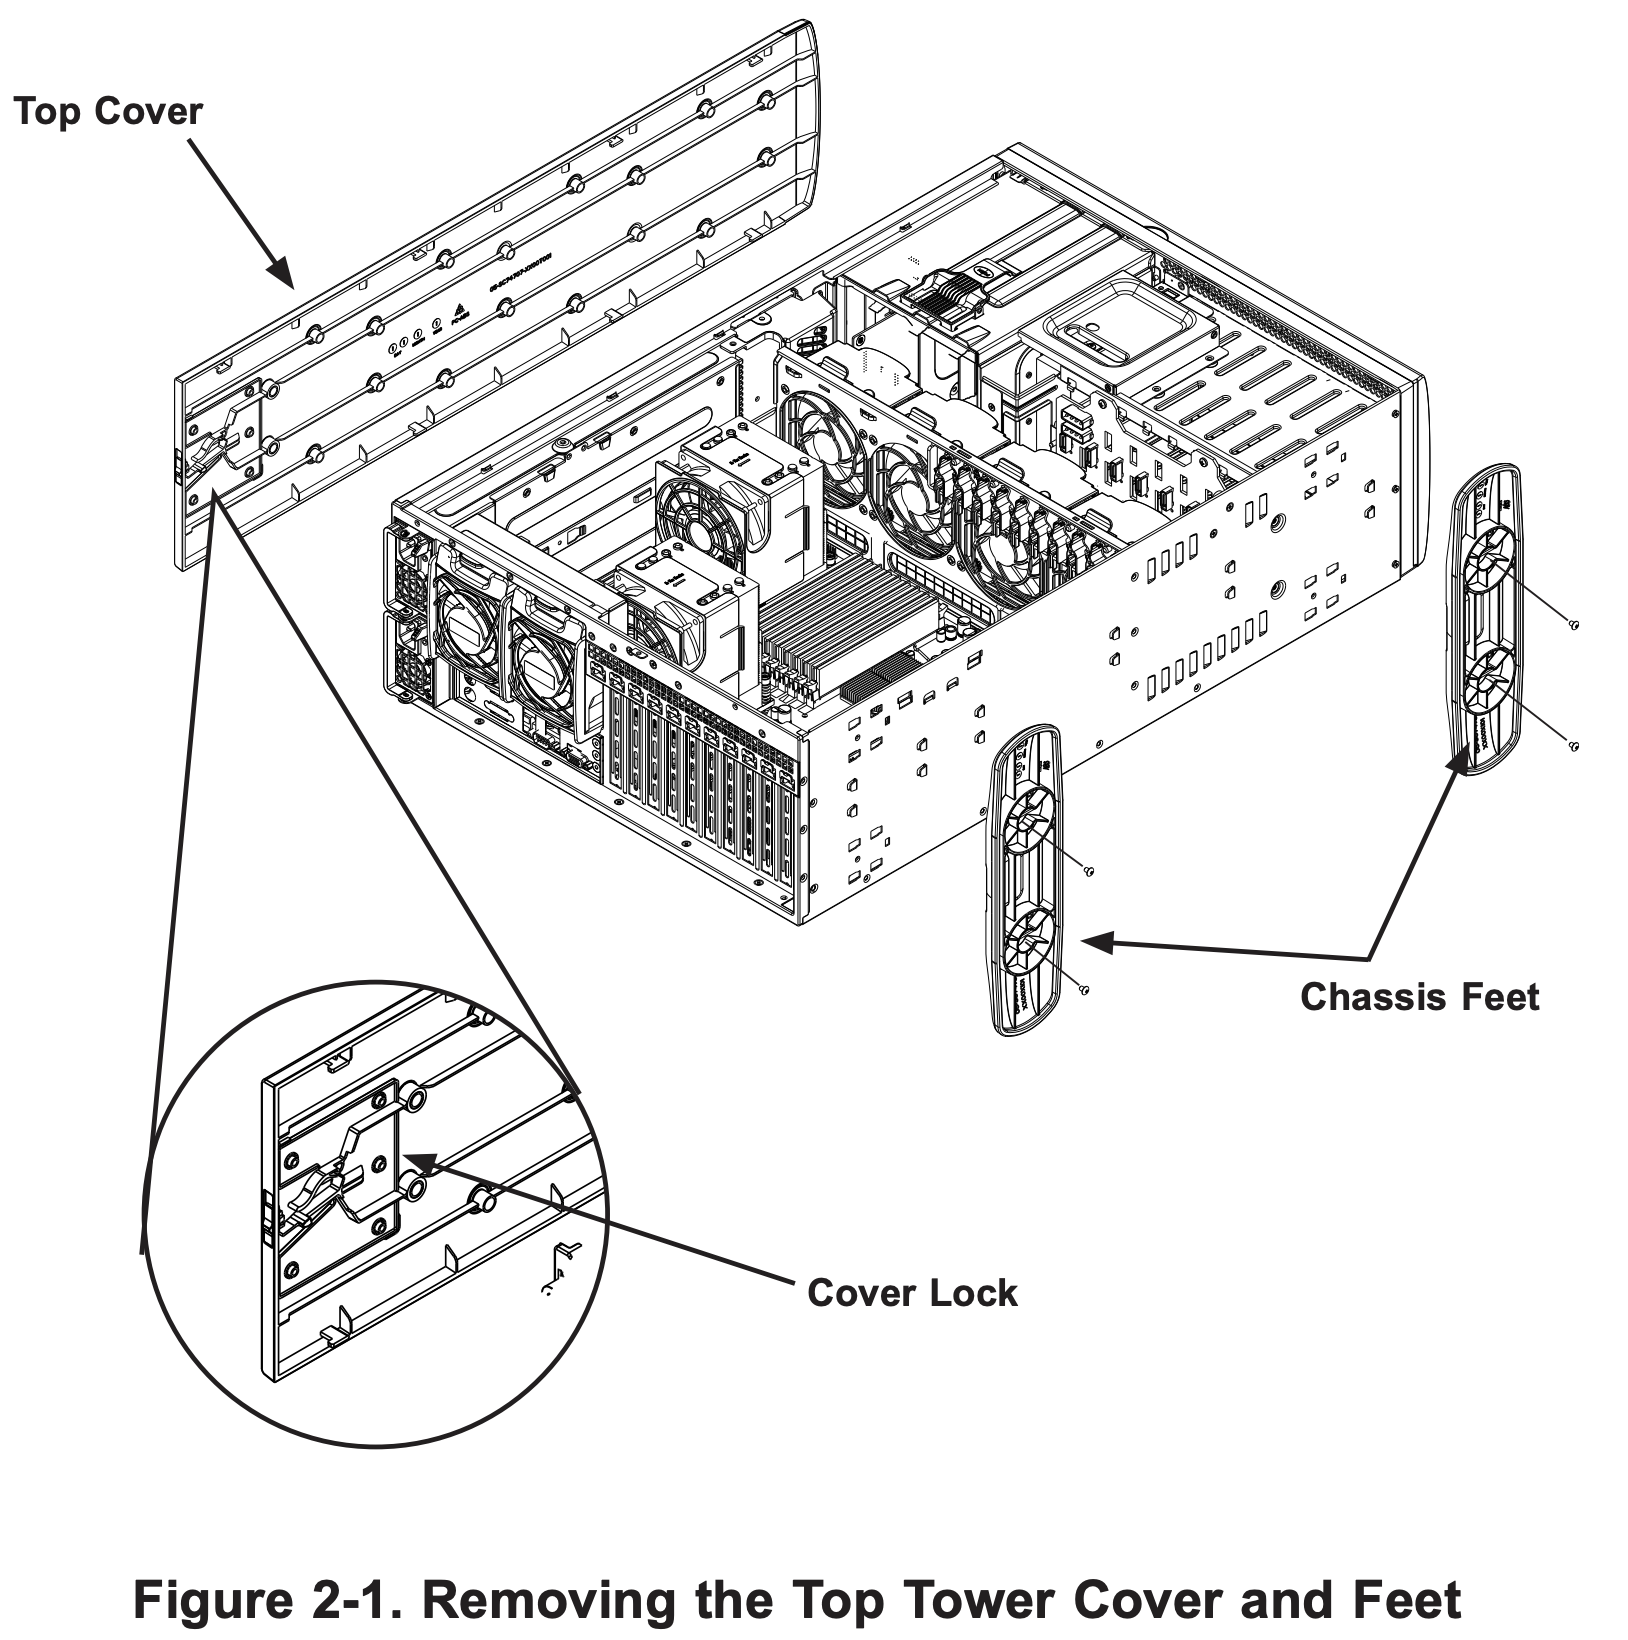
Preparing the Chassis for Rack Mounting
-
Remove the Top Tower Cover:
-
Locate the blue cover lock at the rear of the chassis.
-
Slide the lock to the right and push the cover forward.
-
Lift the top cover off the chassis.
-
-
Remove the Chassis Feet:

-
Lay the chassis on its side.
-
Remove the screws securing the chassis feet.
-
Use a flathead screwdriver to gently lift the foot lock tab at the center of each foot.
-
Slide each foot toward the rear of the chassis to remove.
Installing the Rails
- Identify Rail Components:

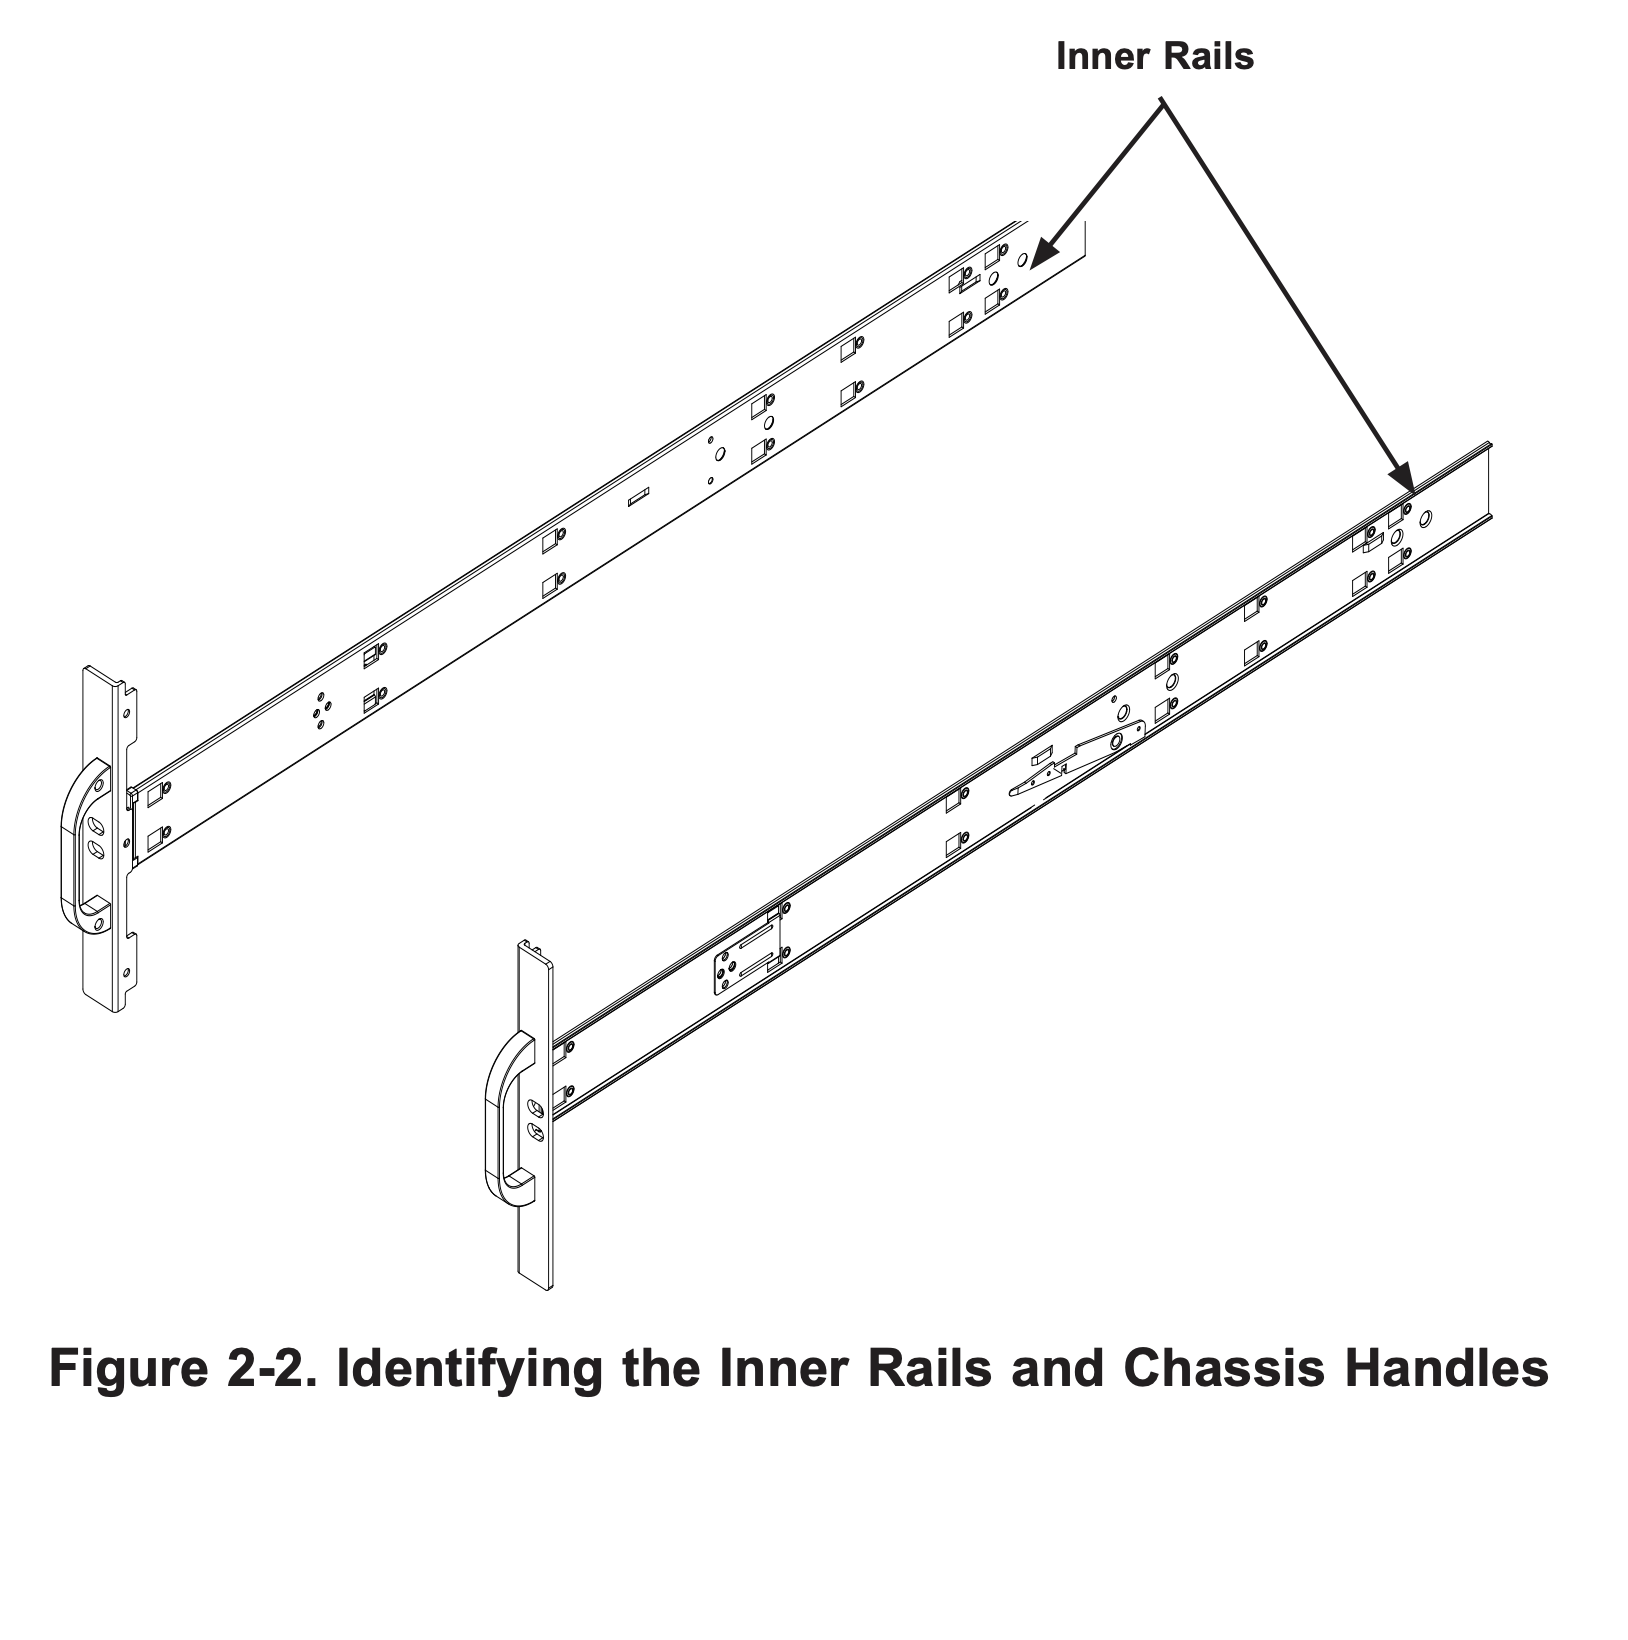
- The rack-mounting kit includes two rail assemblies, each with an inner rail (attaches to the chassis) and an outer rail (attaches to the rack).
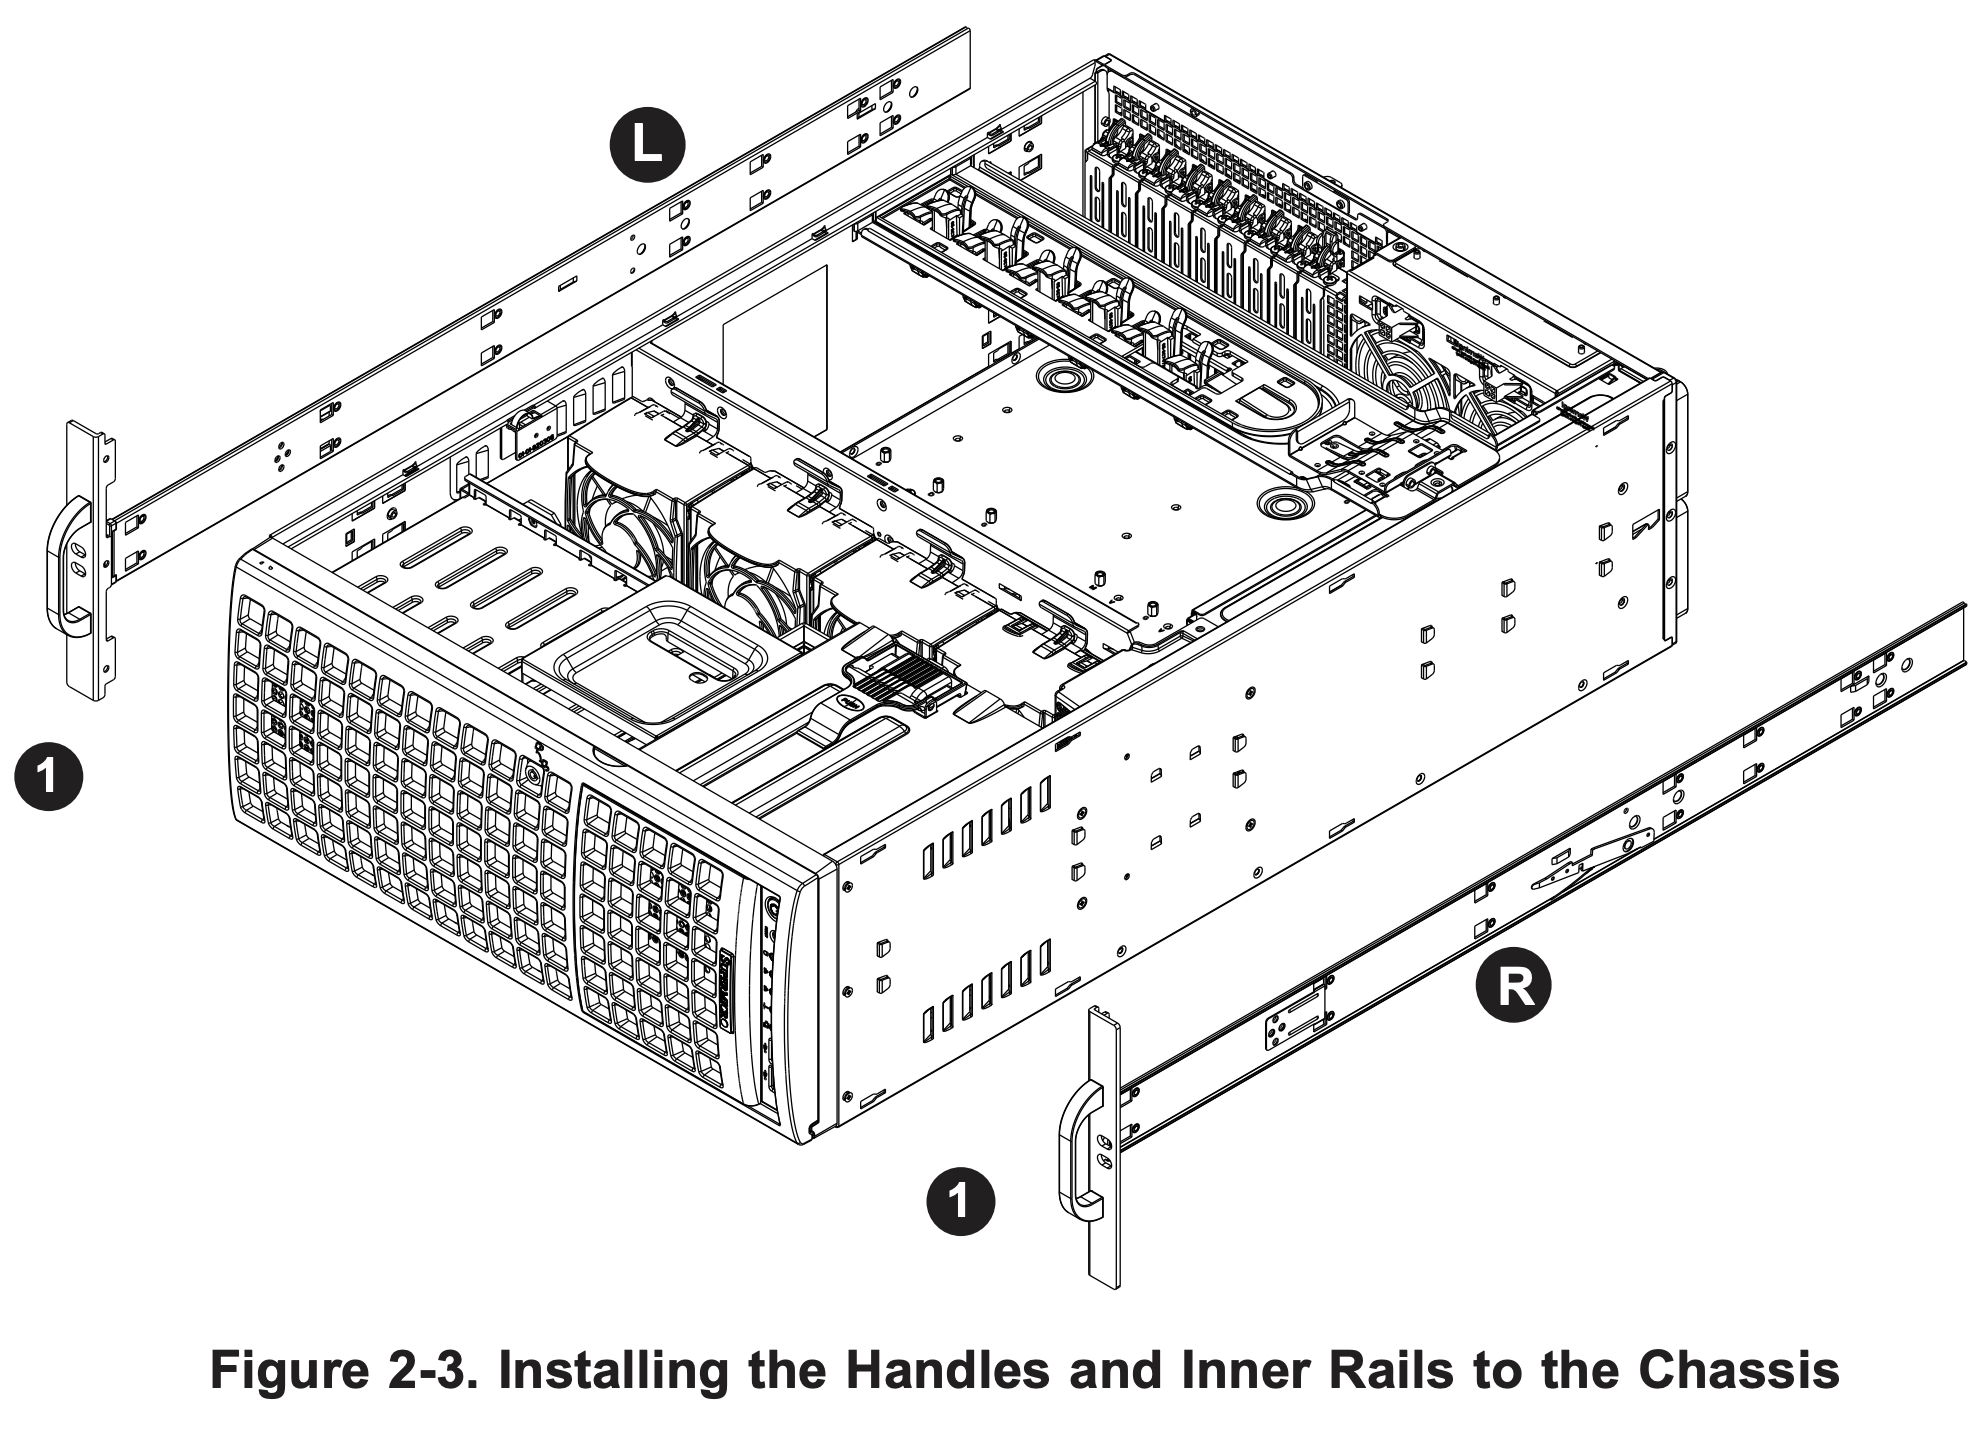
- Install Inner Rails to the Chassis:

-
Attach the chassis handles to the front of the chassis using three screws each.
-
Identify the left and right inner rails (labeled on the rails).
-
Align each rail with the screw holes on the side of the chassis.
-
Securely screw the inner rails to the chassis.
- Install Outer Rails to the Rack:

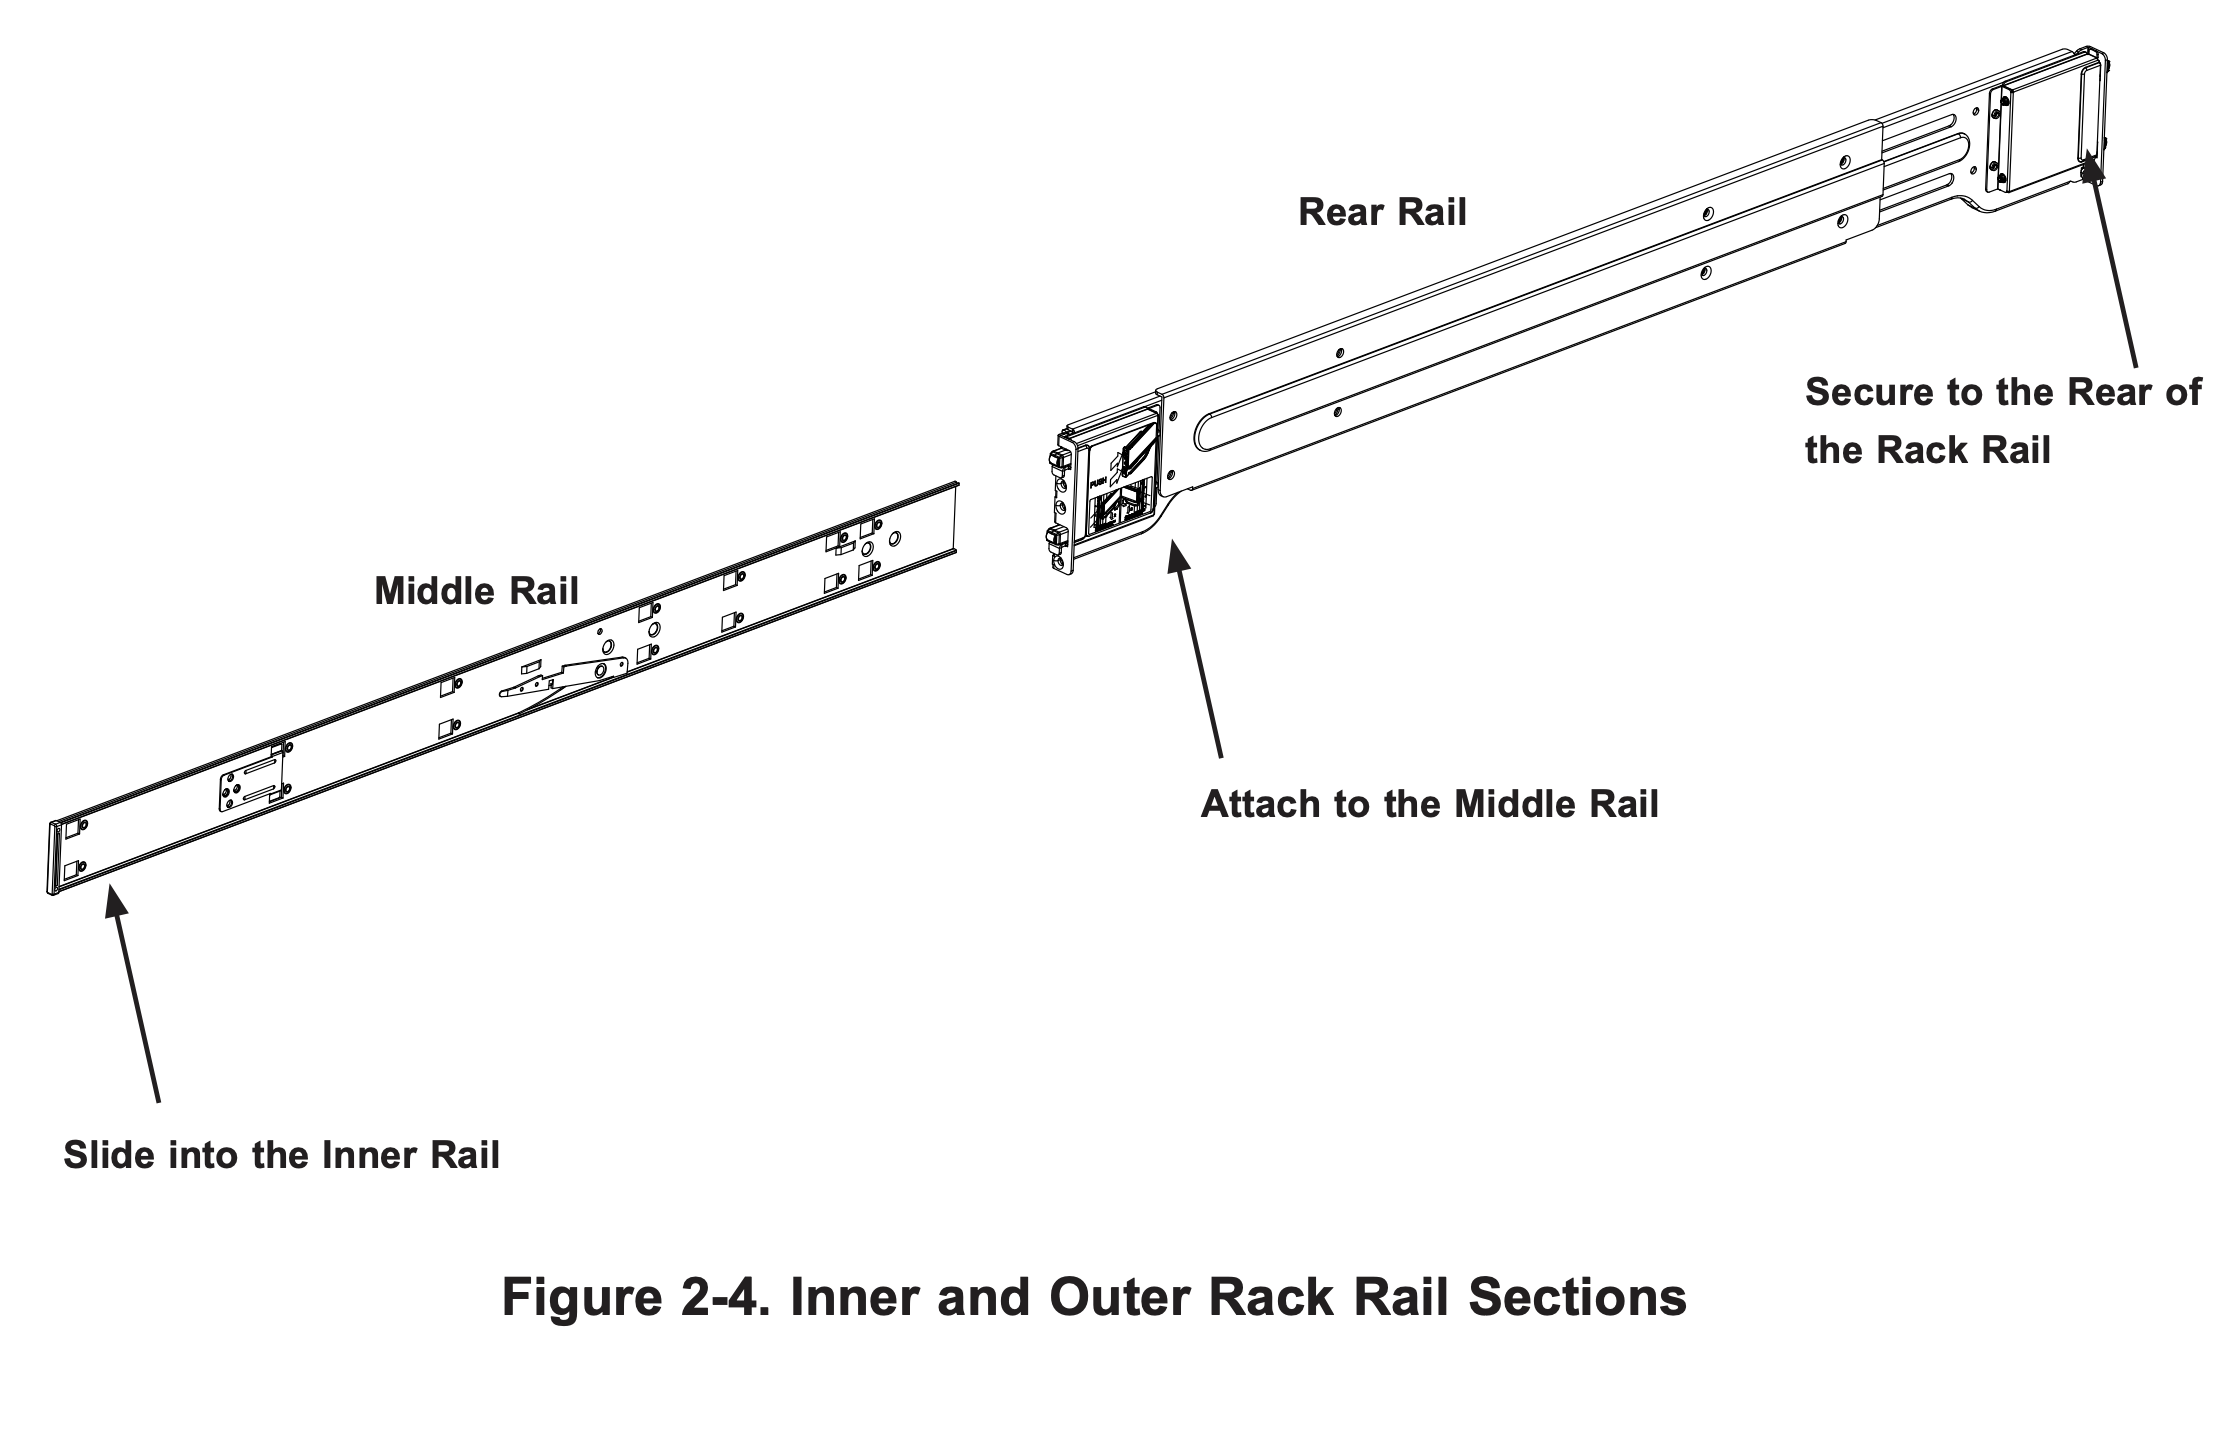
-
Attach the rear rail to the middle rail for each assembly.
-
Adjust the rails to fit snugly into the rack.
-
Secure the rear rail to the rack with two M5 screws.
-
Repeat for the left outer rail.
- Mount the Chassis:

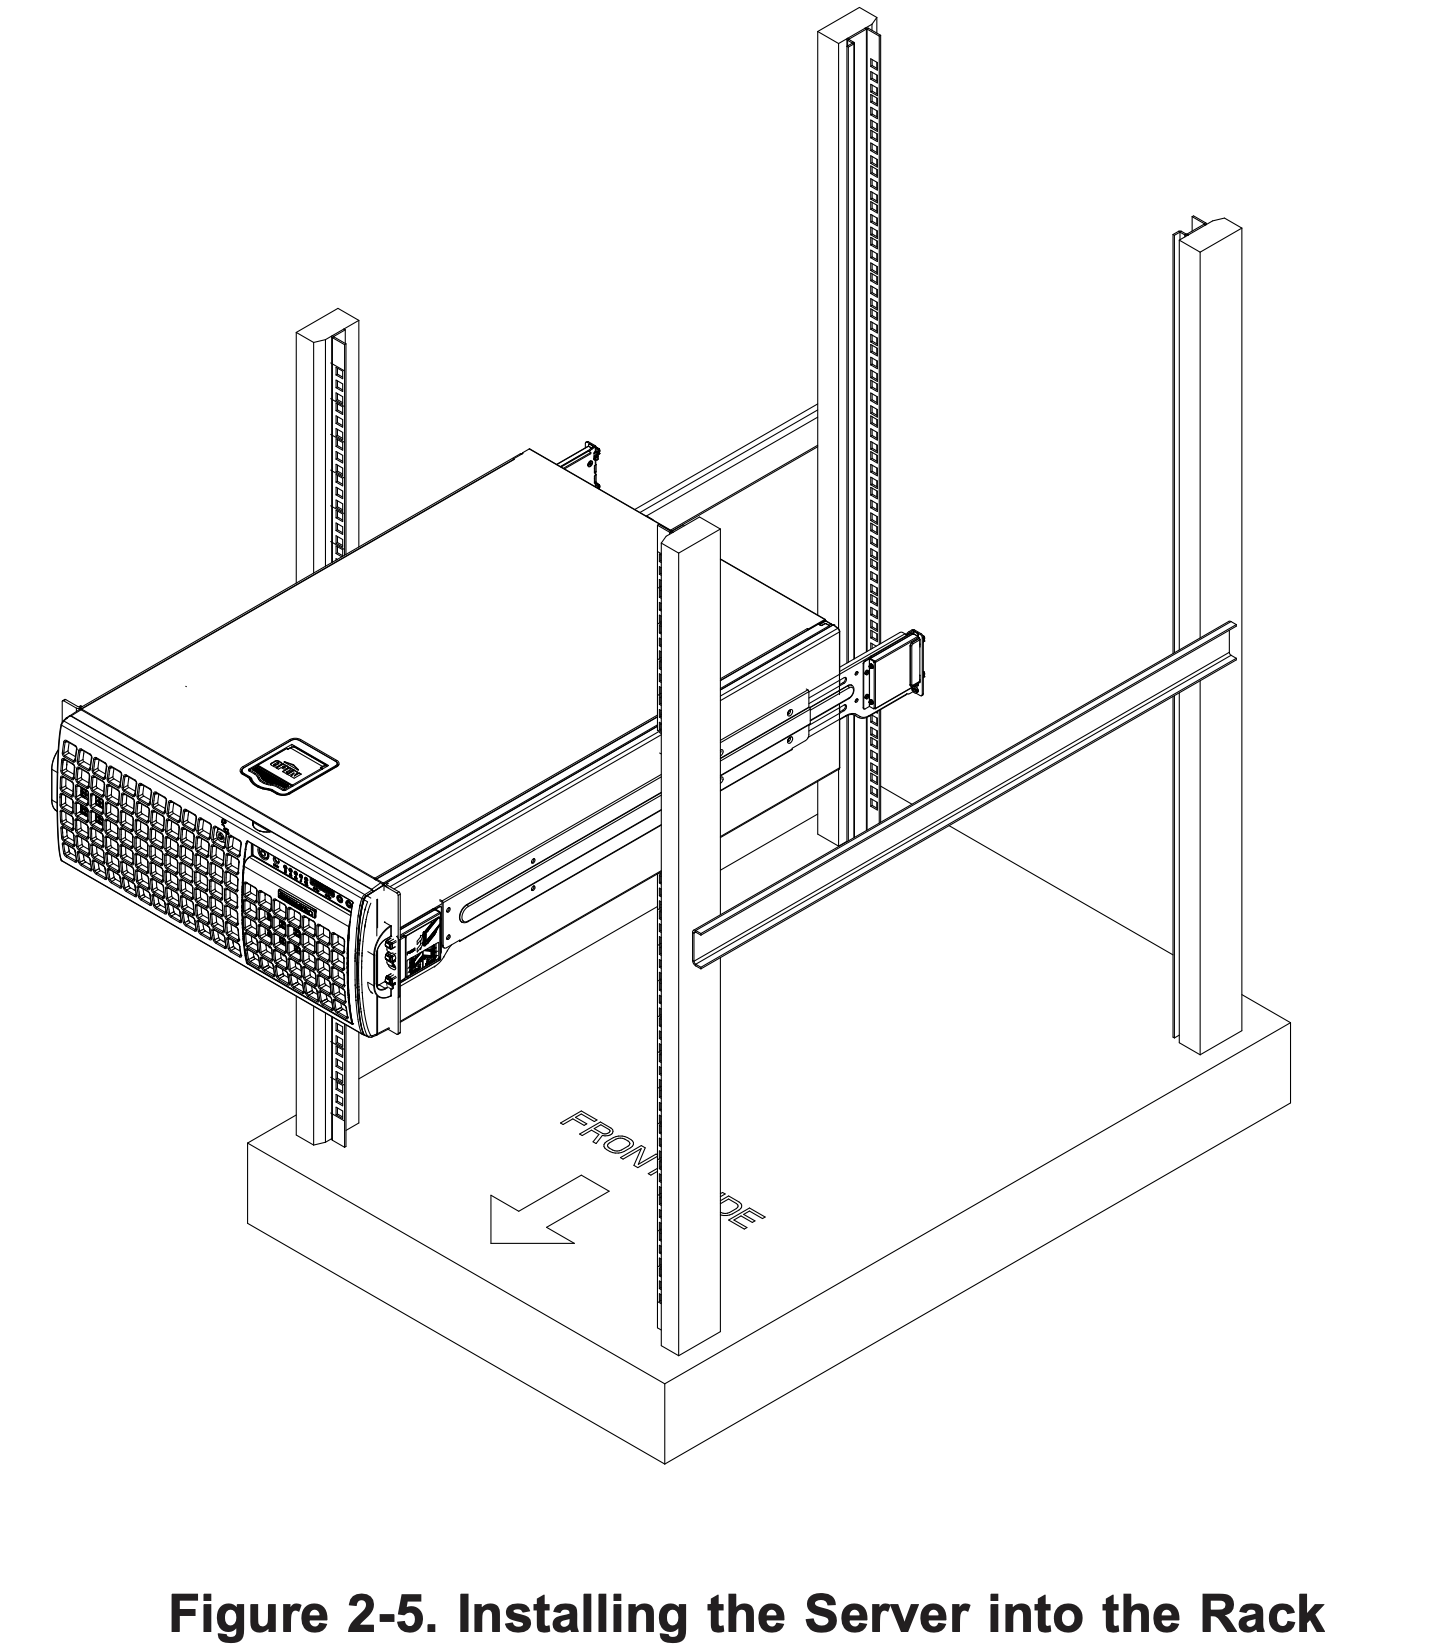
-
Slide the chassis (with inner rails attached) into the outer rails on the rack.
-
Ensure the rail locking tabs engage to prevent overextension.
-
Test the setup to confirm stability before full operation.
Warnings:
-
Ensure the rack is stabilized or bolted to the floor to prevent tipping.
-
Install the server at the bottom of the rack first for stability.
-
Use a rack lift during installation to avoid injury or equipment damage.
Refer to Figures 2-1 to 2-4 in the SuperMicro SuperServer SYS-740GP-TNRT Manual for visual guidance.
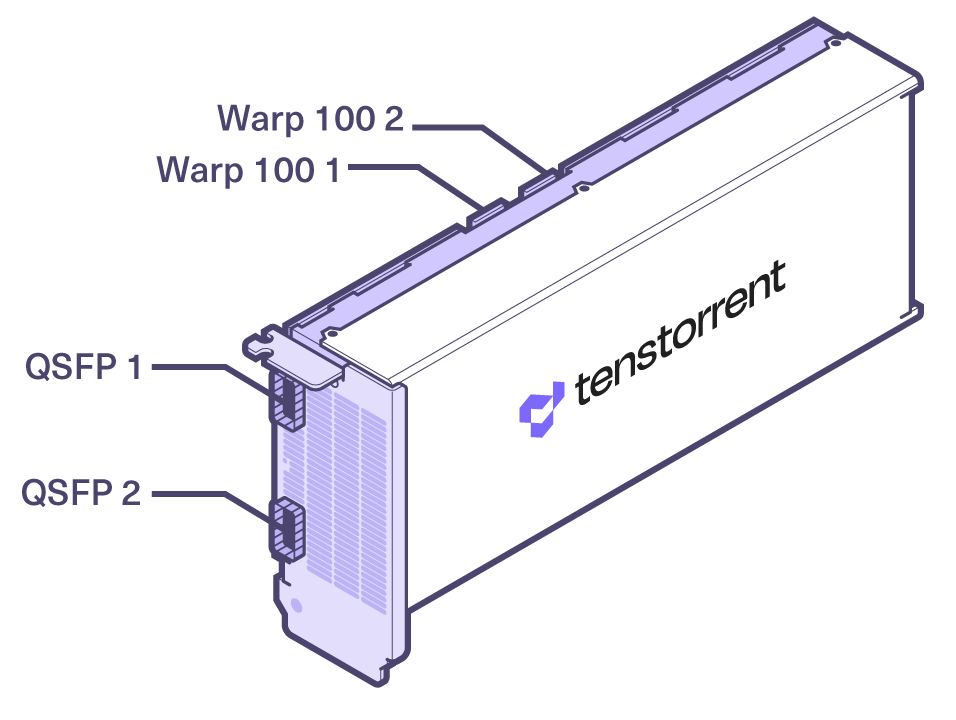
QSFP-DD Connections and System Topology (TW-02002)
The TT-LoudBox (TW-02002) includes four Wormhole™ n300s Tensix Processors connected via internal Warp 100 bridges and two external QSFP-DD 400GbE cables (0.6m/2ft) to form a mesh topology. The Warp 100 bridges are preconnected, but the QSFP-DD cables must be connected by the customer.
Connection Instructions
- Locate the Ports:

- Refer to the system topology diagram provided with the TT-LoudBox documentation for port and slot numbering.
- Connect QSFP-DD Cables:

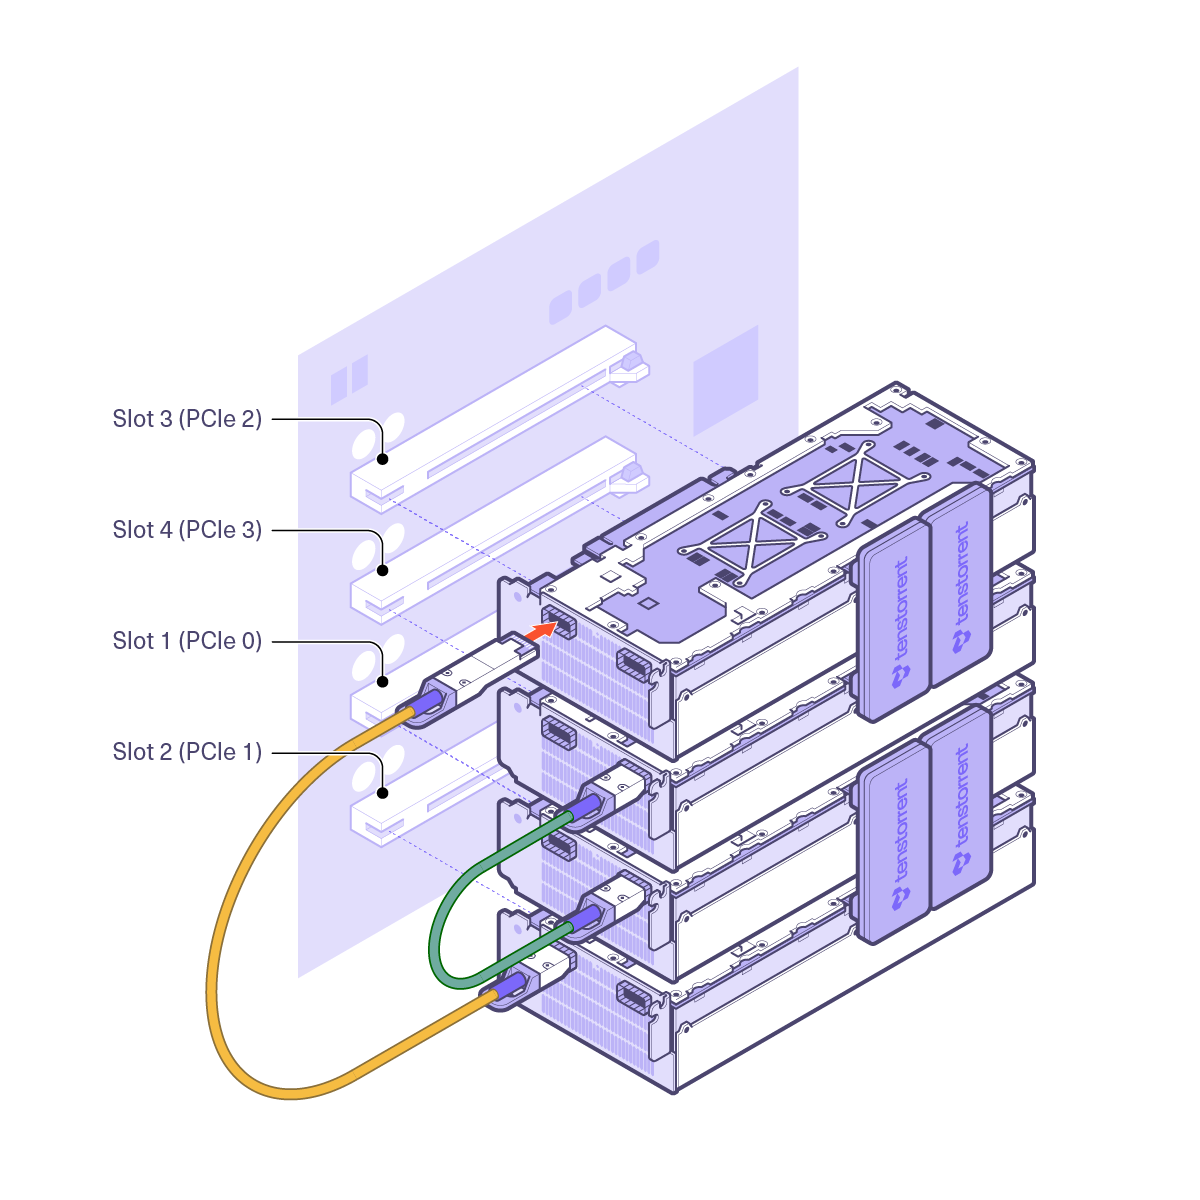
-
Connect one QSFP-DD cable to Port 1 on the Wormhole cards in Slot 1 and Slot 4.
-
Connect the second QSFP-DD cable to Port 2 on the Wormhole cards in Slot 3 and Slot 2.
-
Verify Connections:
-
Ensure cables are securely plugged in.
-
Check for link status LEDs on the QSFP-DD ports to confirm connectivity.
-
Note: Incorrect cable connections may disrupt the Tensix Processor mesh. Follow the topology diagram precisely.
Environmental Specifications
-
Wormhole n300s Tensix Processors: Refer to the Tenstorrent Wormhole n150s and n300s specification page for environmental requirements (e.g., temperature, humidity, and ventilation).
-
SuperMicro SuperServer SYS-740GP-TNRT: Refer to the SuperMicro SuperServer SYS-740GP-TNRT page for chassis-specific environmental specifications, including operating temperature, humidity, and airflow requirements.
General Guidelines:
-
Ensure the server is placed in a well-ventilated area with adequate airflow.
-
Maintain ambient temperatures within the recommended range for both the Tensix Processors and the base system.
-
Avoid placing the server in environments with excessive dust, moisture, or vibration.
Network Configuration and BMC Connection
The TT-LoudBox requires network connectivity for remote management and software installation. Follow these steps to configure networking and connect the BMC.
Step 1: Connect Ethernet to the BMC

-
Locate the BMC Port: The TT-LoudBox has an IPMI port (1x RJ45) for Baseboard Management Controller access. This is separate from the two RJ45 10GBase-T ports (Intel® X550-AT) used for host system connectivity.
-
Connect Ethernet: Plug an Ethernet cable into the IPMI port and connect it to your network switch or router.
-
Verify Power: Ensure the TT-LoudBox is powered on and the BMC is active (check for indicator lights on the IPMI port).
Step 2: Configure BMC Network Settings
-
Access the BMC: Use a computer on the same network to access the BMC web interface.
-
Find the BMC IP address (default may be set via DHCP, or check the label for a static IP).
-
Open a web browser and enter the BMC IP address (e.g., http://<BMC-IP-Address>).
-
Log in using the default credentials from the label (e.g., username: ADMIN, password: as provided).
-
-
Set a Static IP (Recommended):
-
Navigate to the Network Settings in the BMC web interface.
-
Configure a static IP address, subnet mask, gateway, and DNS servers compatible with your network.
-
Save the settings and reboot the BMC if prompted.
-
-
Test Connectivity: From a computer, ping the BMC IP address to confirm connectivity (e.g., ping <BMC-IP-Address>).
Step 3: Connect Host Network
-
Locate Host Network Ports: Use one or both of the 2x RJ45 10GBase-T ports for host system connectivity.
-
Connect Ethernet: Plug Ethernet cables into the RJ45 ports and connect to your network switch or router.
-
Note MAC Addresses: Record the MAC addresses of the RJ45 ports (found on the system label or via BMC interface) for network configuration.
Step 4: Connect QSFP-DD Cables
The TT-LoudBox (TW-02002 configuration) includes four Wormhole™ n300s Tensix Processors with internal Warp 100 bridges and requires two external QSFP-DD cables to complete the mesh topology.
-
Locate Ports: Refer to the topology diagram provided in the TT-LoudBox documentation.
-
Connect Cables:
-
Connect one QSFP-DD cable to Port 1 on the cards in Slots 1 and 4.
-
Connect the second QSFP-DD cable to Port 2 on the cards in Slots 3 and 2.
-
-
Verify Connections: Ensure cables are securely connected and check for link status LEDs.
Providing Network Information to [ai]levate
To enable remote installation and configuration of Ubuntu 22.04 LTS Server on your Tenstorrent TT-LoudBox, you must provide network access details to [ai]levate, the provider of this solution. An [ai]levate representative will work with your network team to configure the TT-LoudBox hardware, developed by [ai]levate’s partner, Tenstorrent, and set up the operating system with the specified networking parameters and user credentials. Please provide the following information to facilitate this process.
Required Network Information
-
BMC IP Address: The static IP address assigned to the Baseboard Management Controller (BMC) during configuration (see Network Configuration and BMC Connection).
-
BMC Credentials: Username and password for BMC access, found on the label on the TT-LoudBox chassis or motherboard (behind the front cover, at the bottom of the system).
-
Host Network Details:
-
IP Address: Preferred static IP address for the host system (via the 2x RJ45 10GBase-T ports) or confirmation to use DHCP.
-
Subnet Mask: The subnet mask for the host network (e.g., 255.255.255.0 for a /24 network).
-
Gateway: The default gateway for the host network (e.g., 192.168.1.1).
-
DNS Servers: Primary and secondary DNS server addresses (e.g., 8.8.8.8, 8.8.4.4).
-
Server Name: The desired hostname for the TT-LoudBox (e.g., loudbox01).
-
MAC Addresses: MAC addresses of the 2x RJ45 10GBase-T ports (found on the system label or via the BMC interface).
-
-
User Account Details:
-
Username: The preferred username for the administrative account (e.g., admin).
-
Password: A strong password for the administrative account, meeting security requirements (e.g., minimum 12 characters, including letters, numbers, and symbols).
-
-
Network Access:
-
Ensure the TT-LoudBox has internet access.
-
Verify that firewalls allow connections on necessary ports, including:
-
SSH: TCP port 22 for remote access.
-
HTTP/HTTPS: TCP ports 80/443 for software downloads and updates.
-
Any additional ports specified by [ai]levate for remote management.
-
-
Submission Instructions
-
Compile Information: Gather all required network and user account details listed above.
-
Secure Submission: Send the information securely to [ai]levate via the designated support channel (see Support and Contact Information).
-
Coordinate with [ai]levate: An [ai]levate representative will contact your network team to confirm receipt of the information and schedule the remote installation of Ubuntu 22.04 Server.
Note: Ensure your network team is available to assist with any additional configuration or troubleshooting during the remote setup process.
Installing Ubuntu 22.04 LTS
Note: The installation of Ubuntu 22.04 LTS Server is performed remotely by an [ai]levate representative in collaboration with your network team, using the Tenstorrent TT-LoudBox hardware. The steps below are provided for transparency to outline the process, including the configuration of networking parameters and user account setup. You do not need to perform these steps yourself.
Step 1: Prepare the Installation Media
-
Download Ubuntu 22.04 LTS: The [ai]levate representative will obtain the Ubuntu 22.04 LTS Server ISO from ubuntu.com.
-
Create a Bootable USB (if needed for local troubleshooting):
-
Use a tool like dd on a Linux system to write the ISO to a USB drive (minimum 8GB).
-
Example command:
sudo dd if=ubuntu-22.04.iso of=/dev/sdX bs=4M status=progress && sync- Replace /dev/sdX with the appropriate USB device path (e.g., /dev/sdb).
-
Step 2: Install Ubuntu
-
Boot from Installation Media:
-
The [ai]levate representative will configure the TT-LoudBox to boot from the installation media (via BMC remote console or physical USB if necessary).
-
Access the boot menu (e.g., by pressing F11 or Del) and select the installation media.
-
-
Follow Installation Prompts:
-
Select Install Ubuntu Server.
-
Configure language, keyboard layout, and time zone.
-
Configure Networking:
-
Set the hostname to the provided Server Name (e.g., loudbox01).
-
Configure the network interface (2x RJ45 10GBase-T ports) with:
-
IP Address: Use the provided static IP or DHCP as specified.
-
Subnet Mask: Apply the provided subnet mask (e.g., 255.255.255.0).
-
Gateway: Set the provided gateway address (e.g., 192.168.1.1).
-
DNS Servers: Enter the provided DNS server addresses (e.g., 8.8.8.8, 8.8.4.4).
-
-
-
Configure disk partitioning (use the entire 3.8TB U.2 NVMe drive with LVM for simplicity).
-
Create Administrative User Account:
-
Set the username to the provided Username (e.g., admin).
-
Set the password to the provided Password, ensuring it meets security requirements.
-
-
Enable the SSH server for remote access.
-
-
Complete Installation:
-
Finalize the installation and reboot the system.
-
Remove any physical installation media (if used).
-
Step 3: Verify Installation
-
Log In: The [ai]levate representative will verify access using the provided username and password via SSH (e.g., ssh <username>@<host-ip>) or the BMC remote console.
-
Update System:
sudo apt update && sudo apt upgrade -y- Confirm Network: Verify internet connectivity and network configuration:
ip address show
ping 8.8.8.8
hostname- Ensure the hostname matches the provided Server Name.
- Confirm the IP address, subnet mask, gateway, and DNS settings align with the provided details.
Note: Once the installation is complete, the [ai]levate representative will confirm with your network team that the TT-LoudBox is operational with the specified networking and user account settings, ready for the next steps (see Installing Tenstorrent Prerequisites).
Installing Tenstorrent Prerequisites
Note: The installation of Tenstorrent software prerequisites is performed remotely by an [ai]levate representative in collaboration with your network team, using the Tenstorrent TT-LoudBox hardware, developed by [ai]levate’s partner, Tenstorrent. The steps below are provided for transparency to outline the process. You do not need to perform these steps yourself.
Important: The recommended method for installing Tenstorrent software is the tt-installer tool. The manual installation steps below are used by [ai]levate representatives to ensure proper configuration. Each software utility references the latest available version at the time of writing, but compatibility must be verified using each SDK’s release compatibility matrix. The [ai]levate representative will consult these matrices to ensure the correct versions are installed.
Step 1: Install Software Dependencies
The [ai]levate representative will install essential software dependencies (git, wget, pip, dkms, and cargo) required for Tenstorrent software on Ubuntu 22.04 LTS.
- Update Package Lists and Install Dependencies:
sudo apt update && sudo apt install -y wget git python3-pip dkms cargoNote: Installation on non-Ubuntu distributions (e.g., Fedora, Enterprise Linux) is experimental and not supported for the TT-LoudBox at this time.
Step 2: Install the Kernel-Mode Driver (TT-KMD)
The Tenstorrent Kernel-Mode Driver (TT-KMD) enables communication with the TT-LoudBox’s Wormhole™ n300s Tensix Processors.
- Clone and Install TT-KMD:
git clone https://github.com/tenstorrent/tt-kmd.git
cd tt-kmd
sudo dkms add .
sudo dkms install tenstorrent/1.34
sudo modprobe tenstorrent
cd ..
Step 3: Device Firmware Update (TT-Flash / TT-Firmware)
The TT-LoudBox requires the latest firmware for the Wormhole™ n300s Tensix Processors, installed using the TT-Flash utility.
- Install TT-Flash:
pip install git+https://github.com/tenstorrent/tt-flash.gitNote: If an externally-managed-environment error occurs, the [ai]levate representative will use a Python virtual environment or pipx to resolve it.
- Update Device Firmware:
- Download the firmware package:
wget https://github.com/tenstorrent/tt-firmware/releases/download/v18.4.0/fw_pack-18.4.0.fwbundle- Flash the firmware:
tt-flash --fw-tar fw_pack-18.4.0.fwbundle- If an error indicates the firmware is too old, force the update:
tt-flash --fw-tar fw_pack-18.4.0.fwbundle --force- Reboot the system:
sudo rebootNote: The firmware version must be 18.3.0 or newer for compatibility with the TT-LoudBox’s Wormhole devices.
Step 4: Set Up HugePages
HugePages optimize memory allocation to accelerate communication with Tenstorrent devices.
- Install Tenstorrent Tools:
wget https://github.com/tenstorrent/tt-system-tools/releases/download/v1.3.1/tenstorrent-tools_1.3.1_all.deb
sudo dpkg -i tenstorrent-tools_1.3.1_all.deb- Enable HugePages Services:
sudo systemctl enable --now tenstorrent-hugepages.service
sudo systemctl enable --now 'dev-hugepages\x2d1G.mount'- Reboot the System:
sudo rebootNote: If the above steps fail, the [ai]levate representative will check the latest release at TT-System-Tools for updates.
Step 5: (Optional) Multi-Card Configuration (TT-Topology)
Note: The TT-LoudBox ships with its topology preconfigured for the four Wormhole™ n300s Tensix Processors. This step is only performed if the topology has been modified or requires reconfiguration. If not applicable, the [ai]levate representative will skip this step.
- Install and Configure TT-Topology:
pip install git+https://github.com/tenstorrent/tt-topology
tt-topology -l mesh
Step 6: Install the System Management Interface (TT-SMI)
The Tenstorrent System Management Interface (TT-SMI) provides tools to monitor and manage the TT-LoudBox hardware.
- Install TT-SMI:
pip install git+https://github.com/tenstorrent/tt-smiStep 7: Verify System Configuration and Test TT-SMI
The [ai]levate representative will verify the system configuration by running the TT-SMI utility.
- Run TT-SMI:
tt-smi
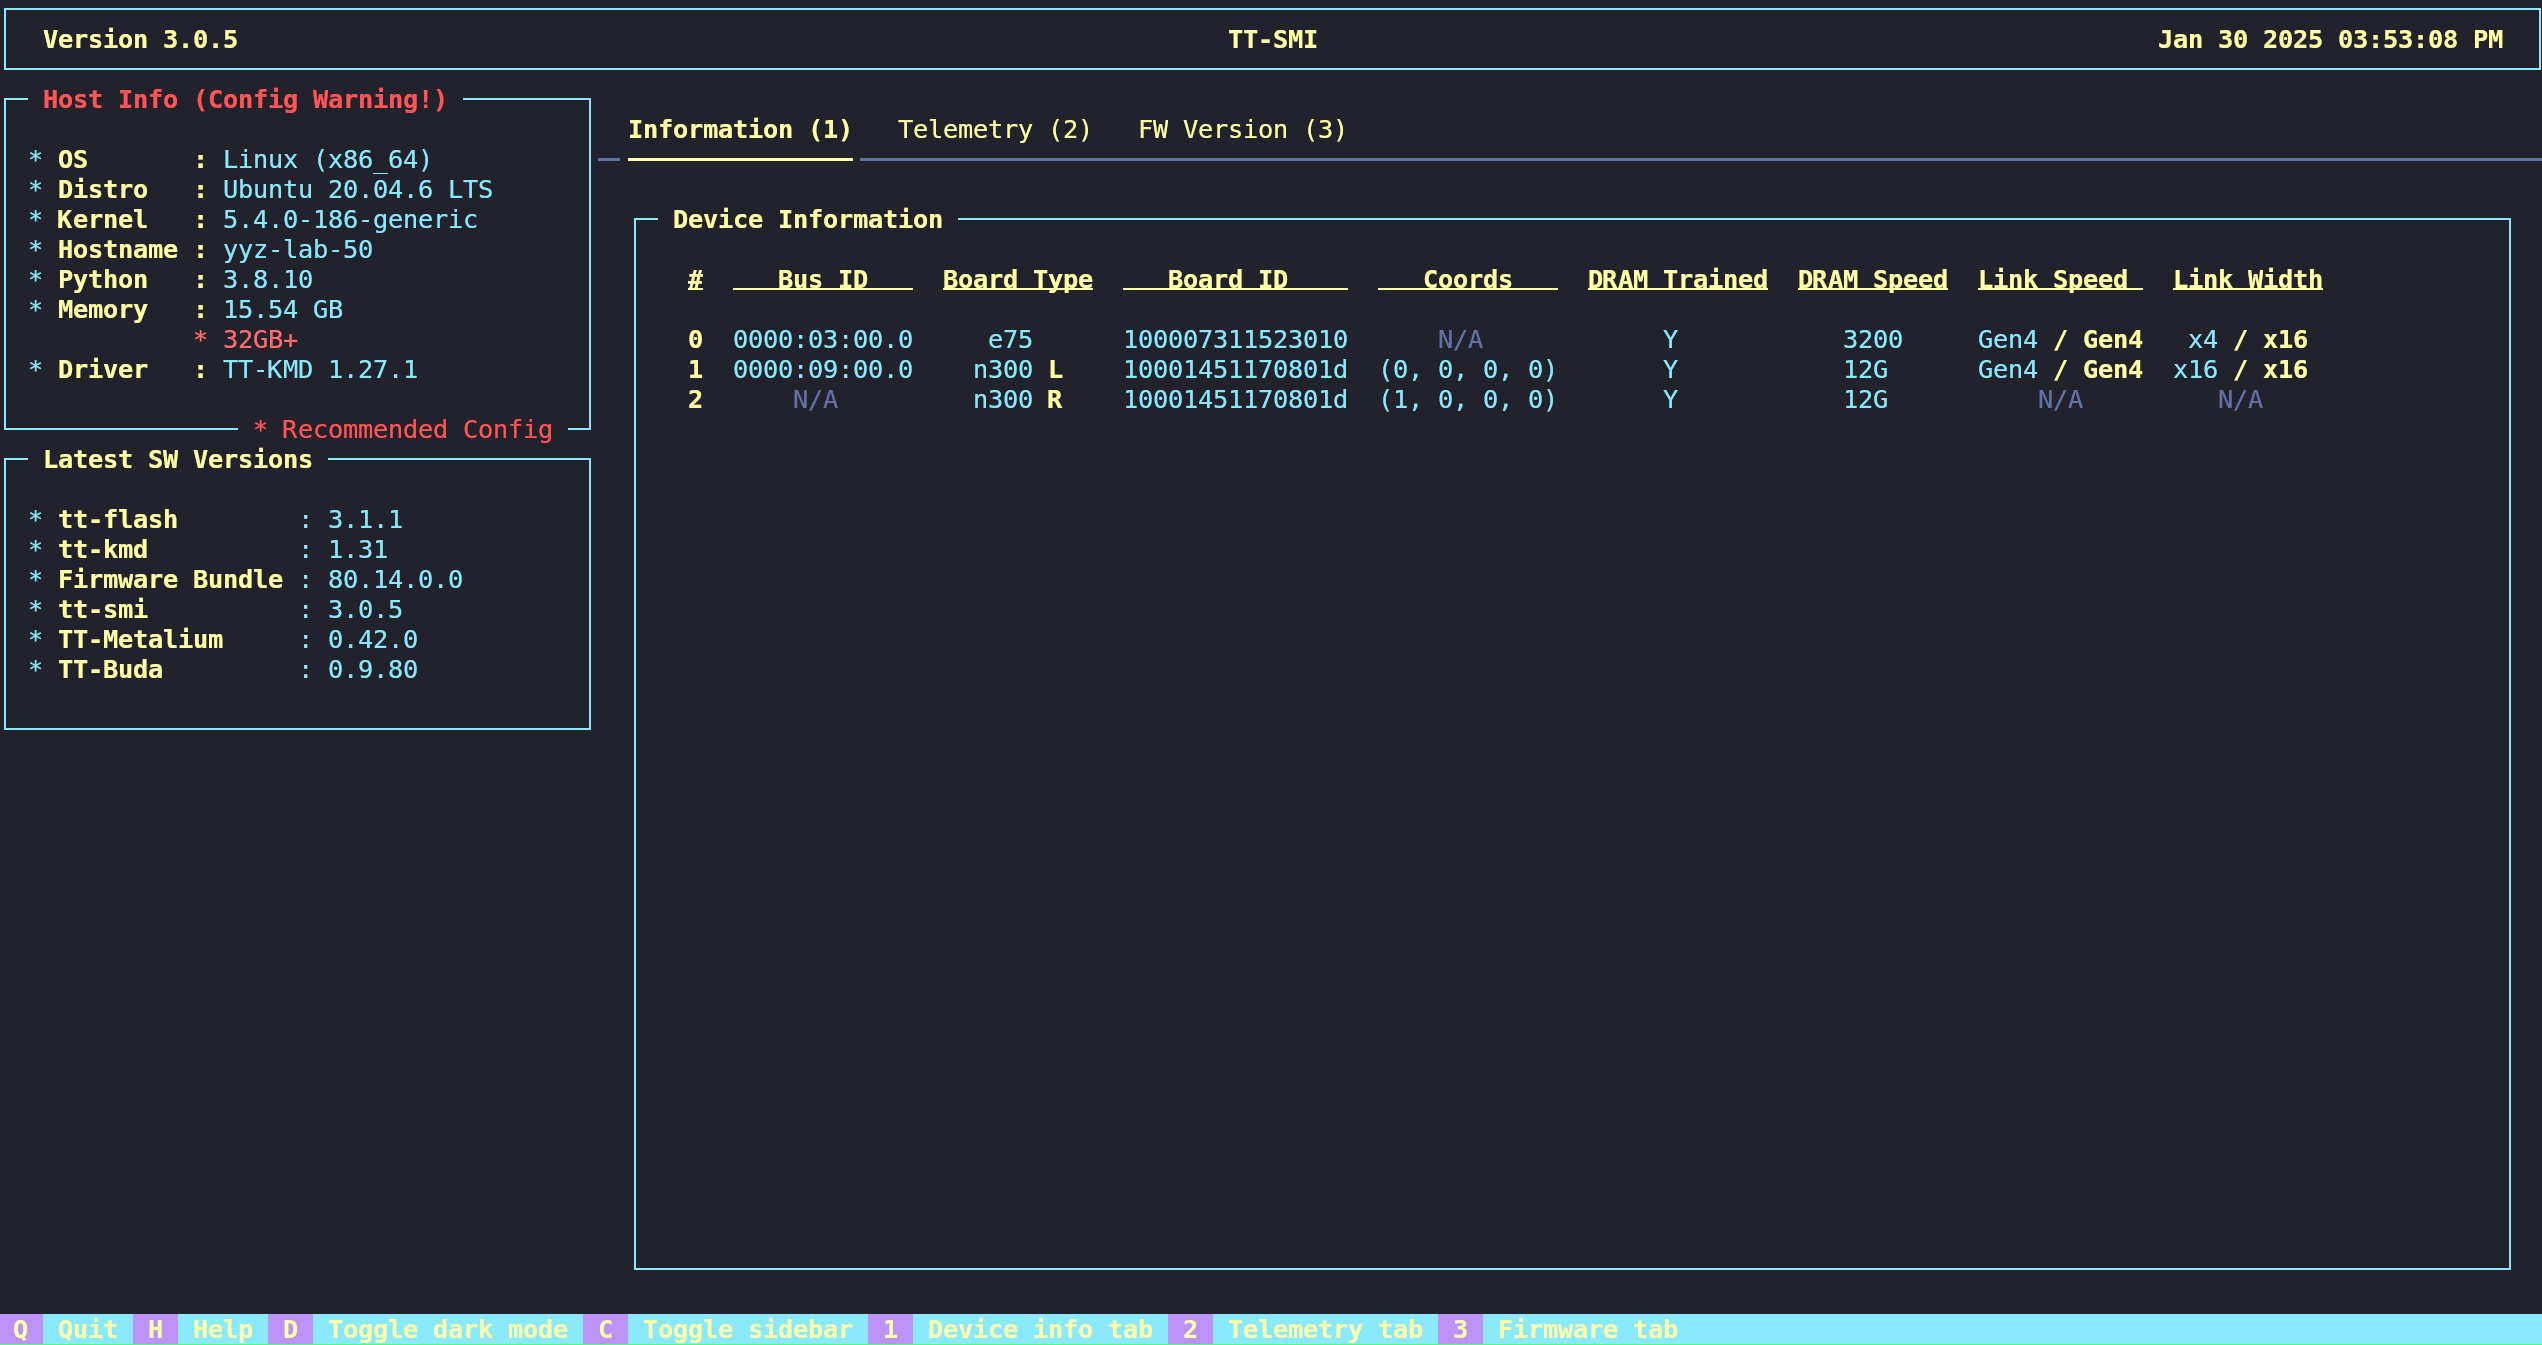
- Expected Output: The TT-SMI interface will display device information, telemetry, and firmware status, confirming that the TT-LoudBox hardware and prerequisites are correctly configured.
Note: Once the prerequisites are installed and verified, the [ai]levate representative will confirm with your network team that the TT-LoudBox is ready for the next steps (see Installing Tenstorrent Software).
Configuring the System and Model Setup
Note: The configuration of the Tenstorrent TT-LoudBox system and the setup of large language models (LLMs) are performed remotely by an [ai]levate representative in collaboration with your network team, using the TT-LoudBox hardware developed by [ai]levate’s partner, Tenstorrent. The steps below are provided for transparency to outline the process, including the installation of required software (tt-metal, tt-inference-server, and vllm), the transfer and deployment of LLMs from [ai]levate’s secure blob location, and the final verification using a vLLM API with OpenAI-compatible endpoints. You do not need to perform these steps yourself.
This section ensures the TT-LoudBox is configured to run AI models efficiently, leveraging the high-performance capabilities of the Wormhole™ n300s Tensix Processors. Large language models, due to their substantial size (often tens to hundreds of gigabytes), require significant storage and specialized software for deployment. The [ai]levate representative will handle the secure transfer, deployment, and API setup to enable seamless model inference.
Step 1: Install TT-Metal
Purpose: tt-metal is Tenstorrent’s software framework for programming and optimizing workloads on the Wormhole™ n300s Tensix Processors. It provides low-level APIs and tools to manage hardware resources, enabling efficient execution of AI models.
- Clone the TT-Metal Repository:
git clone <https://github.com/tenstorrent/tt-metal.git> --recurse-submodules
cd tt-metal- Install Dependencies:
- Install the required Python packages for development and runtime:t
pip install -r tt_metal/python_env/requirements-dev.txt- Build and Install TT-Metal:
- Create a build directory and compile using Clang 17 (previously installed in Installing Tenstorrent Prerequisites):
mkdir build
cd build
cmake .. -G Ninja -DCMAKE_BUILD_TYPE=RelWithDebugInfo -DCMAKE_CXX_COMPILER=clang-17
ninja
ninja install- Set Python Path:
- Configure the Python environment to include the tt-metal installation:
export PYTHONPATH=$(pwdInsight: tt-metal is critical for leveraging the TT-LoudBox’s hardware acceleration, enabling optimized tensor operations and memory management tailored to the Wormhole architecture. The [ai]levate representative ensures compatibility with the installed TT-KMD and firmware.
Step 2: Install TT-Inference-Server
Purpose: tt-inference-server is a high-level service that simplifies the deployment and management of AI models on Tenstorrent hardware. It provides a server-based interface for running inference tasks, abstracting low-level hardware details.
-
Install TT-Inference-Server:
- Install the latest version from the Tenstorrent repository:
pip install git+<https://github.com/tenstorrent/tt-inference-server> -
Verify Installation:
- Check that the server is installed correctly:
tt-inference-server --version
Insight: The tt-inference-server streamlines model deployment by providing a robust framework for handling inference requests, making it easier to integrate LLMs into client workflows. The [ai]levate representative configures this server to ensure seamless communication with the TT-LoudBox hardware.
Step 3: Install vLLM
Purpose: vLLM (Virtual Large Language Model) is an open-source library optimized for efficient LLM inference, supporting high-throughput and low-latency model execution. It complements tt-metal and tt-inference-server by providing additional optimizations for LLMs.
- Install vLLM:
- Install the version compatible with Tenstorrent hardware
pip install vllm- The [ai]levate representative will consult the Tenstorrent SDK compatibility matrix to ensure the correct vllm version is installed.
-
Verify Installation:
- Confirm that vllm is installed and accessible:
python -c "import vllm; print(vllm.**version**)"Insight: vLLM enhances the TT-LoudBox’s ability to handle large-scale LLMs by optimizing memory usage and inference speed. Its integration ensures that the client’s models run efficiently, leveraging the TT-LoudBox’s 512GB DDR4 memory and 3.8TB NVMe storage.
Step 4: Transfer and Deploy the Large Language Model
Purpose: LLMs are very large (often tens to hundreds of gigabytes), requiring secure and efficient transfer to the TT-LoudBox’s storage. [ai]levate manages this process to ensure data integrity and security, followed by model deployment for inference.
-
Secure Model Transfer:
-
The [ai]levate representative will securely transfer the LLM from [ai]levate’s secure blob storage to the TT-LoudBox’s 3.8TB U.2 NVMe drive.
-
This process uses encrypted protocols (e.g., SFTP or HTTPS) to protect sensitive model data.
-
The representative will coordinate with your network team to ensure sufficient bandwidth and verify storage space:
-
df -h /path/to/storage-
Deploy the Model:
- Configure the model for inference using tt-inference-server and vllm:
tt-inference-server --model-path /path/to/transferred/model --config vllm- The [ai]levate representative will adjust configuration parameters (e.g., batch size, precision) based on the specific LLM and client requirements.
-
Verify Model Deployment:
- Run a test inference to confirm the model is operational:
python -c "from vllm import LLM; llm = LLM(model='/path/to/transferred/model'); print(llm.generate('Test prompt'))"- Check tt-smi for hardware utilization to ensure the model is leveraging the Wormhole™ n300s Tensix Processors:
tt-smiInsight: The secure transfer of LLMs is critical due to their large size and potential sensitivity. [ai]levate’s expertise ensures the model is transferred efficiently and deployed correctly, optimizing performance on the TT-LoudBox’s high-performance hardware.
Step 5: Final Verification and Handover
Purpose: The final verification ensures the TT-LoudBox is fully configured and ready for client use by setting up and testing a vLLM API with OpenAI-compatible endpoints. This allows the client to interact with the deployed LLM using standard API calls.
-
Configure vLLM API with OpenAI Endpoints:
- The [ai]levate representative will configure the vLLM API to expose OpenAI-compatible endpoints:
vllm serve /path/to/transferred/model --host 0.0.0.0 --port 8000-
Example endpoint configuration:
-
Base URL: [http://<host-ip]>:8000/v1 (e.g., [http://12.134.255.3:8000/v1](http://12.134.255.3:8000/v1))
-
API Key: A secure key (e.g., somekey) for authenticated access, provided to the client.
-
Model Name: The deployed model identifier (e.g., Qwen/Qwen3-32B).
-
-
Test the API:
- The [ai]levate representative will verify the API using a test client script:
from openai import OpenAI
client = OpenAI(
    base_url="<http://12.134.255.3:8000/v1>",
    api_key="somekey"
)
response = client.chat.completions.create(
    model="Qwen/Qwen3-32B",
    messages=[{"role": "user", "content": "Test prompt"}]
)
print(response.choices[0].message.content)
- Confirm that the API returns the expected response and that the model is functioning correctly.
-
Handover to Client:
-
The [ai]levate representative will provide the client with:
-
The API base URL (e.g., [http://12.134.255.3:8000/v1](http://12.134.255.3:8000/v1)).
-
The API key (e.g., somekey).
-
The model name (e.g., Qwen/Qwen3-32B).
-
Documentation for interacting with the vLLM API using OpenAI-compatible endpoints.
-
-
Verify system stability and performance using tt-smi:
-
tt-smiInsight: The vLLM API with OpenAI-compatible endpoints provides a standardized, user-friendly interface for interacting with the deployed LLM, enabling seamless integration into client applications. The [ai]levate representative ensures the API is secure, accessible, and optimized for the TT-LoudBox’s hardware.
Note: The [ai]levate representative will confirm with your network team that the TT-LoudBox is fully configured, the LLM is deployed, and the vLLM API is operational. The handover will include all necessary credentials and instructions for using the API. For further customization or additional model deployments, contact [ai]levate support (see Support and Contact Information).
Troubleshooting
Note: Troubleshooting of the Tenstorrent TT-LoudBox is managed by [ai]levate representatives in collaboration with your network team, using the TT-LoudBox hardware developed by [ai]levate’s partner, Tenstorrent. The steps below are provided for transparency to outline common troubleshooting procedures for both server hardware and Tenstorrent software components. You do not need to perform these steps yourself. If issues arise, contact [ai]levate support (see Support and Contact Information) for assistance.
This section covers troubleshooting for the TT-LoudBox’s SuperMicro SuperServer SYS-740GP-TNRT base system and Tenstorrent-specific components, such as the Wormhole™ n300s Tensix Processors and associated software (tt-metal, tt-inference-server, vllm). For comprehensive server hardware troubleshooting, refer to the Troubleshooting section of the SuperMicro SuperServer manual (Chapter 7).
Server Hardware Troubleshooting
The following procedures address common hardware issues with the TT-LoudBox’s base system. [ai]levate representatives will follow these steps or coordinate with your team as needed.
-
No Power:
-
Verify the BMC heartbeat LED (LEDBMC) on the motherboard is on.
-
Ensure power connectors are securely connected to the 1+1 Titanium Level PSUs (1200W at 100-127Vac, 1800W-2090W at 200-240Vac, or 2200W at 220-240Vac).
-
Check for short circuits between the motherboard and chassis.
-
Disconnect all cables and remove add-on cards, then test with a single CPU, heatsink, and power LED connected.
-
Verify the CMOS battery supplies ~3VDC; replace if necessary.
-
Confirm power supply input voltage (100-120V or 180-240V) and test the power switch.
-
-
No Video:
-
Remove all add-on cards and cables, then test the system.
-
Note any beep codes during power-up (see BIOS Error Beep Codes below).
-
-
System Boot Failure:
-
Test with a single DIMM module installed to isolate faulty memory.
-
Follow the memory errors troubleshooting procedure below.
-
-
Memory Errors:
-
Ensure all 16x32GB DDR4-3200 ECC RDIMM modules are properly seated.
-
Swap modules between slots to identify faulty DIMMs or slots.
-
Confirm the power supply voltage switch is set correctly (115V/230V).
-
-
Losing System Setup Configuration:
-
Verify the power supply quality and replace the CMOS battery if it does not supply ~3VDC.
-
Contact [ai]levate support if the issue persists.
-
-
System Becomes Unstable:
-
Confirm CPU compatibility and update to the latest BIOS version.
-
Test memory modules using memtest86.
-
Verify the 3.8TB U.2 NVMe drive functionality and replace if faulty.
-
Check system cooling (heatsink fans, CPU/system fans) via BMC hardware monitoring.
-
Ensure the power supply meets minimum requirements (200V for TW-02002).
-
Verify that correct drivers are installed (e.g., TT-KMD).
-
-
BIOS Error Beep (POST) Codes:
-
1 short: Circuits reset, ready to power up.
-
5 short, 1 long: No memory detected.
-
5 long, 2 short: Video adapter missing or faulty.
-
1 long continuous: System overheat.
-
Additional POST codes are available at AMI BIOS POST Codes User's Guide.
-
-
Crash Dump Using BMC:
- If an Internal Error (IERR) occurs, the [ai]levate representative will access the BMC web interface, check the Server Health > Event Log for errors, and download a crash dump for analysis.
-
UEFI BIOS Recovery:
-
If the main BIOS is corrupted, the [ai]levate representative will use a USB device with the Super.ROM file to recover the BIOS:
-
Copy Super.ROM to a FAT-formatted USB drive.
-
Insert the USB, boot the system, and select “Proceed with flash update” in the BIOS Recovery menu.
-
Complete the flash process and reboot.
-
Update the BIOS settings to default and save.
-
-
-
CMOS Clear:
- To clear CMOS (and passwords), the [ai]levate representative will power down the system, remove the onboard battery, short the JBT1 contact pads for four seconds, and reboot.
-
BMC Reset:
-
Reset the BMC by holding the UID button for six seconds (LED blinks at 2Hz).
-
Restore factory defaults by holding for twelve seconds (LED blinks at 4Hz, clearing all settings except FRU and network).
-
Tenstorrent Software and Hardware Troubleshooting
The following steps address issues specific to Tenstorrent software and Wormhole™ n300s Tensix Processors, performed by [ai]levate representatives.
-
BMC Access Issues:
-
Verify the BMC IP address and credentials via the system label.
-
Check network connectivity: ping <BMC-IP>.
-
Reset the BMC using the UID button (hold for six seconds).
-
-
Network Connectivity Issues:
-
Confirm network settings: ip address show.
-
Check firewall settings: sudo ufw status.
-
Allow SSH if blocked: sudo ufw allow 22.
-
Verify QSFP-DD cable connections for the Wormhole mesh (see QSFP-DD Connections and System Topology).
-
-
TT-SMI Failure:
-
Ensure PCIe AER Reporting is set to “OS First” in BIOS (Chipset > AMD CBS > NBIO Common Options > NBIO RAS Common Options > PCIe AER Reporting Mechanism).
-
Reinstall TT-SMI:
pip install --force-reinstall git+https://github.com/tenstorrent/tt-smi- Check hardware status: tt-smi.
-
-
TT-Flash or Firmware Update Failure:
-
Verify the firmware version (must be 18.3.0 or newer).
-
Force the update if needed:
tt-flash --fw-tar fw_pack-18.4.0.fwbundle --force- Reboot the system: sudo reboot.
-
-
vLLM API Issues:
- Confirm the vLLM server is running:
ps aux | grep vllm-
Test the API endpoint:
-
from openai import OpenAI client = OpenAI(base_url="http://<host-ip>:8000/v1", api_key="somekey") response = client.chat.completions.create(model="Qwen/Qwen3-32B", messages=[{"role": "user", "content": "Test prompt"}]) print(response.choices[0].message.content) -
Check network access to port 8000: sudo netstat -tuln | grep 8000.
-
Restart the vLLM server if necessary:
-
vllm serve /path/to/transferred/model --host 0.0.0.0 --port 8000
-
Model Inference Failure:
-
Verify model path and integrity: ls -lh /path/to/transferred/model.
-
Check disk space: df -h /path/to/storage.
-
Re-run the test inference:
python -c "from vllm import LLM; llm = LLM(model='/path/to/transferred/model'); print(llm.generate('Test prompt'))"- Monitor hardware utilization: tt-smi.
-
Note: If issues persist, the [ai]levate representative will escalate to Tenstorrent’s engineering team for specialized support, ensuring minimal disruption.
Support and Contact Information
For assistance with the Tenstorrent TT-LoudBox or any issues during setup, configuration, or operation, contact [ai]levate’s support team:
-
Website: www.ailevate.com
-
Email: [email protected]
-
Support Portal: Visit www.ailevate.com/support for FAQs, documentation, and additional resources.
For server hardware issues, [ai]levate representatives may refer to the SuperMicro SuperServer manual or coordinate with SuperMicro support. For warranty or replacement parts, contact [ai]levate support, who will facilitate any necessary actions, including Returned Merchandise Authorization (RMA) requests.
Note: Do not attempt to replace components or perform hardware modifications without guidance from [ai]levate support to avoid voiding the warranty.
Updated 9 months ago