
Linking to Internal Systems
Secure connection to customer SQL/EHR systems
Linking to Internal Systems
This guide walks you through connecting the Revenue Recovery platform to your internal EHR systems. The connection process requires both a deployed Relay Service and proper configuration within the Revenue Recovery console.
Prerequisites: Before following this guide, ensure you have completed the Relay Service Deployment and have administrator access to the Revenue Recovery platform.
Supported EHR Systems
Current MVP Support
The Revenue Recovery platform currently supports the following EHR systems:
| EHR System | Support Level | Connection Method | Notes |
|---|---|---|---|
| NextGen | ✅ Full Support | SQL Server Database | Primary MVP focus - Enterprise 5.9+ |
| Epic | 🚧 Future Release | REST API | Planned for future release |
Important: At launch, only NextGen EHR systems are supported. Epic support is planned for a future release.
Connection Architecture
All EHR connections use the secure Relay Service architecture:
flowchart LR
    A[NextGen Database] --> B[Relay VM] --> C[Revenue Recovery Platform]
Connection Prerequisites
Before establishing a connection to your EHR system, ensure the following prerequisites are met:
Relay Service Requirements
| Component | Requirement | Details |
|---|---|---|
| Relay VM | Deployed and registered | 2 vCPU, 4GB RAM, 20GB disk minimum |
| Network Access | Outbound HTTPS (443) | Connection to *.ailevate.com |
| EHR Connectivity | TCP 1433 access | Relay must reach SQL Server |
| DNS Resolution | Internal and external | Both EHR hostname and public FQDNs |
Database Access Requirements
Your NextGen database must be configured with:
- SQL Server Authentication enabled (recommended)
- Dedicated service account with read permissions to NextGen tables
- Network connectivity from Relay VM to SQL Server (port 1433)
- Firewall rules allowing Relay VM → SQL Server communication
- Database name and schema (typically
dboschema)
Required Permissions
The connecting user must have:
- Administrator role in Revenue Recovery platform
- Database credentials for the NextGen SQL Server
- Network access to both the Revenue Recovery console and internal systems
Note: Each organization in the Revenue Recovery platform has a one-to-one relationship with an EHR connection. If the same NextGen instance manages multiple organizations, you can create multiple organizations that use the same connection configuration.
Step-by-Step Connection Process
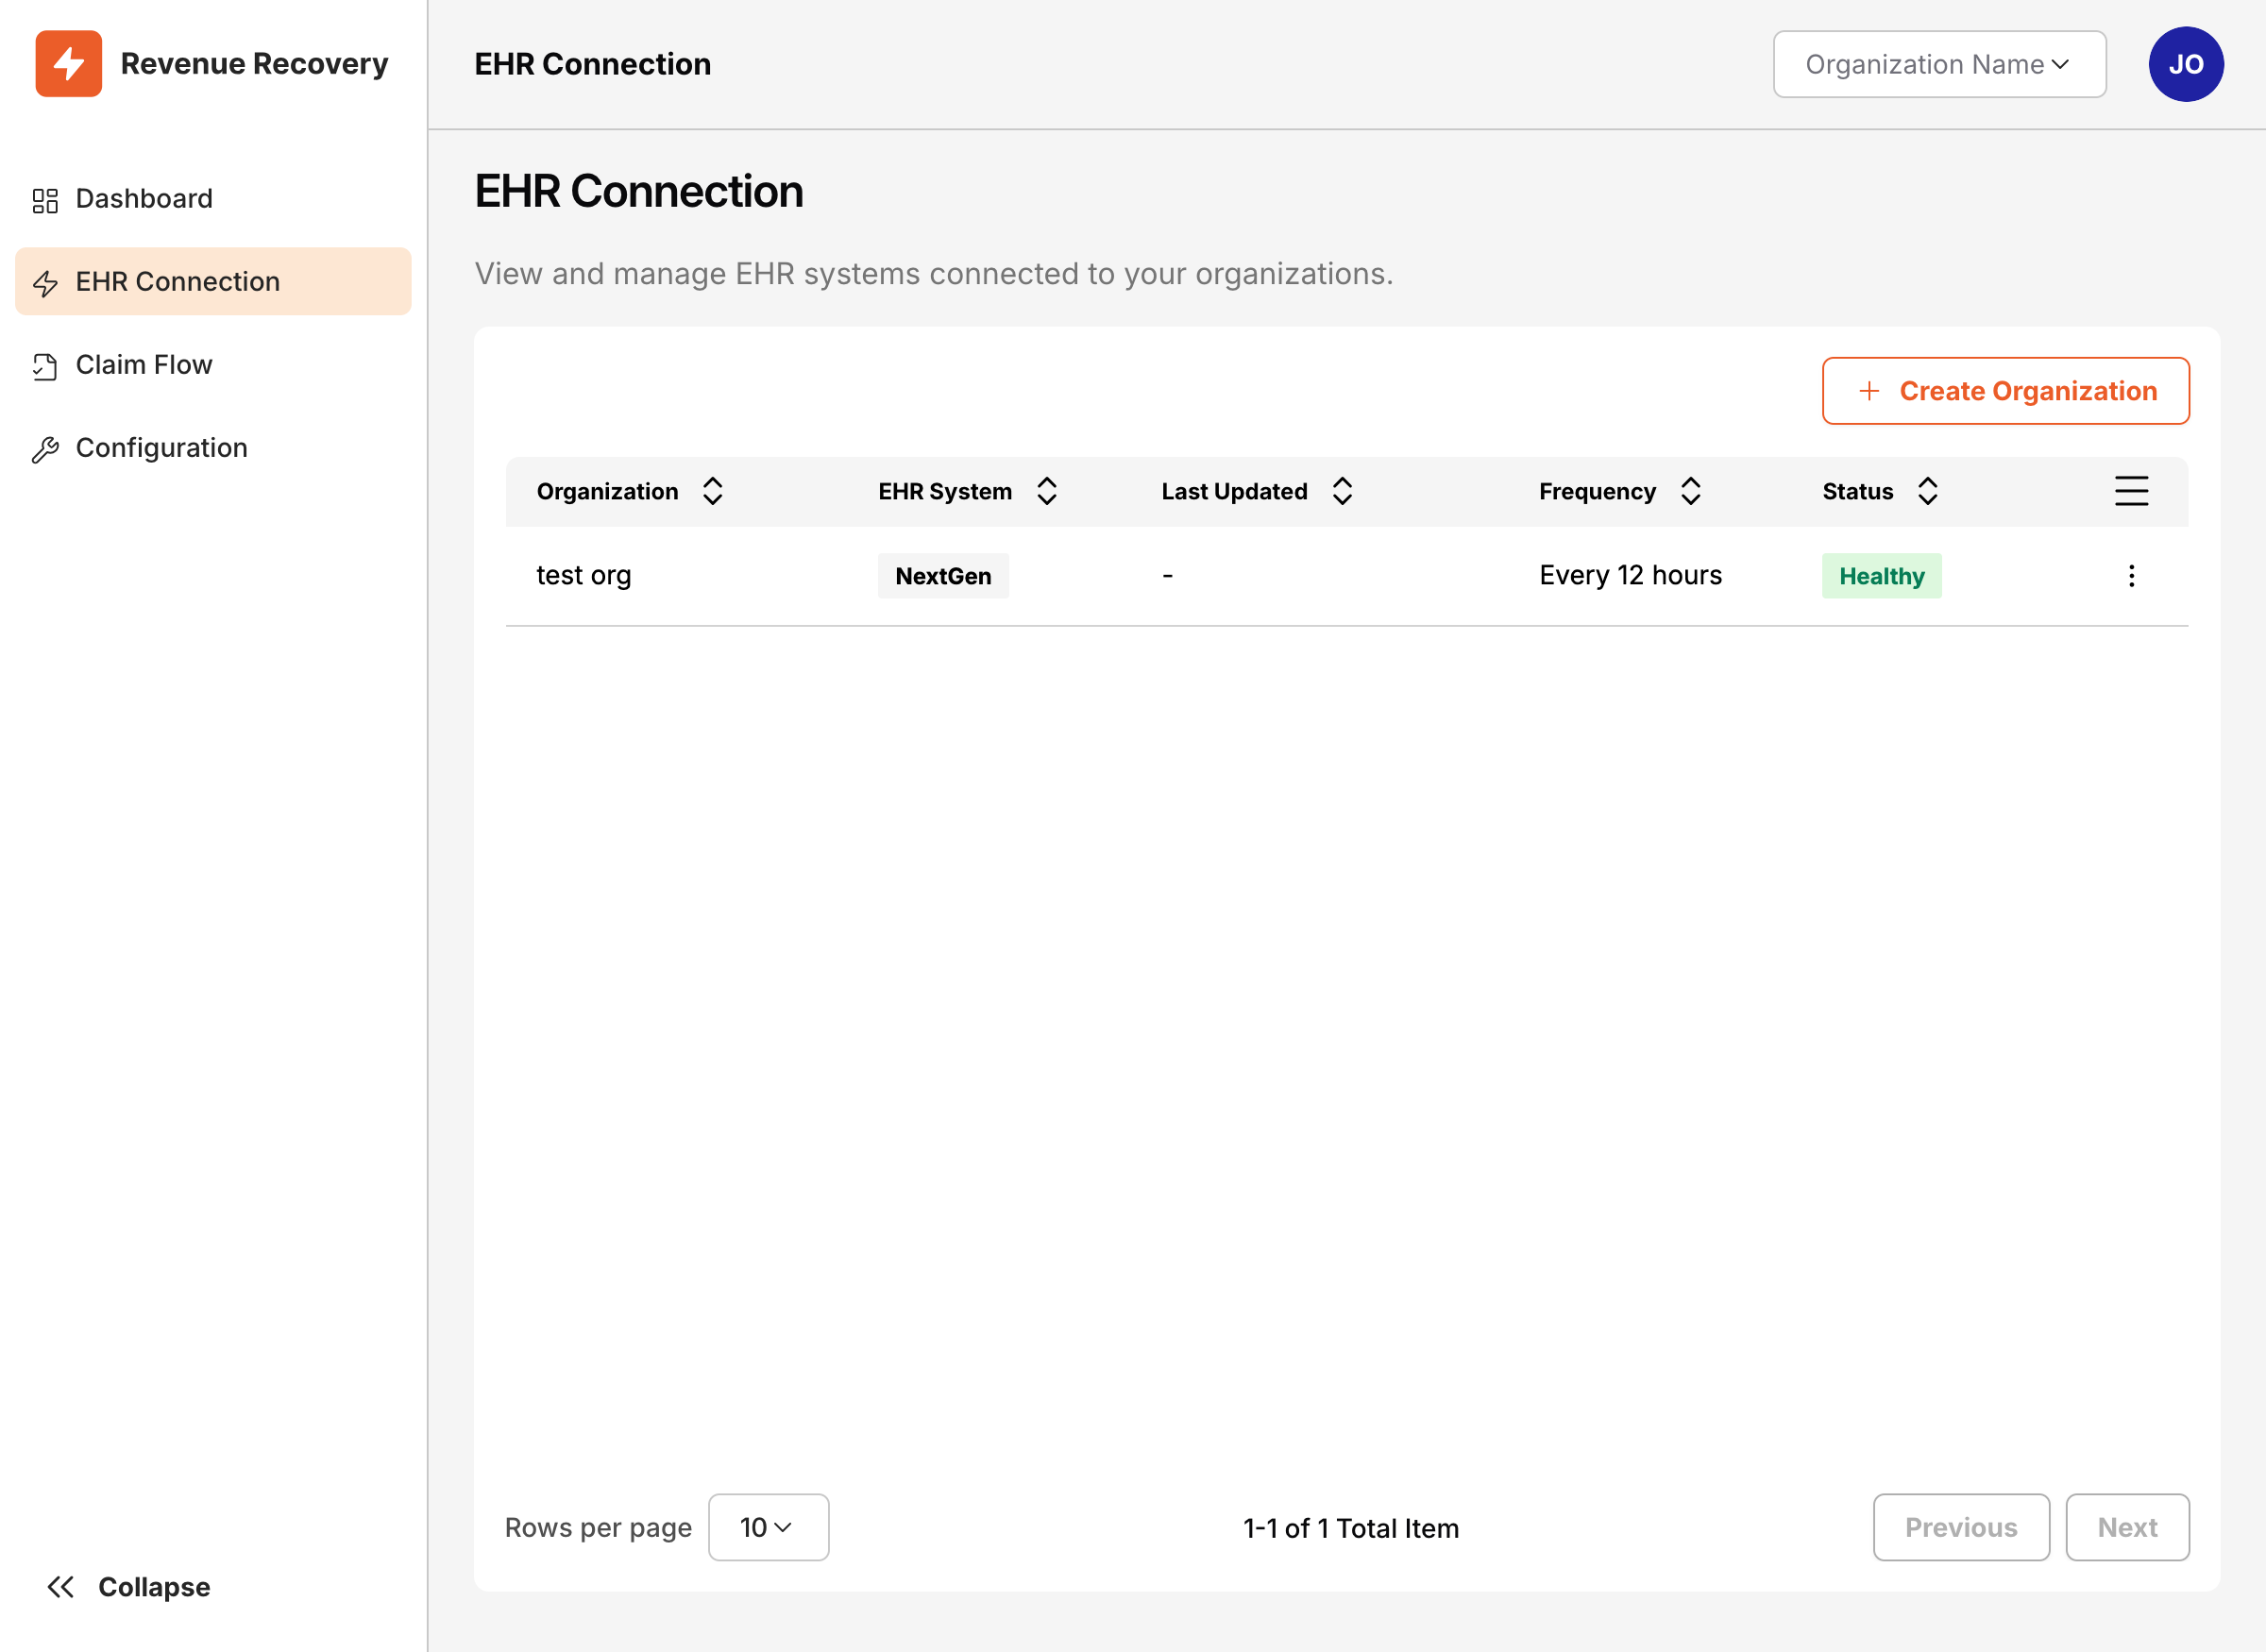
Step 1: Access Connection Configuration
- Log into the Revenue Recovery platform as an Administrator
- Navigate to EHR Connection from the main navigation
- Click Create Organization to start the process
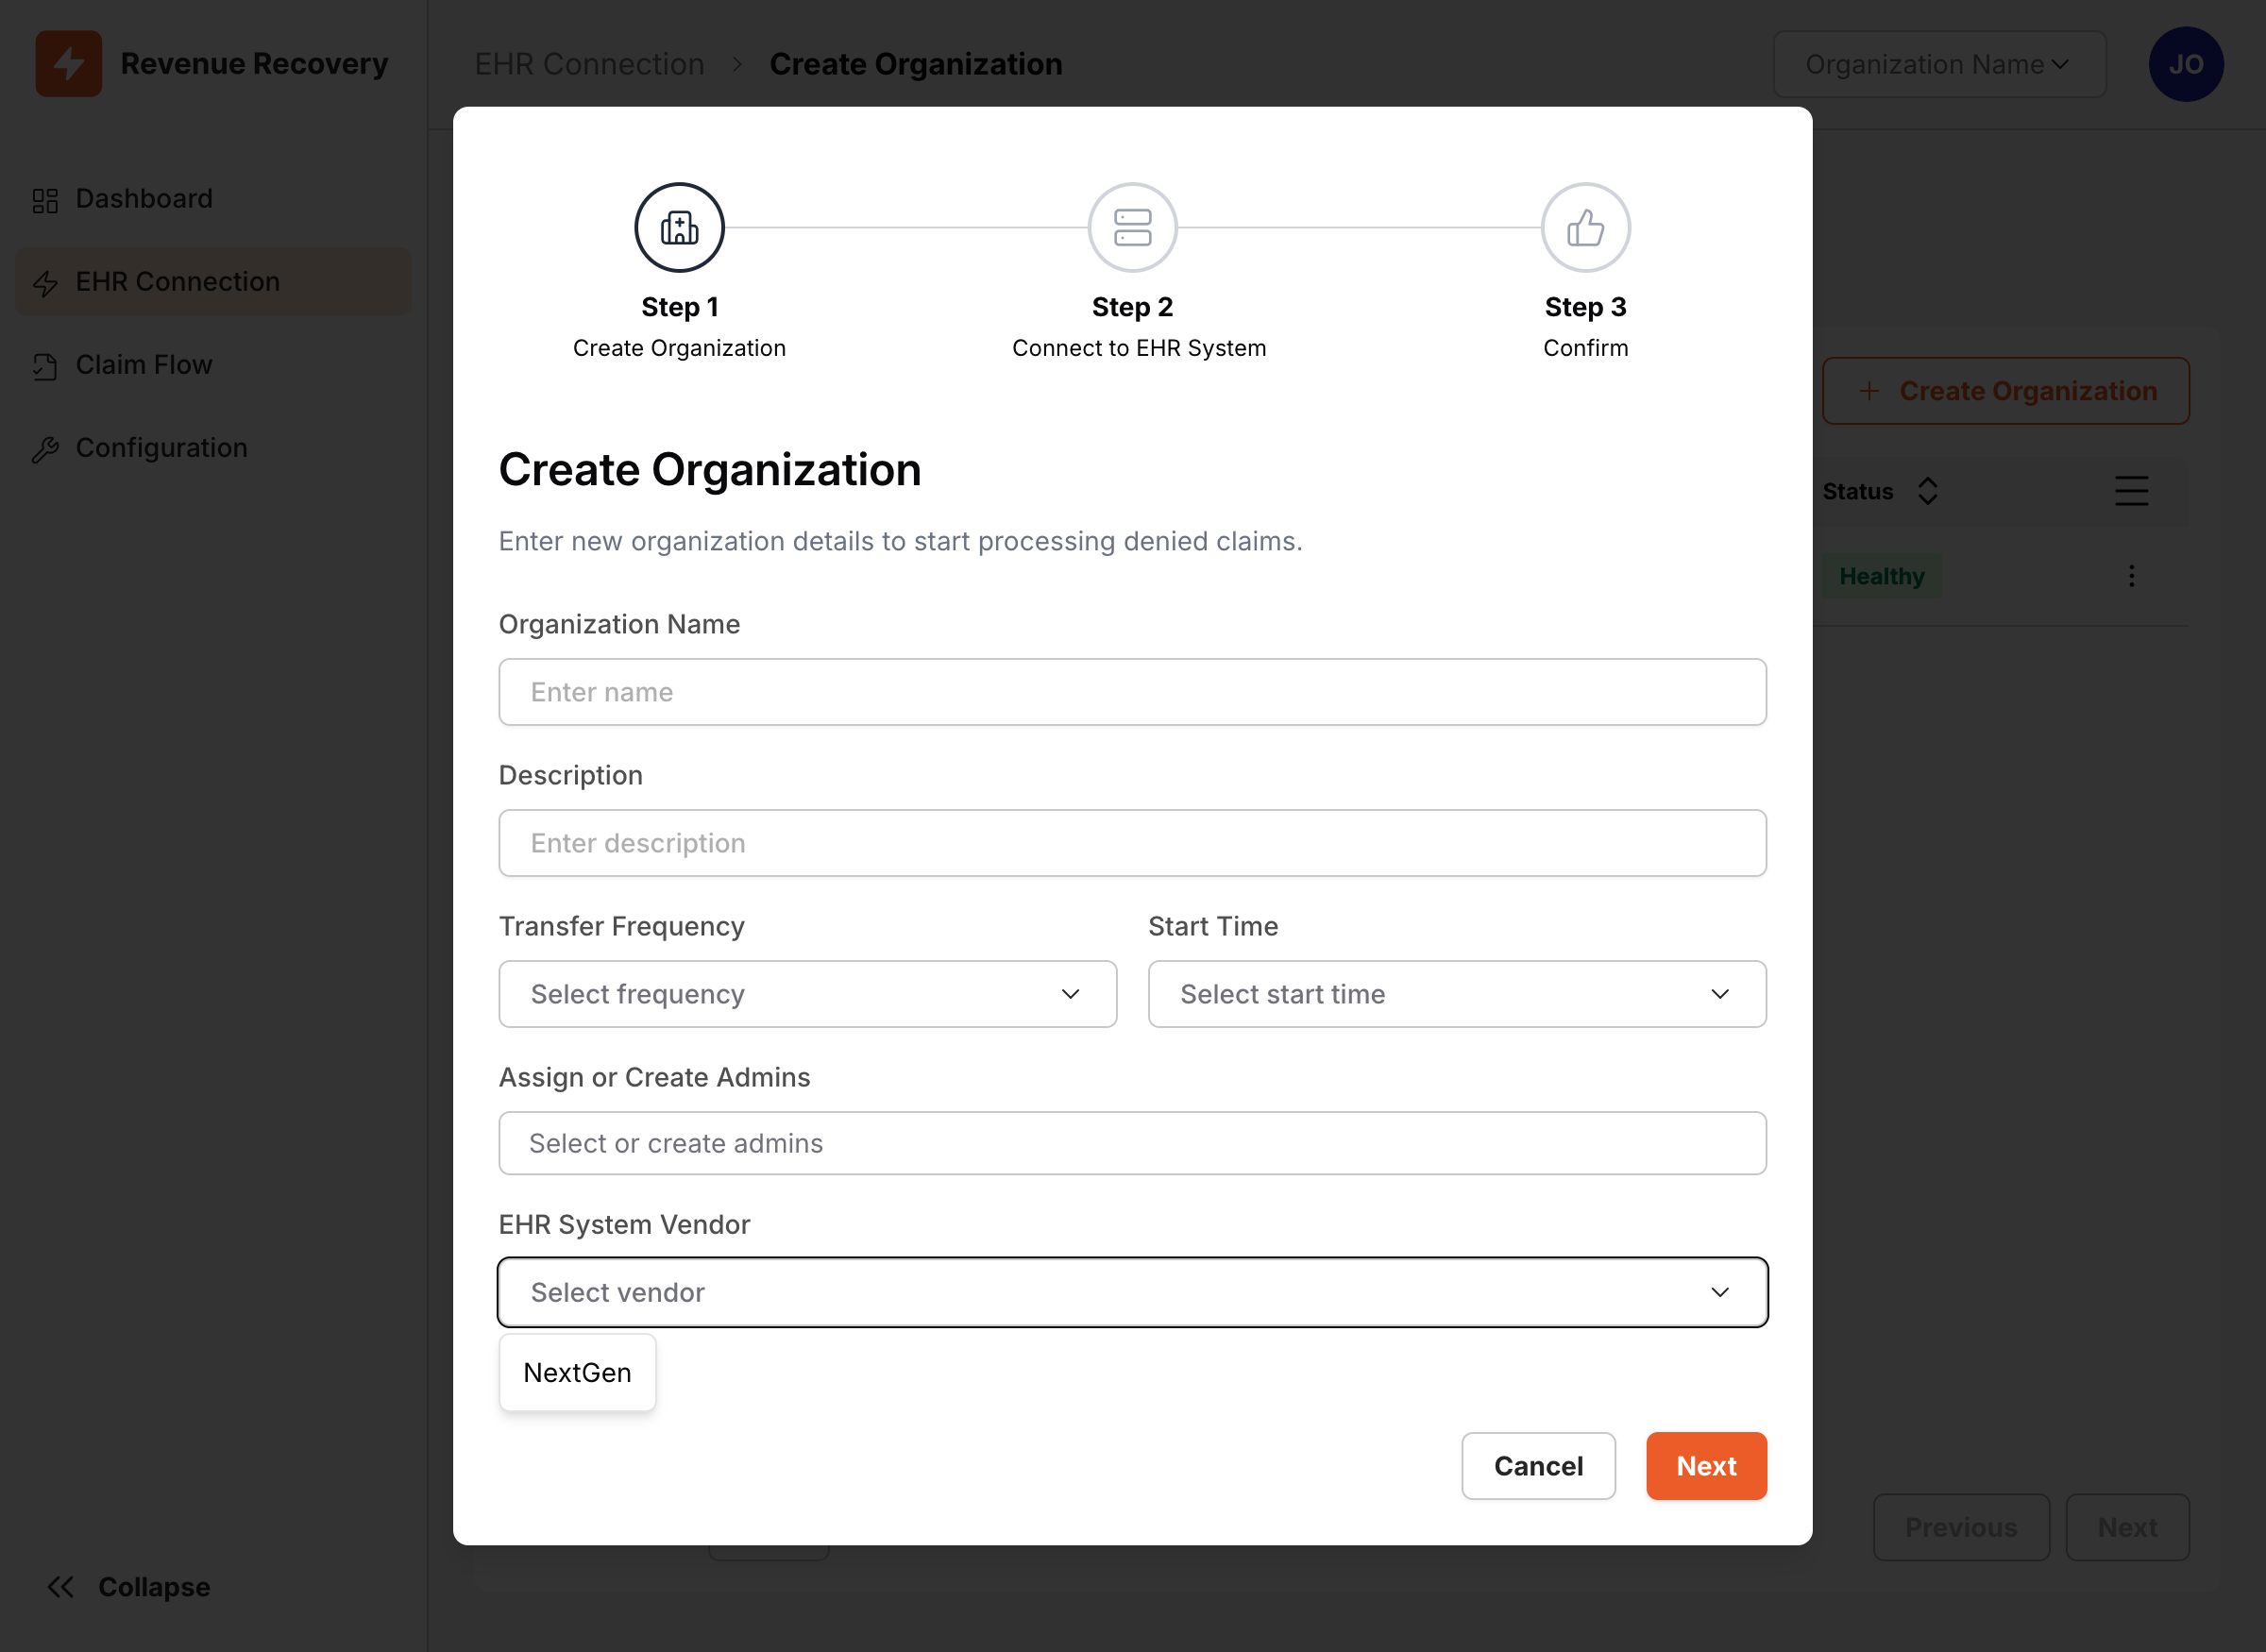
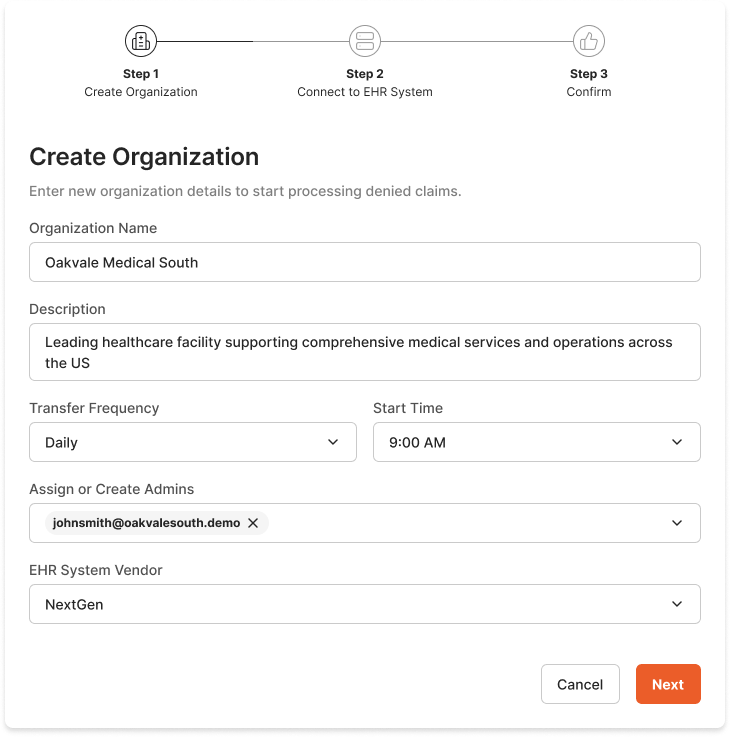
Step 2: Select EHR System Type
- Enter the Organization Name for your hospital or healthcare facility
- Configure Transfer Frequency and Start Time as needed
- From the EHR System Vendor dropdown, select NextGen
Step 3: Configure Database Connection
After completing the organization details, click Next to proceed to the database connection step. Enter the following database connection details:
| Field | Description | Example |
|---|---|---|
| Domain or IP Address | NextGen SQL Server hostname or IP | nextgen-sql.hospital.local |
| Port | SQL Server port (default: 1433) | 1433 |
| Database | NextGen database name | NextGen_Production |
| Username | SQL Server authentication username | nextgen_service |
| Password | SQL Server authentication password | [secure password] |
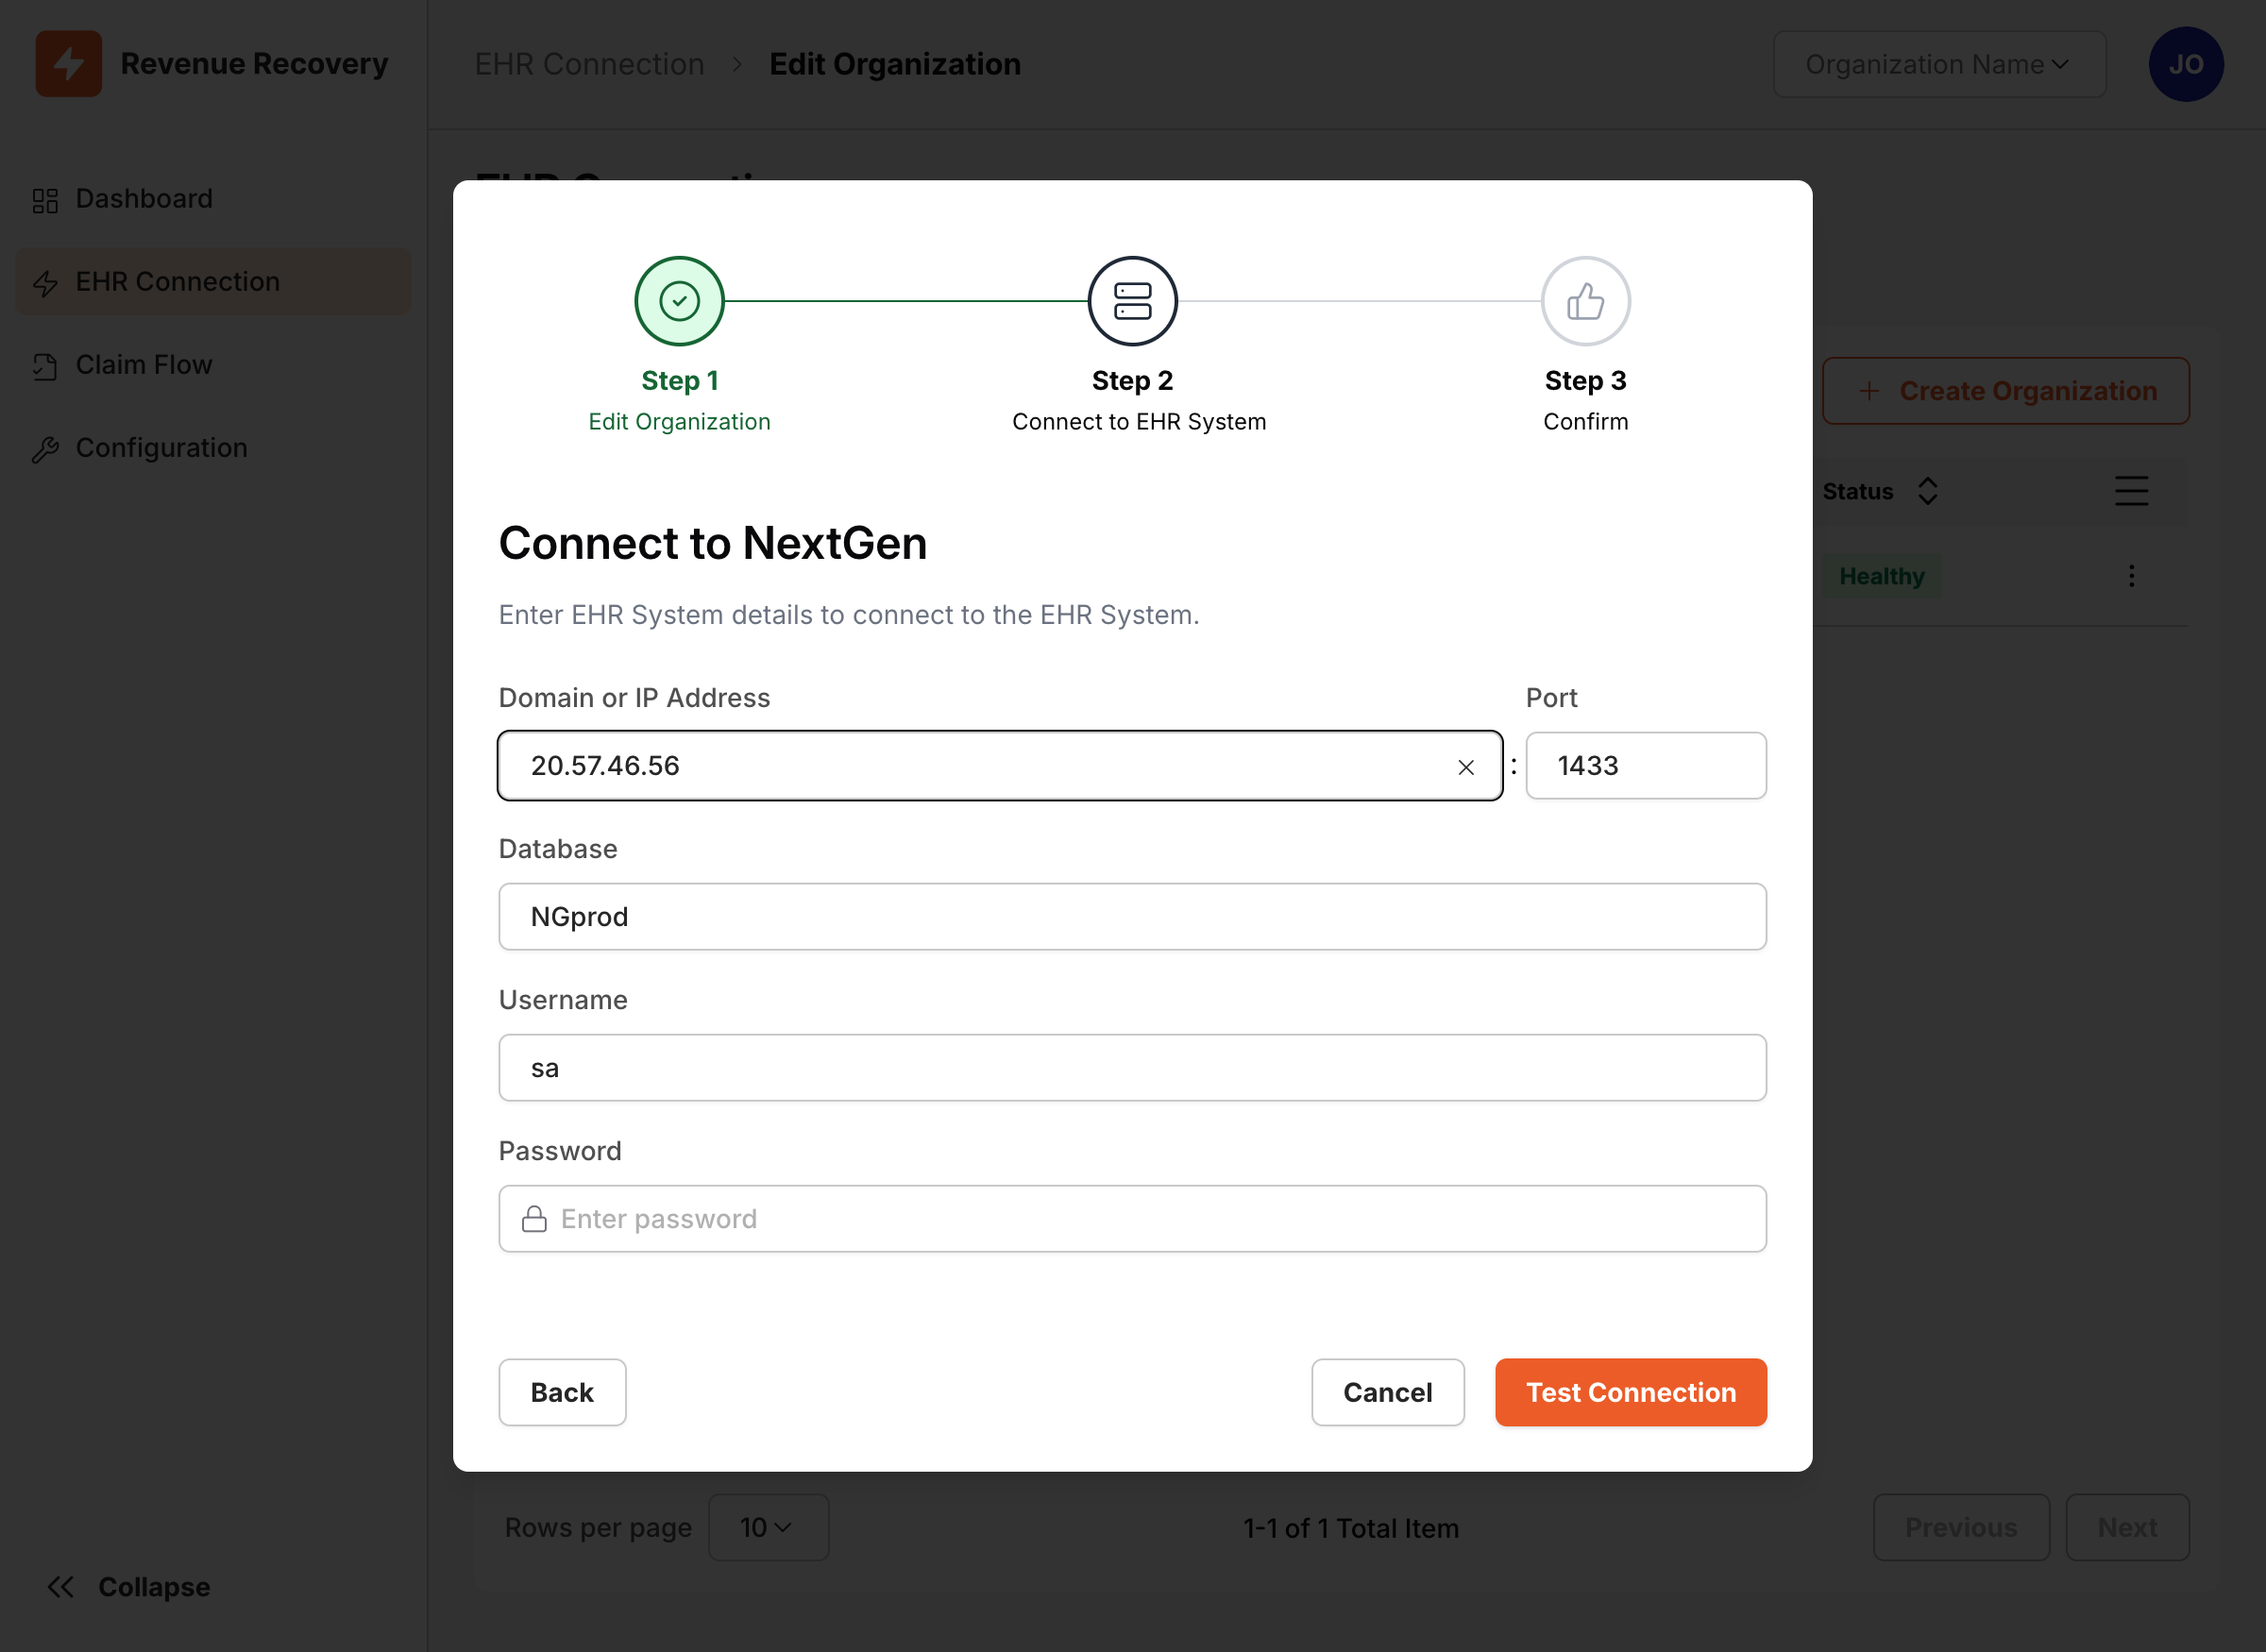
Step 4: Authentication Setup
The platform uses SQL Server Authentication by default. The database connection form includes:
- Username: Enter the SQL Server service account username
- Password: Enter the secure password for the service account
- Test Connection: Click to verify the connection settings
Note: The application currently supports SQL Server Authentication. Ensure your NextGen database is configured to allow SQL Server authentication and that you have appropriate service account credentials.
Step 5: Relay Service Configuration
The Relay Service configuration is handled automatically as part of the organization setup process. The platform will:
- Connect to your pre-deployed Relay VM automatically
- Verify the relay status during the connection test
- Use the relay for secure database connectivity
Important: Ensure your Relay Service VM is deployed and registered before starting the EHR connection process. Refer to the Relay Service Deployment guide if needed.
Step 6: Connection Testing
- Click Test Connection to validate all settings
- The system will verify:
- Database server connectivity
- Authentication credentials
- SQL query execution
- Network connectivity through Relay Service
 The connection test will provide immediate feedback on any configuration issues. Address any errors before proceeding to the final step.
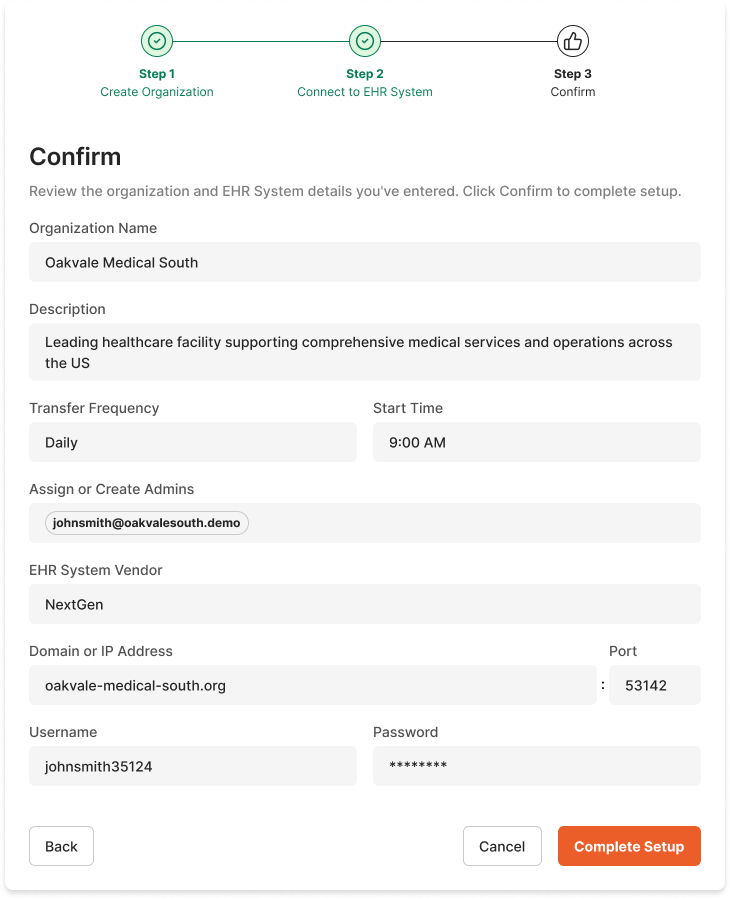
Step 7: Save and Activate
- Review all configuration settings
- Click Next to proceed to the confirmation step
- Review the summary and click Complete Setup to finalize
- The organization and EHR connection will be created and activated automatically
Authentication Options
SQL Server Authentication
Best Practice: Create a dedicated service account with minimal required permissions.
-- Example SQL Server setup (run by DBA)
-- Use a strong, randomly generated password that meets your organization's complexity requirements.
-- Example password below is for demonstration only. Do NOT use in production.
CREATE LOGIN [ailevate_service] WITH PASSWORD = 'N4v!r7Qp$2sLw8zB@1eX';
CREATE USER [ailevate_service] FOR LOGIN [ailevate_service];

-- Grant minimal read permissions
GRANT SELECT ON SCHEMA::dbo TO [ailevate_service];
GRANT EXECUTE ON SCHEMA::dbo TO [ailevate_service];
Required Permissions:
SELECTon NextGen patient and billing tablesEXECUTEon approved stored procedures (if needed)CONNECTto the NextGen database- Access to specific NextGen tables for claim processing
Windows Authentication
When using Windows Authentication:
- The service account must be a domain account
- The Relay VM must be domain-joined
- Kerberos authentication must be configured
- Use the format:
DOMAIN\username
Connection String Security
All connection strings are:
- Encrypted at rest using AES-256
- Encrypted in transit using TLS 1.2+
- Rotated regularly per security policies
- Audited for access patterns
Troubleshooting Common Issues
Issue 1: "Connection Timeout" Error
Symptoms:
Error: Connection timeout after 30 seconds
Unable to reach SQL Server through Relay
Root Causes & Solutions:
| Cause | Solution |
|---|---|
| Firewall blocking TCP 1433 | Work with network team to allow Relay VM → SQL Server on port 1433 |
| SQL Server not listening | Verify SQL Server service is running and listening on configured port |
| DNS resolution failure | Test nslookup from Relay VM to SQL Server hostname |
| Network routing issues | Verify Relay VM can ping SQL Server IP address |
Diagnostic Steps:
- SSH to Relay VM and test connectivity:
telnet nextgen-sql.hospital.local 1433 # or test with netcat nc -vz nextgen-sql.hospital.local 1433 - Check SQL Server error logs for connection attempts
- Verify firewall rules on both Relay VM and SQL Server
- Test DNS resolution from Relay VM:
nslookup nextgen-sql.hospital.local - Verify Relay service status:
sudo systemctl status ailevate-tunnel.service
sudo systemctl status ailevate-proxy.service
Issue 2: "Authentication Failed" Error
Symptoms:
Error: Login failed for user 'ailevate_service'
Authentication method not supported
Root Causes & Solutions:
| Cause | Solution |
|---|---|
| Incorrect credentials | Verify username/password in SQL Server Management Studio |
| Account disabled/locked | Check user account status in SQL Server |
| SQL Auth not enabled | Enable "SQL Server and Windows Authentication mode" |
| Password expired | Reset password and update connection configuration |
Diagnostic Steps:
- Test credentials directly on SQL Server:
-- Run on SQL Server SELECT name, is_disabled FROM sys.sql_logins WHERE name = 'ailevate_service'; - Verify SQL Server authentication mode
- Check SQL Server error log for specific authentication errors
- Test connection from SQL Server Management Studio using same credentials
Issue 3: "Relay Service Unavailable" Error
Symptoms:
Error: Relay Service not responding
Unable to establish secure tunnel
Root Causes & Solutions:
| Cause | Solution |
|---|---|
| Relay VM powered off | Start the Relay VM and verify Azure Arc agent status |
| Outbound connectivity blocked | Verify HTTPS 443 access to *.ailevate.com |
| Azure Arc agent offline | Restart Azure Arc agent: sudo systemctl restart azconnectedmachine |
| DNS resolution issues | Test resolution of management.azure.com from Relay VM |
Diagnostic Steps:
- Check Azure Arc agent status:
sudo azcmagent show - Test outbound connectivity:
curl -I https://management.azure.com - Review Azure Arc agent logs:
sudo journalctl -u azconnectedmachine -f - Check Relay service logs:
sudo journalctl -u ailevate-tunnel.service -n 50
sudo journalctl -u ailevate-proxy.service -n 50
Connection Monitoring
Health Checks
The platform automatically monitors connection health:
- Connection Status: Real-time connectivity status
- Query Performance: Response time metrics
- Error Rates: Failed query percentages
- Data Freshness: Last successful data retrieval
Alerts and Notifications
Configure alerts for:
- Connection failures lasting > 5 minutes
- Query response times > 10 seconds
- Authentication failures
- Relay Service disconnections
Best Practices
- Regular Testing: Schedule monthly connection tests
- Credential Rotation: Rotate passwords quarterly
- Monitoring: Review connection logs weekly
- Documentation: Keep connection details updated
- Backup Plans: Have fallback procedures documented
Next Steps: Once your EHR connection is established, proceed to Configuring Default Settings to customize how the platform interacts with your EHR data.