
Editing, Testing and Deleting EHR Connections
How to configure, test, edit and delete EHR connections and users
Editing, Testing, and Deleting EHR Connections
This guide provides comprehensive instructions for managing your EHR connections in Revenue Recovery, including how to edit connection details, test connections to verify functionality, and safely delete connections when needed. These operations help ensure your EHR integrations remain reliable and secure.
Editing an EHR Connection
You can modify existing EHR connection details to adapt to changes in your EHR system configuration, update credentials, or modify data transfer settings.
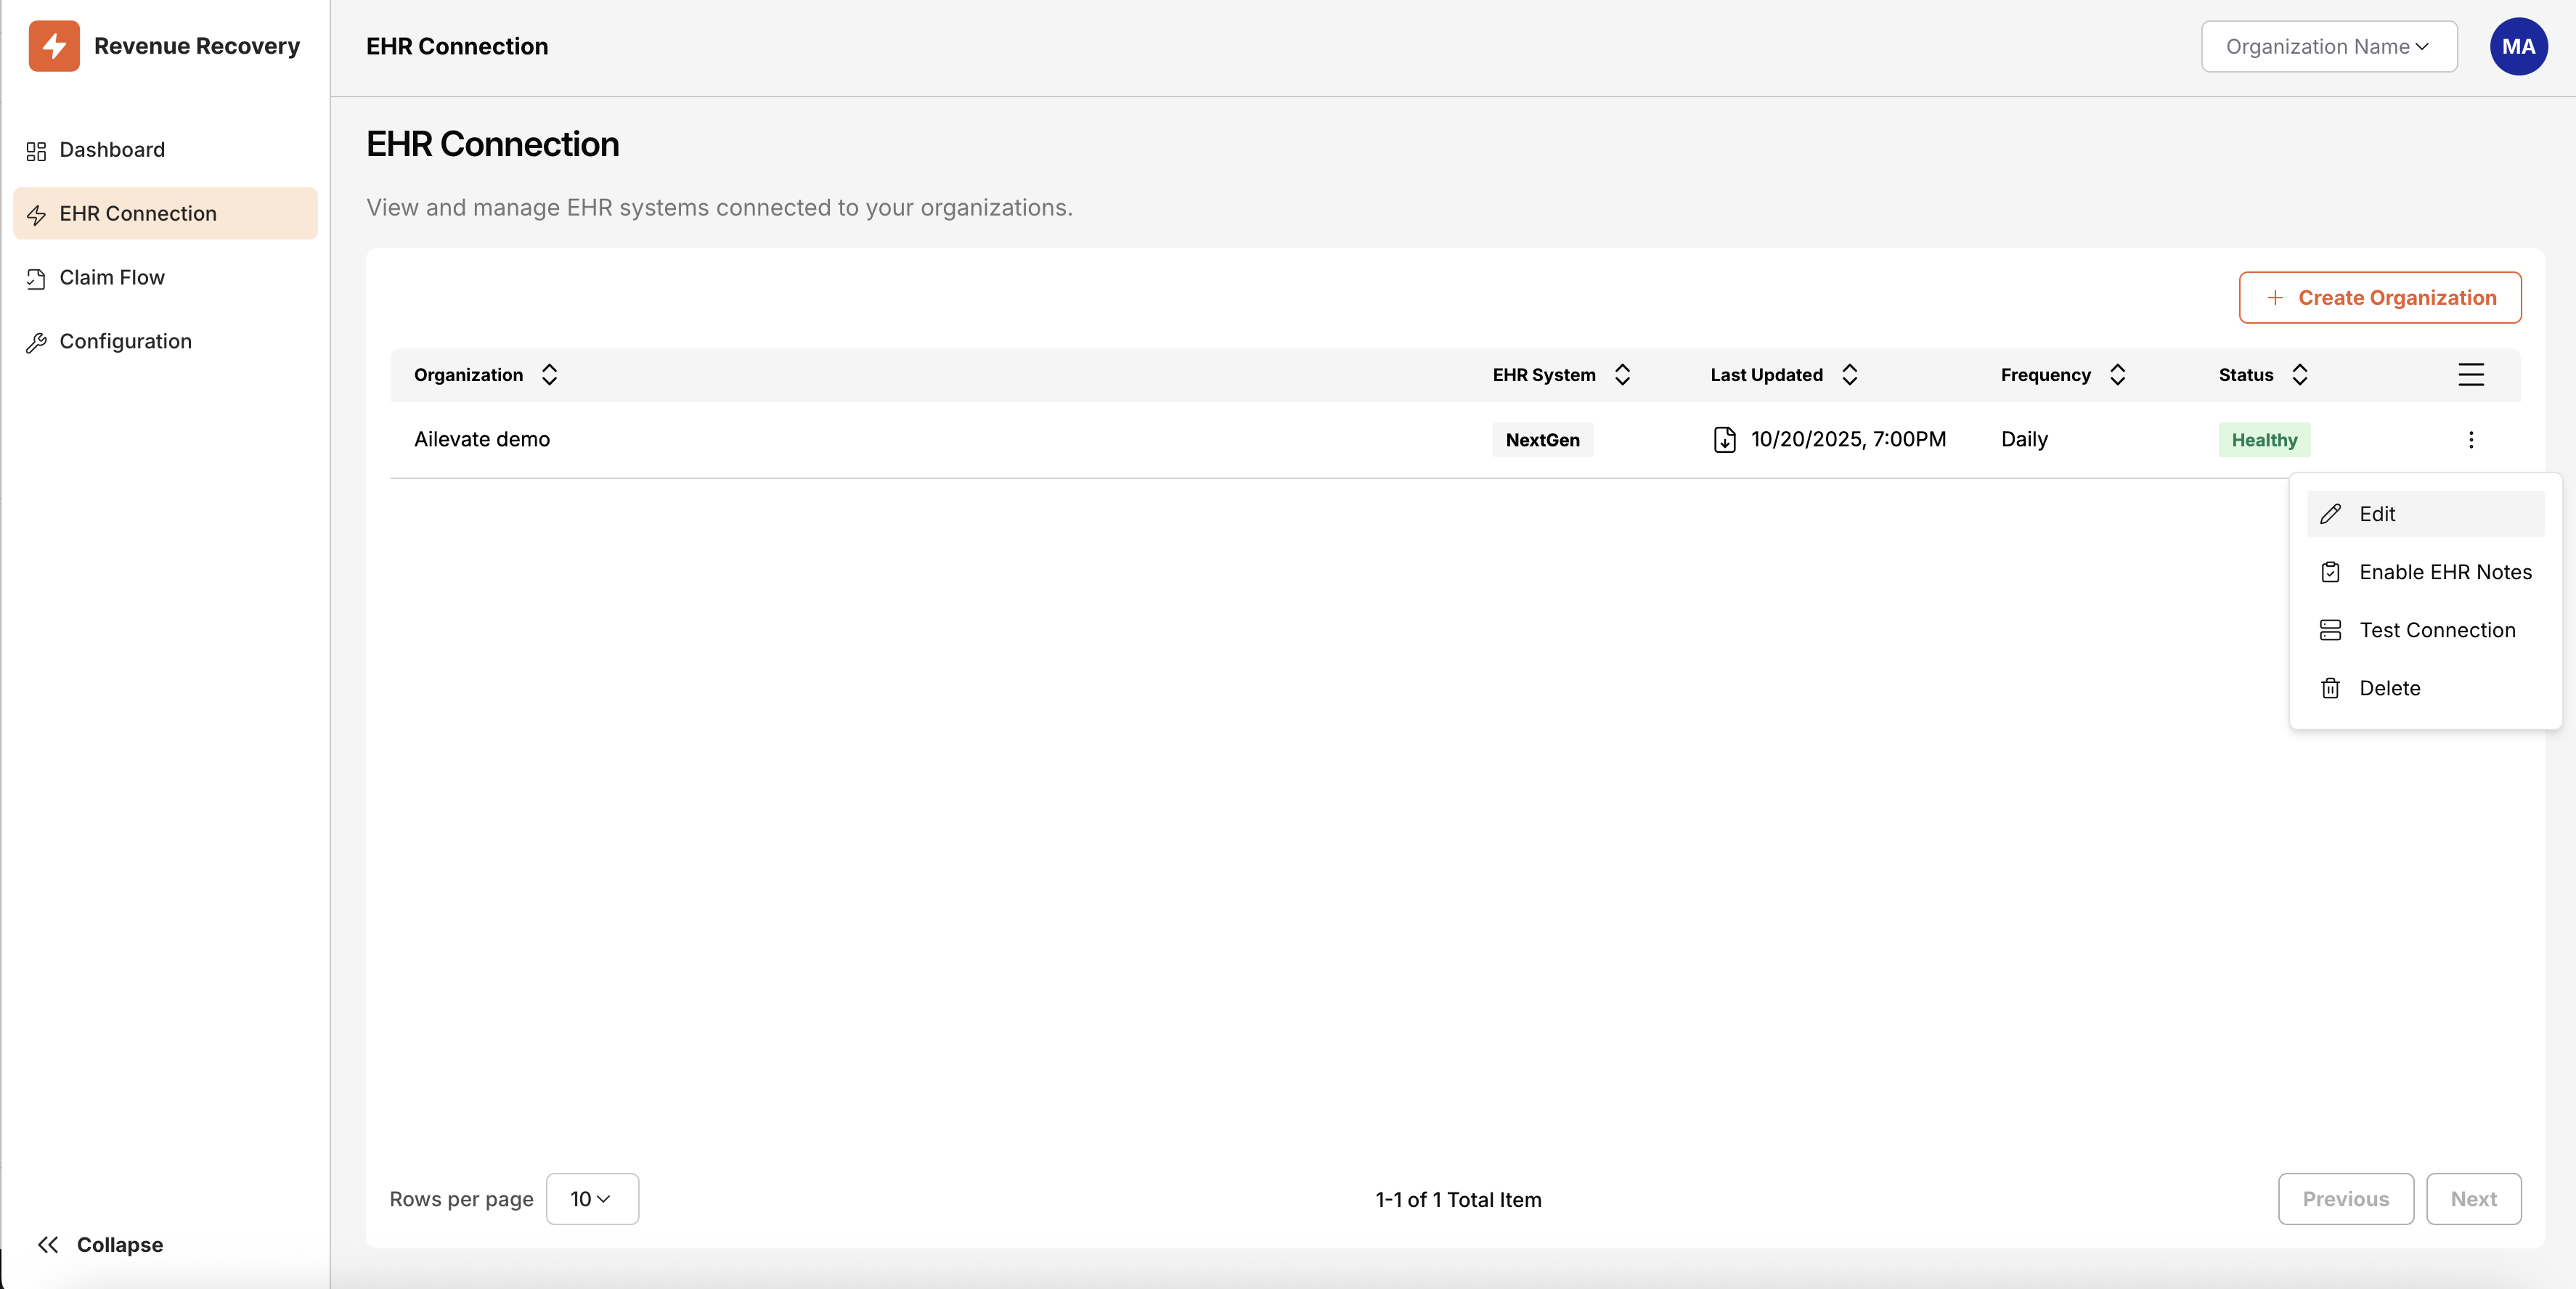
Accessing Connection Settings
- Navigate to EHR Connection from the main navigation menu
- Locate the organization whose connection you want to edit
- Click the kebab menu (three dots) next to the organization
- Select Edit from the dropdown menu
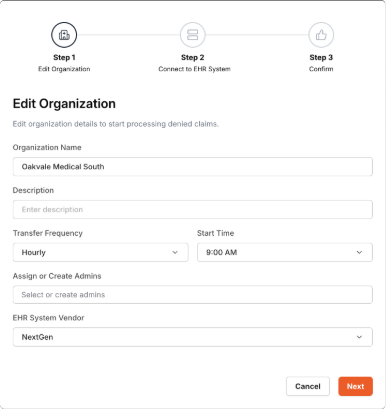
Editing Connection Details
The edit process follows the same multi-step wizard used during initial setup:
Step 1: Organization Details
- Update organization name or description
- Modify transfer frequency (Hourly, Every 12 hours, Daily)
- Change start time for data transfers
- Add or remove administrator users
- Update EHR system vendor selection
Step 2: EHR Connection Configuration
- Update connection credentials (database username/password, API keys)
- Modify server addresses or ports
- Update database names or connection strings
- Test the updated connection before saving
Step 3: Confirmation
- Review all changes before applying
- Confirm the updated configuration
Important Considerations
⚠️ Connection Impact
- Changes to connection details may temporarily disrupt data flow
- Schedule updates during maintenance windows when possible
- Test connections thoroughly after making changes
🔐 Security Requirements
- Sensitive credential changes may require re-authentication
- All configuration changes are logged for audit purposes
- Administrators are notified of significant configuration changes
Testing an EHR Connection
Testing EHR connections is crucial for verifying that your integrations are working properly and can access the required data from your EHR system.
When to Test Connections
- During Initial Setup: Before finalizing a new EHR connection
- After Configuration Changes: When updating credentials or connection details
- Troubleshooting Issues: When experiencing data flow problems
- Regular Maintenance: Periodic verification of connection health
Testing a Connection
From the Organization List
- Go to EHR Connection in the main navigation
- Find the organization you want to test
- Click the kebab menu (three dots) next to the organization
- Select Test Connection from the dropdown
During Setup or Editing
Connection testing is automatically available during the organization creation or editing process in Step 2 (Connect to EHR System).
Test Connection Process
When you initiate a connection test, Revenue Recovery performs the following validations:
- Network Connectivity: Verifies the system can reach your EHR server
- Authentication: Validates login credentials or API keys
- Database/API Access: Confirms permissions to access required data
- Data Retrieval: Tests ability to query essential tables or endpoints
Expected Test Results
✅ Successful Connection
- Green indicator with "Connection Successful" message
- Confirmation that all required data sources are accessible
- Estimated data volume and transfer capabilities
- Ready to begin data synchronization
❌ Failed Connection
- Red indicator with specific error details
- Error code and technical description
- Recommended resolution steps
- Links to troubleshooting guides
Testing During Organization Creation

Connection testing is integrated into the organization setup wizard to ensure your EHR connection is working before completing the configuration.
Deleting an EHR Connection
Deleting an EHR connection permanently removes the organization and all associated data from Revenue Recovery. This action cannot be undone and requires careful consideration.
Before You Delete
⚠️ Critical Warning: Deleting an EHR connection will:
- Permanently remove the organization and all its data
- Stop all data synchronization from your EHR system
- Delete all historical claims, recommendations, and reports
- Remove all user access permissions for this organization
Deletion Process
Step 1: Access Deletion Options
- Navigate to EHR Connection
- Locate the organization you want to delete
- Click the kebab menu (three dots)
- Select Delete from the dropdown
Step 2: Review Impact Warnings
The system will display comprehensive warnings about the deletion impact:
- Data Loss Warning: All claims data and recommendations will be permanently deleted
- User Access Impact: Users will lose access to this organization's data
- Integration Termination: EHR data synchronization will stop immediately
- Audit Trail: Deletion will be logged for compliance purposes
Step 3: Confirm Deletion
To prevent accidental deletion:
- Read all warning messages carefully
- Type "DELETE" in the confirmation field (case-sensitive)
- Click the Delete button (only enabled after typing DELETE)
- Confirm final warning in the popup dialog
Post-Deletion Effects
After successful deletion:
- Organization disappears from the EHR Connection list
- All associated users lose access to organization data
- Data synchronization stops immediately
- Administrators receive email notification of the deletion
- Deletion is logged in the system audit trail
Common Error Messages and Resolutions
Connection Authentication Errors
Error: "Invalid Database Credentials"
Cause: Username, password, or database name is incorrect
Resolution Steps:
- Verify credentials with your EHR system administrator
- Check that the database name matches exactly (case-sensitive)
- Confirm the user account has appropriate permissions
- Test credentials directly against your EHR database
- Update connection details and re-test
Network and Connectivity Errors
Error: "Connection Timeout - Unable to Reach Server"
Cause: Network connectivity issues or incorrect server address
Resolution Steps:
- Verify the server IP address or domain name is correct
- Check that the port number matches your EHR configuration
- Confirm your firewall allows outbound connections on the specified port
- Test network connectivity from your location to the EHR server
- Contact your network administrator if connectivity issues persist
Error: "SSL Certificate Verification Failed"
Cause: SSL/TLS certificate issues with the EHR server
Resolution Steps:
- Verify the EHR server has a valid SSL certificate
- Check that the certificate hasn't expired
- Confirm the server hostname matches the certificate
- Contact your EHR vendor if certificate issues persist
- Consider using trusted certificate authorities
Data Access and Permission Errors
Error: "Access Denied to Required Tables"
Cause: Database user lacks permissions to access essential data
Resolution Steps:
- Grant the database user READ permissions on required tables
- Verify access to claims, patient, and billing data tables
- Check that views and stored procedures are accessible
- Confirm the user has CONNECT permissions to the database
- Work with your database administrator to review and update permissions
Error: "Database Not Found or Inaccessible"
Cause: Database name is incorrect or database is offline
Resolution Steps:
- Verify the exact database name (case-sensitive)
- Confirm the database is running and accessible
- Check that the database server is online and responding
- Verify network connectivity to the database server
- Contact your EHR system administrator for database status
Getting Additional Help
If you continue to experience issues after following these resolution steps:
- Contact Support: Use the "Contact Support" option within the application
- Include Error Details: Provide the exact error message and error code
- Share Configuration: Include relevant (non-sensitive) connection details
- Describe Environment: Mention your EHR system type and version
- Document Steps: List the troubleshooting steps you've already attempted
The Revenue Recovery support team can provide additional assistance with complex configuration issues or work with your EHR vendor to resolve integration challenges.
Updated 9 months ago