
Security Settings
Configure IP Allow Lists and Trusted Domain Lists to enhance platform security
Enhance platform security by configuring access controls to restrict unauthorized access. Network-based security controls add powerful layers of protection beyond authentication, helping you ensure that only authorized users from trusted locations can access sensitive healthcare data.
Why Security Settings Matter:
Healthcare organizations face unique security challenges. Patient data must remain protected while staying accessible to authorized staff. Security Settings provide two complementary approaches to access control: IP Allow Lists restrict access based on where users connect from, while Trusted Domain Lists control who can use email-based authentication based on their email domain.
When to Use Security Settings:
Consider enabling these features when your organization needs to:
- Restrict access to office networks - Limit platform access to users connecting from corporate offices or VPN connections
- Control remote access - Implement strict network-based policies for users working outside traditional office environments
- Enforce email domain restrictions - Ensure only users with company email addresses can create accounts via Magic Link
- Meet compliance requirements - Satisfy organizational or regulatory requirements for network-based access controls
- Enhance security posture - Add additional protection beyond username and password authentication
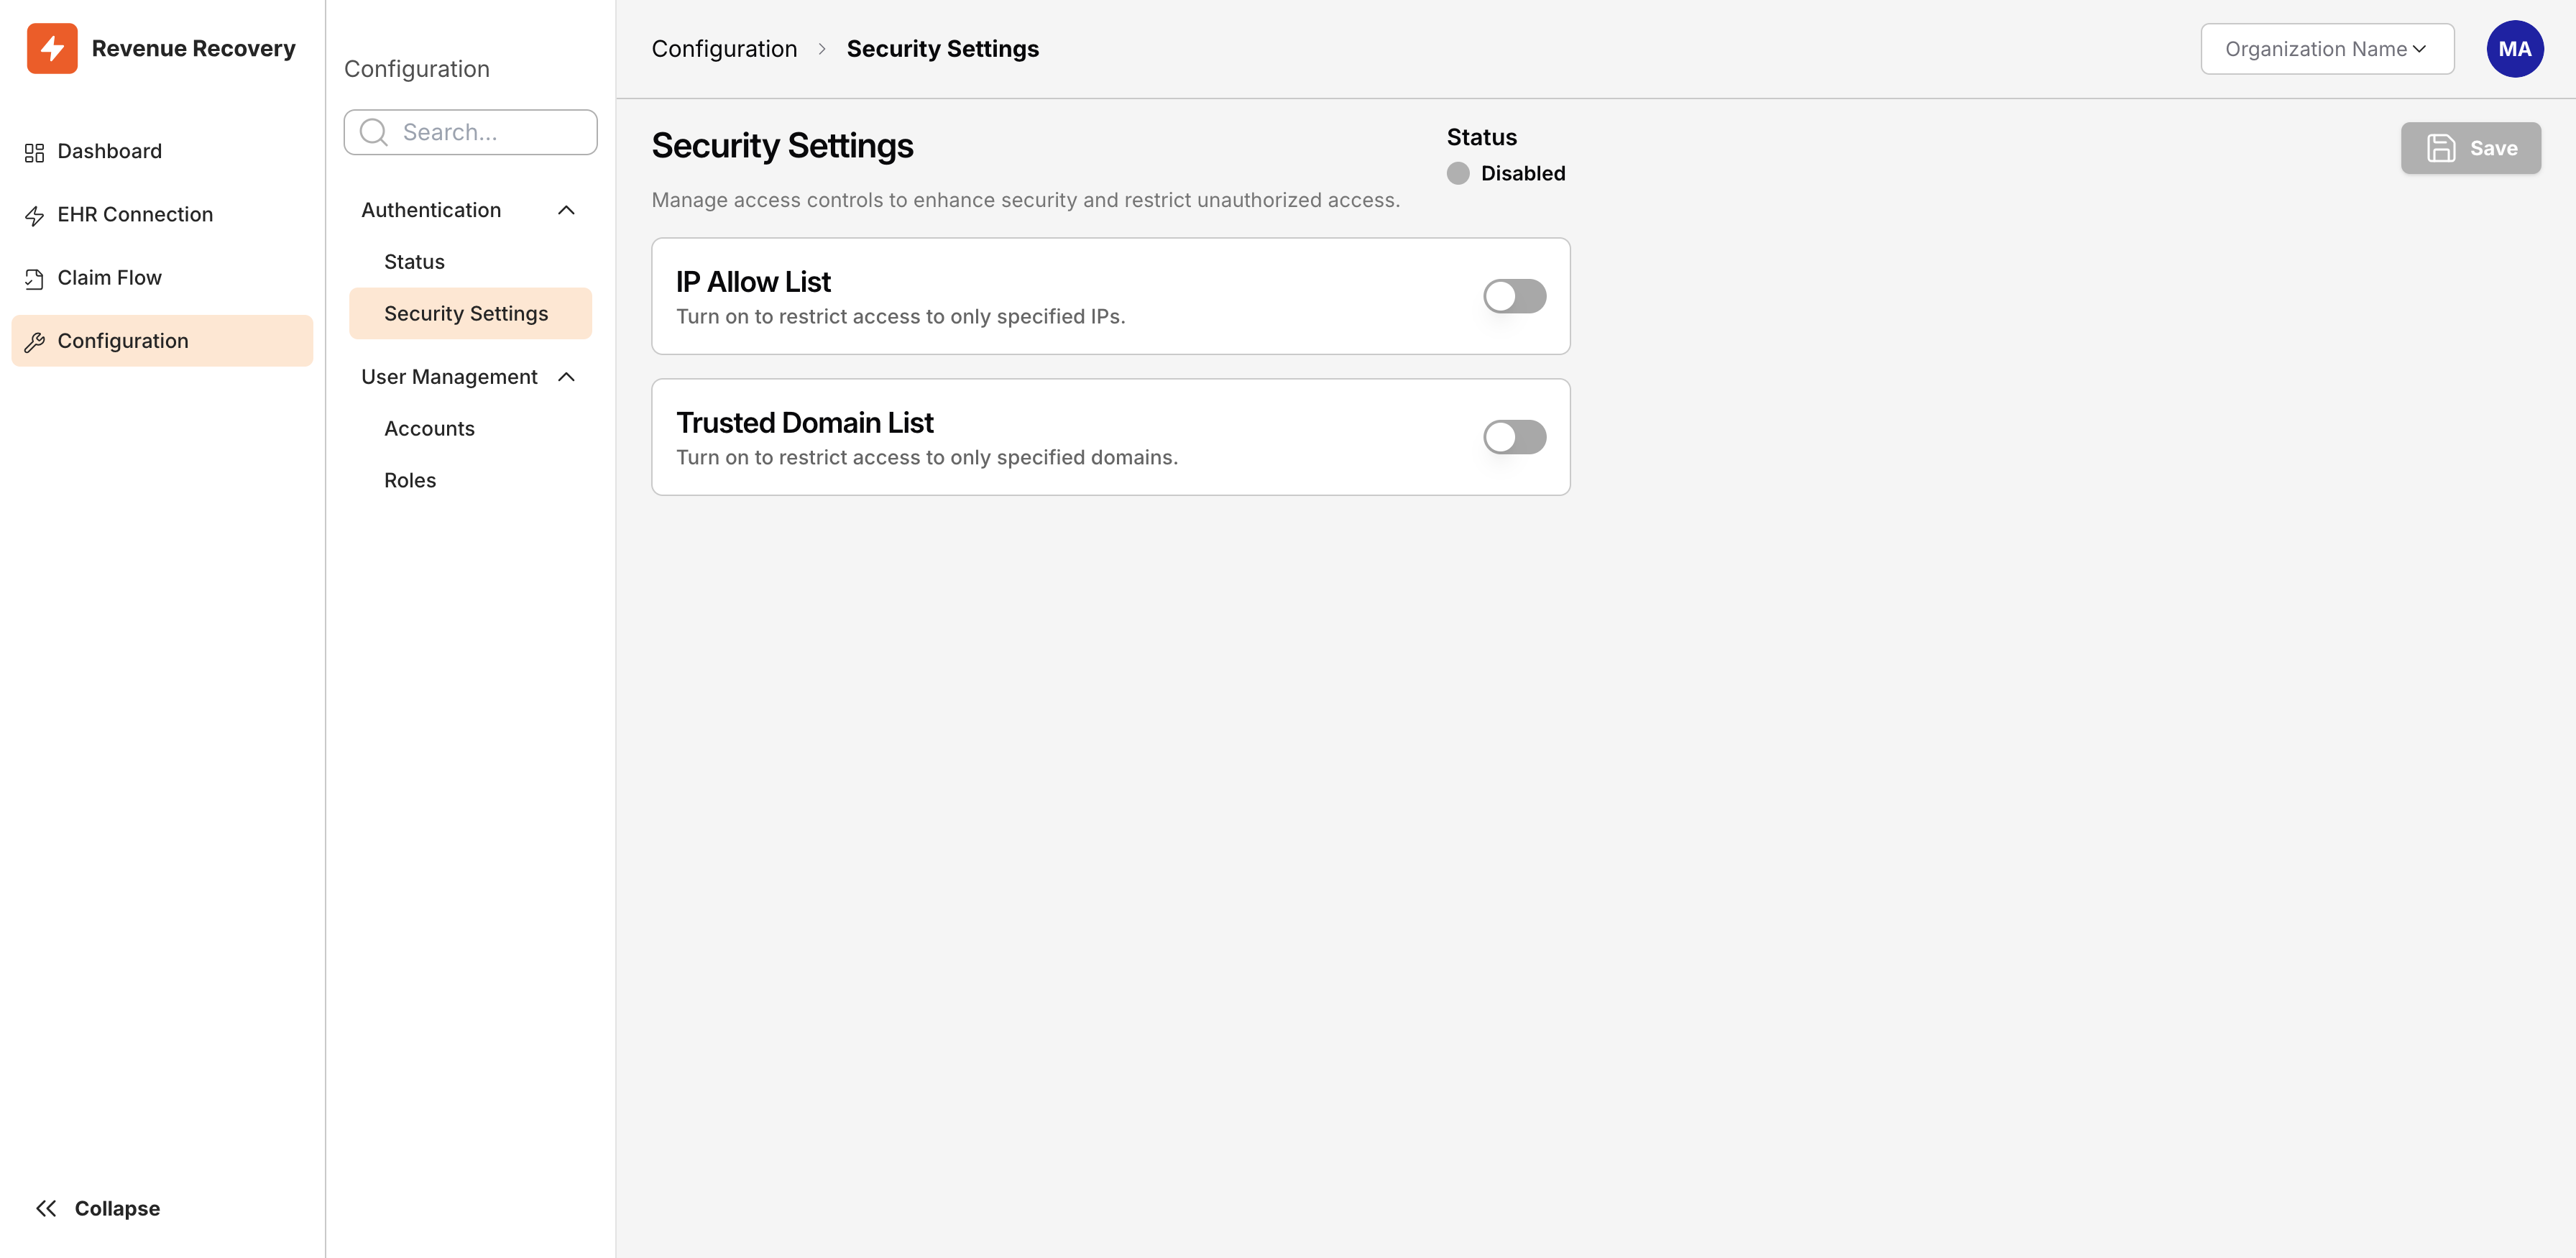 The Security Settings page showing both IP Allow List and Trusted Domain List toggles in their default (disabled) state
Critical Safety Warning: Security Settings can prevent access to the platform if misconfigured. Always add your current IP address before enabling IP restrictions, and keep one browser session open while testing. We strongly recommend testing with a secondary administrator account before rolling out to your entire team.
Accessing Security Settings
Security Settings are managed through Configuration → Authentication → Security Settings. This page serves as your control center for network-based access controls, with clear toggle switches that reveal configuration options when enabled.
The page displays two main security features:
- IP Allow List - Controls which IP addresses can access the platform
- Trusted Domain List - Controls which email domains can use Magic Link authentication
Both features remain disabled by default, allowing unrestricted access until you explicitly configure and enable them. The Status indicator at the top right shows whether any security settings are currently active, changing from "Disabled" to "Enabled" when you save your configuration.
Configuring IP Allow List
The IP Allow List restricts platform access to specific IP addresses or ranges, providing network-level security controls. When enabled, only users connecting from IP addresses in your allow list can access Revenue Recovery—all other connection attempts are blocked.
How IP Allow List Works:
Think of the IP Allow List as a guest list for your platform. Just as a building security guard checks visitors against an approved list, the IP Allow List checks every connection attempt against your list of approved IP addresses. If the connecting IP address isn't on the list, access is denied immediately, before the user even reaches the login screen.
Enabling and Configuring IP Allow List
To configure IP restrictions, toggle on the IP Allow List switch. The page reveals a data entry table where you can add authorized IP addresses.
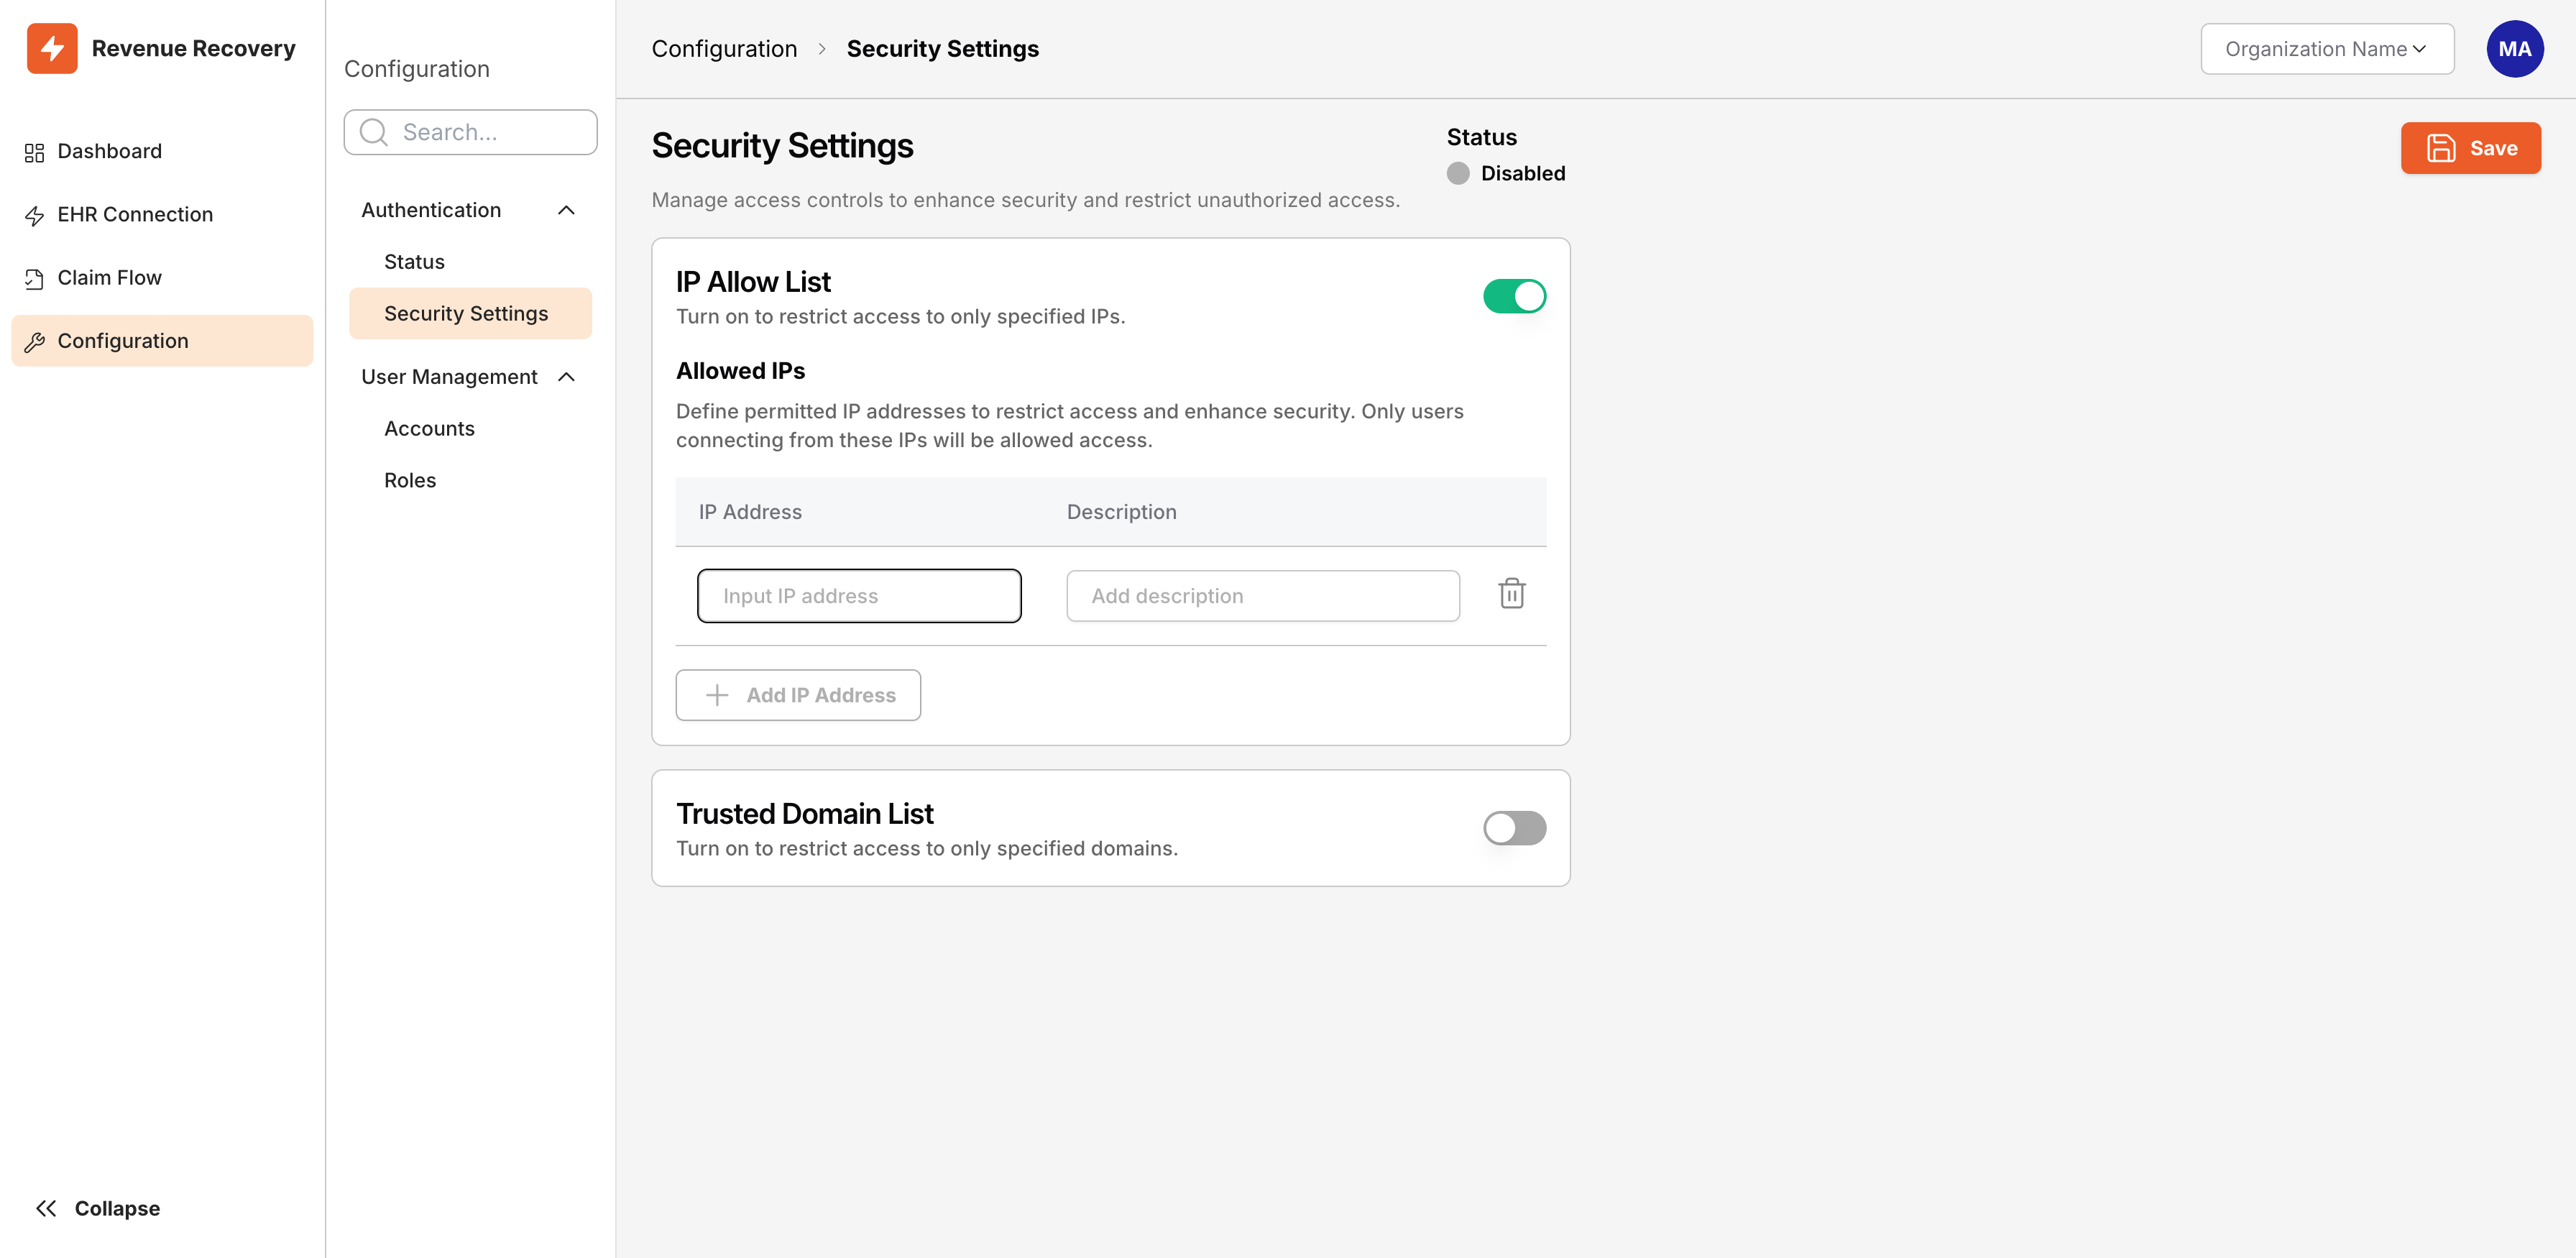 IP Allow List toggle enabled, revealing the "Allowed IPs" data entry table with fields for IP Address and Description
Step-by-Step Configuration:
-
Toggle On - Click the IP Allow List switch to enable the feature. The data entry table appears with two columns: IP Address and Description.
-
Add Your Current IP First - Before adding any other IPs, identify and add your current IP address. This prevents you from locking yourself out.
Tip: Not sure of your current IP? Search "what is my IP" in your browser, or check with your IT team for your office's public IP address. -
Enter IP Address - Type the IP address in the IP Address field. You can add:
- Individual IP addresses:
192.168.1.1 - IP ranges (if supported):
192.168.1.0/24
- Individual IP addresses:
-
Add Description - Enter a clear description in the Description field explaining what this IP represents. Good descriptions help you manage your allow list as your network infrastructure changes.
Example Descriptions:
- "Main Office - Chicago"
- "Corporate VPN Gateway"
- "Remote Office - Dallas"
- "Dr. Smith Home Office"
- "Backup Administrator Access"
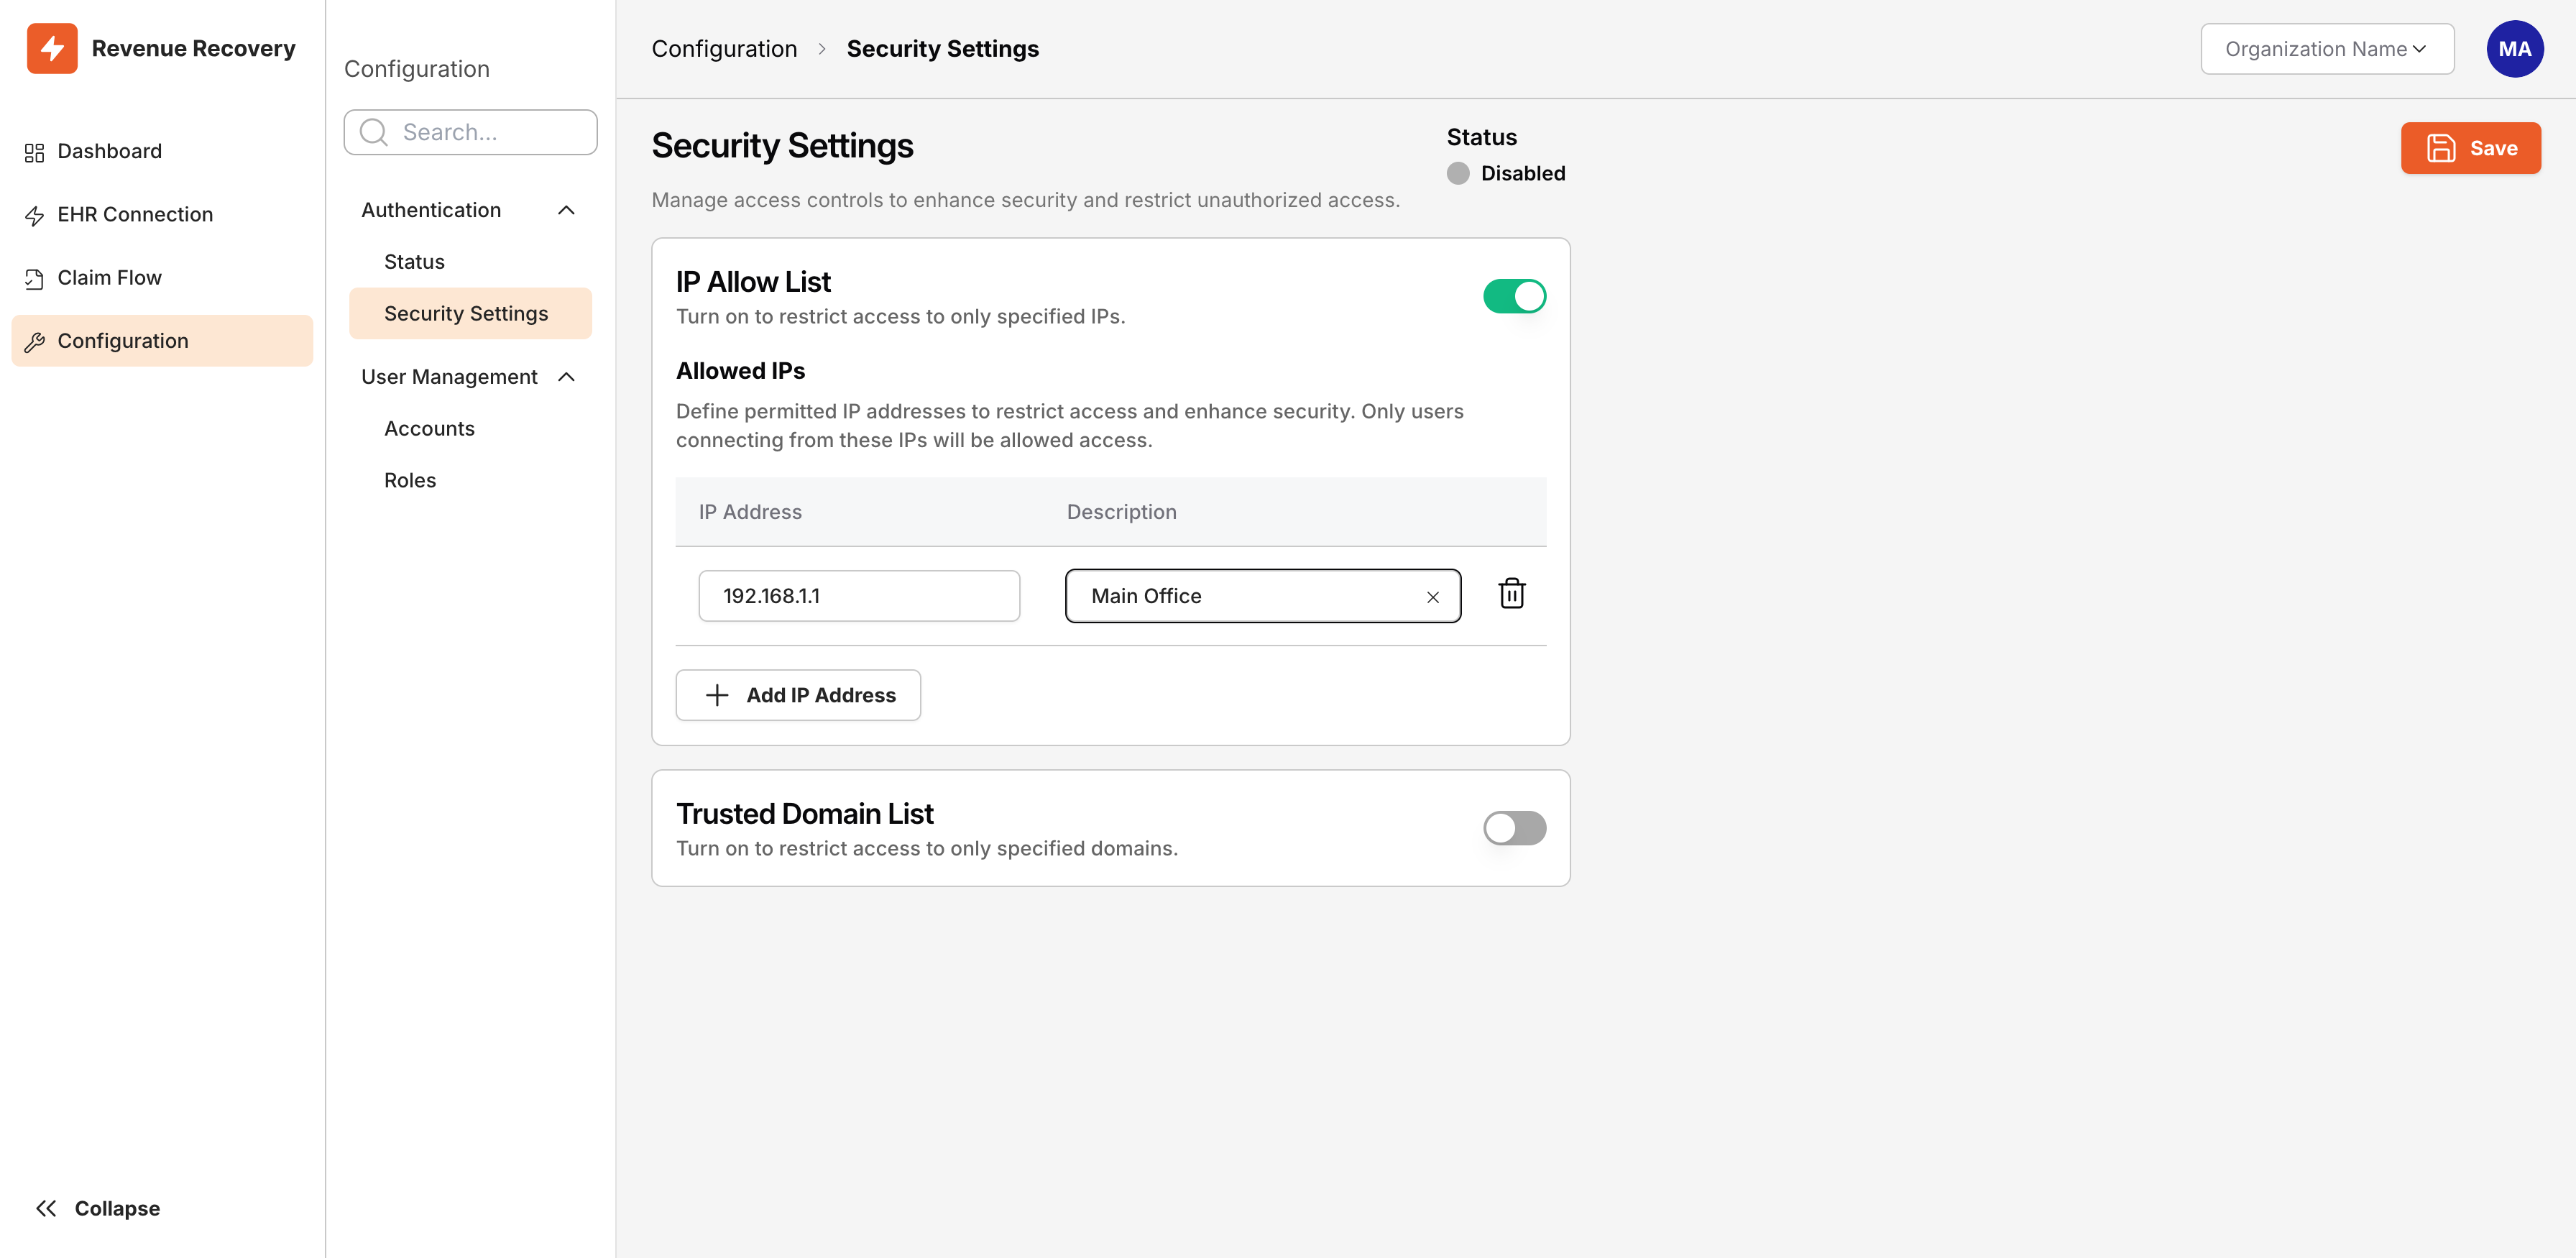 Filling in the IP Address field (192.168.1.1) and Description field (Main Office) before clicking Add IP Address
-
Click Add IP Address - After entering both values, click the Add IP Address button. The entry appears in the table above the input fields.
-
Add Additional IPs - Repeat steps 3-5 for each IP address that needs platform access. Include:
- All office locations
- VPN gateway IP addresses
- Home office IPs for remote administrators
- Backup access points for business continuity
-
Review Your List - Before enabling the restrictions, review your complete list to ensure you haven't missed critical access points.
IP Allow List Best Practices
Plan Before You Enable:
- Document IP Ownership - Use clear, specific descriptions for every IP address. Include location, purpose, and a contact person if possible.
- Include Backup IPs - Add multiple access points to maintain business continuity if your primary connection fails.
- Consider Remote Workers - Plan for users who work from home or travel frequently. VPN solutions provide consistent IP addresses for remote staff.
- Test Thoroughly - Before announcing IP restrictions to your team, test access from every location that needs platform access.
Maintain Your Allow List:
- Review Quarterly - Schedule regular reviews to remove outdated IPs and add new locations as your organization evolves.
- Update When Infrastructure Changes - When you change internet providers, move offices, or modify your network configuration, update your IP Allow List promptly.
- Track Network Changes - Work with your IT team to stay informed about network infrastructure changes that might affect platform access.
Safety Considerations:
- Mobile Users - IP restrictions affect mobile devices. Staff using cellular data will have different IP addresses that change frequently, making IP Allow Lists challenging for mobile-first workflows.
- Dynamic IPs - If your organization uses dynamic IP addresses (IPs that change periodically), you'll need to update your allow list regularly or implement static IP solutions.
- Emergency Access - Maintain an emergency access plan. Administrator accounts may have special emergency bypass capabilities, but confirm this with your platform vendor.
Important Considerations for IP Allow List
Immediate Effect:
Changes to the IP Allow List take effect immediately when you click Save. Users connecting from newly-blocked IPs lose access instantly, even if they're currently logged in. Plan your configuration changes during low-usage periods when possible.
All Authentication Methods:
IP Allow List restrictions apply to all authentication methods (both Microsoft Entra ID and Magic Link). Users connecting from blocked IPs cannot access the platform regardless of their authentication credentials.
Admin Emergency Access:
Some platforms provide administrator bypass capabilities for emergency situations, but this varies by configuration. Confirm emergency access procedures with your platform vendor before enabling IP restrictions.
Configuring Trusted Domain List
The Trusted Domain List restricts email-based authentication (Magic Link) to specific email domains, ensuring only authorized organizational email addresses can access the platform. When enabled, users attempting to authenticate with Magic Link must use an email address from an approved domain.
How Trusted Domain List Works:
The Trusted Domain List acts like an exclusive club membership based on email domains. When someone tries to log in using Magic Link authentication, the system checks whether their email domain (the part after the @ symbol) matches your approved list. For example:
- ✅ Approved: If you add
@yourcompany.com, then[email protected]can log in - ❌ Blocked: Personal emails like
[email protected]are denied access
Enabling and Configuring Trusted Domain List
To configure domain restrictions, toggle on the Trusted Domain List switch. Similar to IP Allow List, the page reveals a data entry table for adding authorized email domains.
Step-by-Step Configuration:
-
Toggle On - Click the Trusted Domain List switch to enable the feature. The domain entry table appears.
-
Enter Email Domain - Type the domain in the Domain field, including the @ symbol:
@yourcompany.com -
Add Description - Enter a description explaining what this domain represents:
@ailevate.com - Primary Company Domain@subsidiary-name.com - Acquired Company Domain@contractor-company.com - Approved Contractor Firm
-
Click Add Domain - The domain appears in the table above the input fields.
-
Add Additional Domains - Repeat for each email domain that should have Magic Link access.
Include These Domains:
- Primary organizational domain
- Subsidiary or division domains
- Approved contractor or consultant domains
- Legacy domains from mergers or acquisitions
Trusted Domain List Best Practices
Domain Planning:
| Practice | Reason |
|---|---|
| Include All Legitimate Domains | Don't forget subsidiaries, divisions with separate domains, or legacy domains still in use |
| Verify Domain Ownership | Only add domains your organization controls or has formal agreements with |
| Coordinate with HR and IT | These teams know which email domains are actively used by authorized personnel |
| Document Domain Purposes | Clear descriptions help future admins understand why each domain is approved |
Contractor and Partner Access:
When adding contractor or external partner domains, establish clear policies to maintain security:
- Time-Limited Access - Remove contractor domains promptly when engagements end to prevent unauthorized access from former partners
- Specific Project Domains - Request contractors use project-specific email addresses rather than approving their entire company domain, limiting exposure if the contractor relationship ends
- Regular Review - Schedule quarterly reviews to identify and remove outdated contractor domains as business relationships evolve
Important Considerations for Trusted Domain List
Magic Link Only: Trusted Domain List affects only Magic Link authentication. Users authenticating via Microsoft Entra ID use domain validation configured in your identity provider, not the platform's Trusted Domain List.
User Experience:
When someone attempts to use Magic Link with a non-approved domain, they receive a clear error message explaining that their email domain isn't authorized. This helps users understand why access was denied and directs them to contact their administrator.
Admin Domain Bypass:
Some platforms allow administrator accounts to bypass domain restrictions for system access. Verify bypass capabilities with your platform vendor if you plan to use admin accounts with non-standard email domains.
Saving and Activating Security Settings
After configuring IP addresses or domain restrictions, you must explicitly save your changes to activate them. Revenue Recovery uses a confirmation-based save process to prevent accidental security changes.
Understanding Save Controls
| Control | Behavior |
|---|---|
| Save Button | Disabled (grayed out) by default. Becomes active (orange/highlighted) when you make changes |
| Status Indicator | Shows "Disabled" when no restrictions are active, "Enabled" when at least one feature is enforcing restrictions |
Activation Process
Follow these steps to safely activate your security settings:
1. Configure Your Settings Toggle on desired features and add all necessary IP addresses or domains
2. Review Thoroughly Double-check that you've included all required IPs or domains
3. Click Save The Save button applies your changes and activates restrictions immediately
4. Verify Status Change Confirm the Status indicator changes from "Disabled" to "Enabled"
5. Test Access Before announcing changes, test access from various locations to confirm proper configuration
Critical Warning: Clicking Save activates restrictions immediately. Users connecting from blocked IPs or using unauthorized email domains lose access instantly.
Managing Combined Security
You can enable both IP Allow List and Trusted Domain List simultaneously for layered security. This combination provides comprehensive access control but requires careful planning to avoid unintended access blocks.
Combined Security Scenarios
Here are common configurations for combined security:
| Scenario | Configuration | Access Result |
|---|---|---|
| Office-Only with Domain Restrictions | • IP Allow List: Office IPs • Trusted Domain List: Company domain | Only users from office network with company email addresses can access |
| VPN Access with Multiple Domains | • IP Allow List: VPN gateway IP • Trusted Domain List: Multiple subsidiary domains | Remote users must connect via VPN AND use approved company email |
How Combined Security Works
When using both features together, understand their interaction to avoid unintended access blocks:
- More Restrictive Access Control - Combined security creates stricter requirements. Users must satisfy both the IP restriction (correct network location) AND the domain restriction (approved email domain) to access the platform.
- Different Scopes for Different Methods - IP Allow List affects all authentication methods (Microsoft Entra ID and Magic Link), while Trusted Domain List affects only Magic Link. This means Microsoft Entra ID users only need to satisfy IP requirements, not domain requirements.
- Thorough Testing Required - Test combinations across multiple user scenarios before rolling out: office users, remote users, different authentication methods, and different email domains. What works for one group may block another.
Troubleshooting Security Settings
Even with careful planning, security configurations can cause access issues. Use this quick-reference table to diagnose and resolve common problems:
| Issue | Symptoms | Root Cause | Solutions |
|---|---|---|---|
| Administrator Locked Out | Cannot access platform from current location after clicking Save | Current IP address not included in allow list before enabling restrictions | • Connect from approved location (office/VPN) to modify allow list • Use emergency admin access if available • Contact platform support for temporary disable Prevention: Always add your current IP first |
| Remote Users Blocked | Users cannot access from home/travel, but office access works fine | Remote IP addresses not in allow list | • Implement VPN - add VPN gateway IP to allow list • Add remote IPs individually (static IPs only) • Temporarily disable IP restrictions if remote work is critical Prevention: Plan for remote work before enabling restrictions |
| Magic Link Fails | Employees with valid company emails receive error messages during Magic Link auth | Email domain not in Trusted Domain List | • Add missing domain (check subsidiary/legacy domains) • Verify domain format includes @ symbol: @company.com• Review domain list for typos Prevention: Coordinate with HR/IT to identify all domains first |
| Save Button Disabled | Save button stays grayed out after making changes | Form validation detected invalid data | • Check IP format: 192.168.1.1 (four numbers, periods)• Complete all required fields (IP Address AND Description) • Remove incomplete entries |
| Status Shows "Disabled" | Configured and saved, but Status still shows "Disabled" | Features toggled off before saving, or no entries added | • Verify toggles are ON • Confirm entries were added (clicked Add button) • Re-apply configuration |
Quick Tip: Most access issues stem from missing IPs or domains. When users report problems, first verify their IP address or email domain is in your allow lists before investigating other causes.
Related Documentation
For Authentication Configuration:
- Configuring Authentication - Set up Microsoft Entra ID and Magic Link authentication methods that work with Security Settings
For User Management:
- User and Role Management - Manage user accounts and resolve access issues caused by security restrictions
For Initial Setup:
- First Login and Setup - Quick security setup during platform onboarding
Platform Availability Note: Security Settings is currently available in the demo environment and will be rolled out to production environments as part of ongoing platform enhancements. Check with your account representative for availability in your specific environment.
Have questions about Security Settings? Your IT team can help identify appropriate IP addresses and VPN configurations. Platform administrators can assist with domain verification and access troubleshooting. For emergency lockout situations, contact your platform vendor's support team.