
User and Role Management
Invite users, assign roles, and manage platform access for your organization
Managing your team's access to Revenue Recovery is one of your most important responsibilities as an administrator. This guide covers inviting users, assigning roles, monitoring activity, and maintaining secure access.
Overview
User management gives you complete control over who can access the platform and what they can do. All operations happen through Configuration > User Management:
- Accounts - Invite users, assign roles, and manage individual accounts
- Roles - View role definitions and see who's assigned to each role
Administrator Role Required: Only users with the Administrator role can manage user accounts, assign roles, and modify permissions. If you don't have administrator access, contact your organization's system administrator.
Understanding Platform Roles
Revenue Recovery uses Role-Based Access Control (RBAC) with four built-in roles providing specific access levels:
| Role | Access Level | Typical Use Case |
|---|---|---|
| Administrator | Full platform access including user management and settings | System administrators and platform managers |
| Contributor | Can create, edit, and manage content | Revenue cycle staff, billing analysts, and claim processors |
| Viewer | Read-only access to all content | Executives, auditors, or team members who need visibility without editing capabilities |
| No Access | No platform access | Temporarily disable a user without deleting their account |
Role changes take effect immediately when saved.
Managing User Accounts
The Accounts page is your command center for user management—inviting new users, modifying accounts, and monitoring activity.
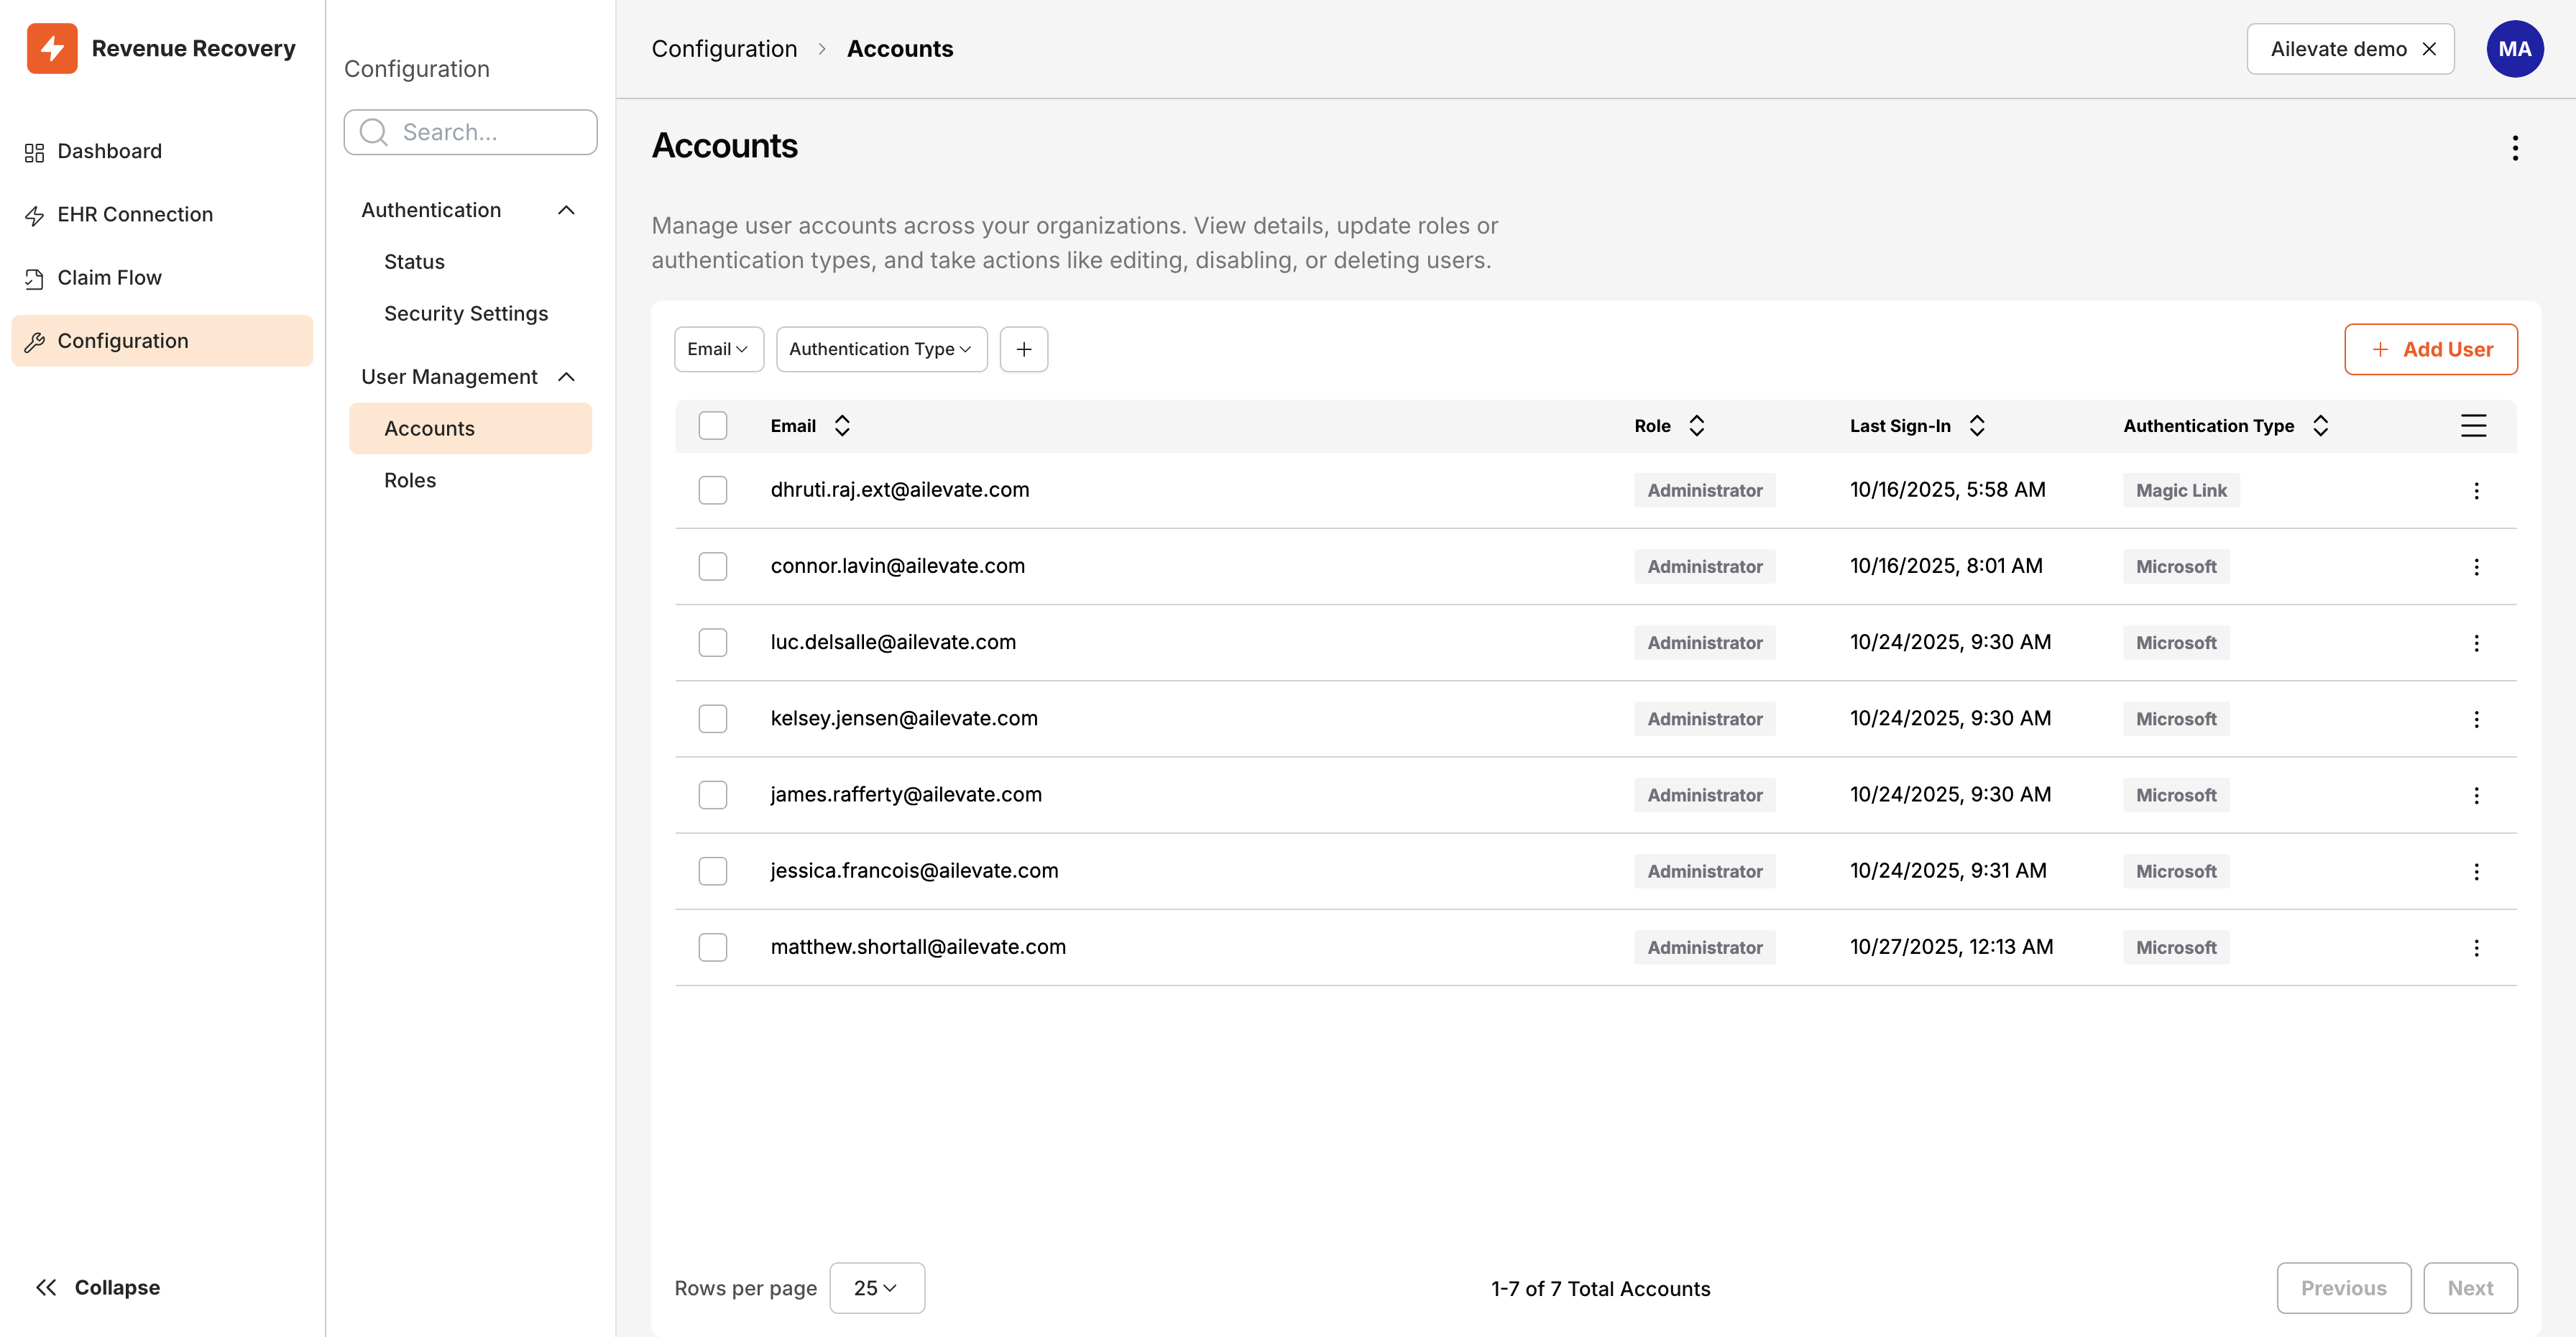
The Accounts page displaying all users with their email addresses, roles, last sign-in times, and authentication methods
Viewing User Activity
The Accounts table provides at-a-glance insights into your user base:
| Column | Information | Why It Matters |
|---|---|---|
| User's email address | Primary identifier for each user | |
| Role | Current role assignment | Shows access level for each user |
| Last Sign-In | Date and time of most recent platform access | Helps identify inactive accounts |
| Authentication Type | Microsoft or Magic Link | Shows which authentication method each user is using |
| Actions | Menu button (⋮) | Access edit and delete options |
Use this information to identify inactive accounts, verify users are accessing the platform, and audit which authentication methods your team is using.
Filtering and Searching Users
For organizations with many users, the filtering options help you quickly find specific accounts:
Available Filters:
- Email - Filter by email address or domain (useful for finding all users from a specific subsidiary)
- Authentication Type - Show only Microsoft or Magic Link users (helpful when auditing authentication methods)
To use filters, click the filter buttons at the top of the Accounts table, then click Add Filter to combine multiple criteria. Clear filters by clicking the × icon on each active filter.
Adding New Users
The invitation process is straightforward and takes just a few moments.
Prerequisites
Before inviting a user, make sure you have:
✅ Administrator role access to the platform
✅ The user's email address
✅ A clear understanding of which role the user should have
✅ Confirmation that your authentication method (Microsoft Entra ID or Magic Link) is properly configured
If you haven't configured authentication yet, see Configuring Authentication for setup instructions.
Step-by-Step Invitation Process
1. Navigate to User Management
From the main navigation menu, click Configuration, then select User Management > Accounts.
2. Click Add User
In the top-right corner of the Accounts page, click the Add User button. A dialog appears with fields for email and role.
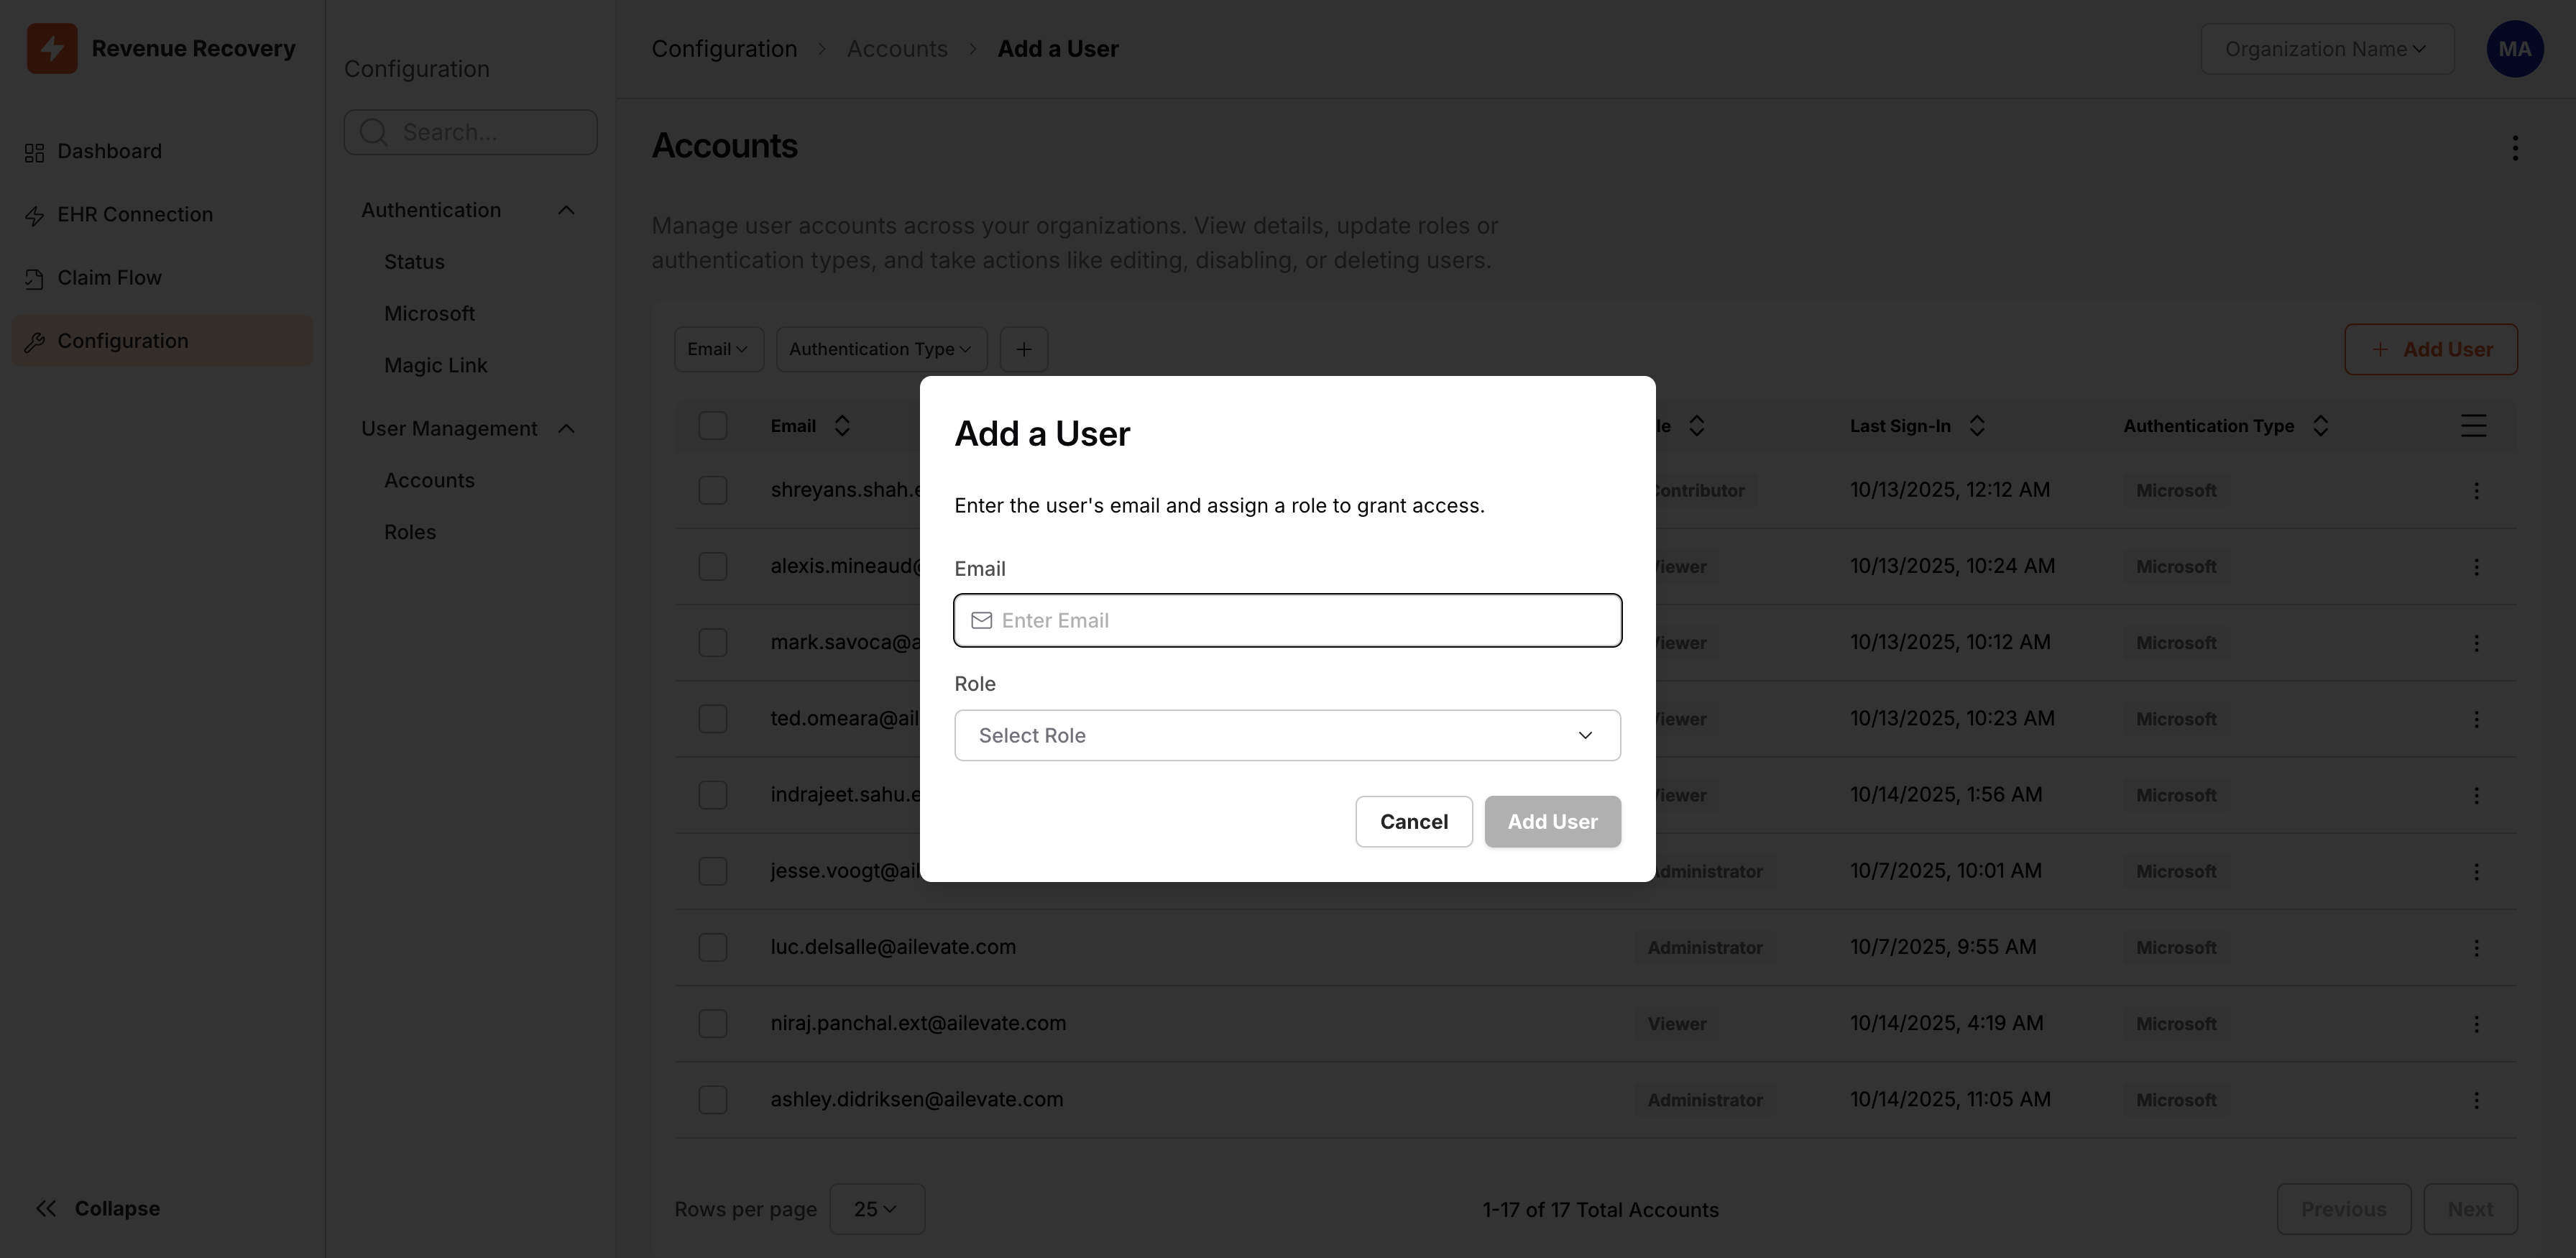
The Add User dialog with Email field and Role dropdown selection
3. Enter the User's Email Address
Type the email address carefully—this is where the invitation will be sent. The email must follow standard format ([email protected]).
4. Select the Appropriate Role
Click the Select Role dropdown and choose the role that matches the user's responsibilities:
- No Access - User cannot access any platform features
- Viewer - Read-only access to all content
- Contributor - Can create, edit, and manage content
- Administrator - Full access including user management and settings
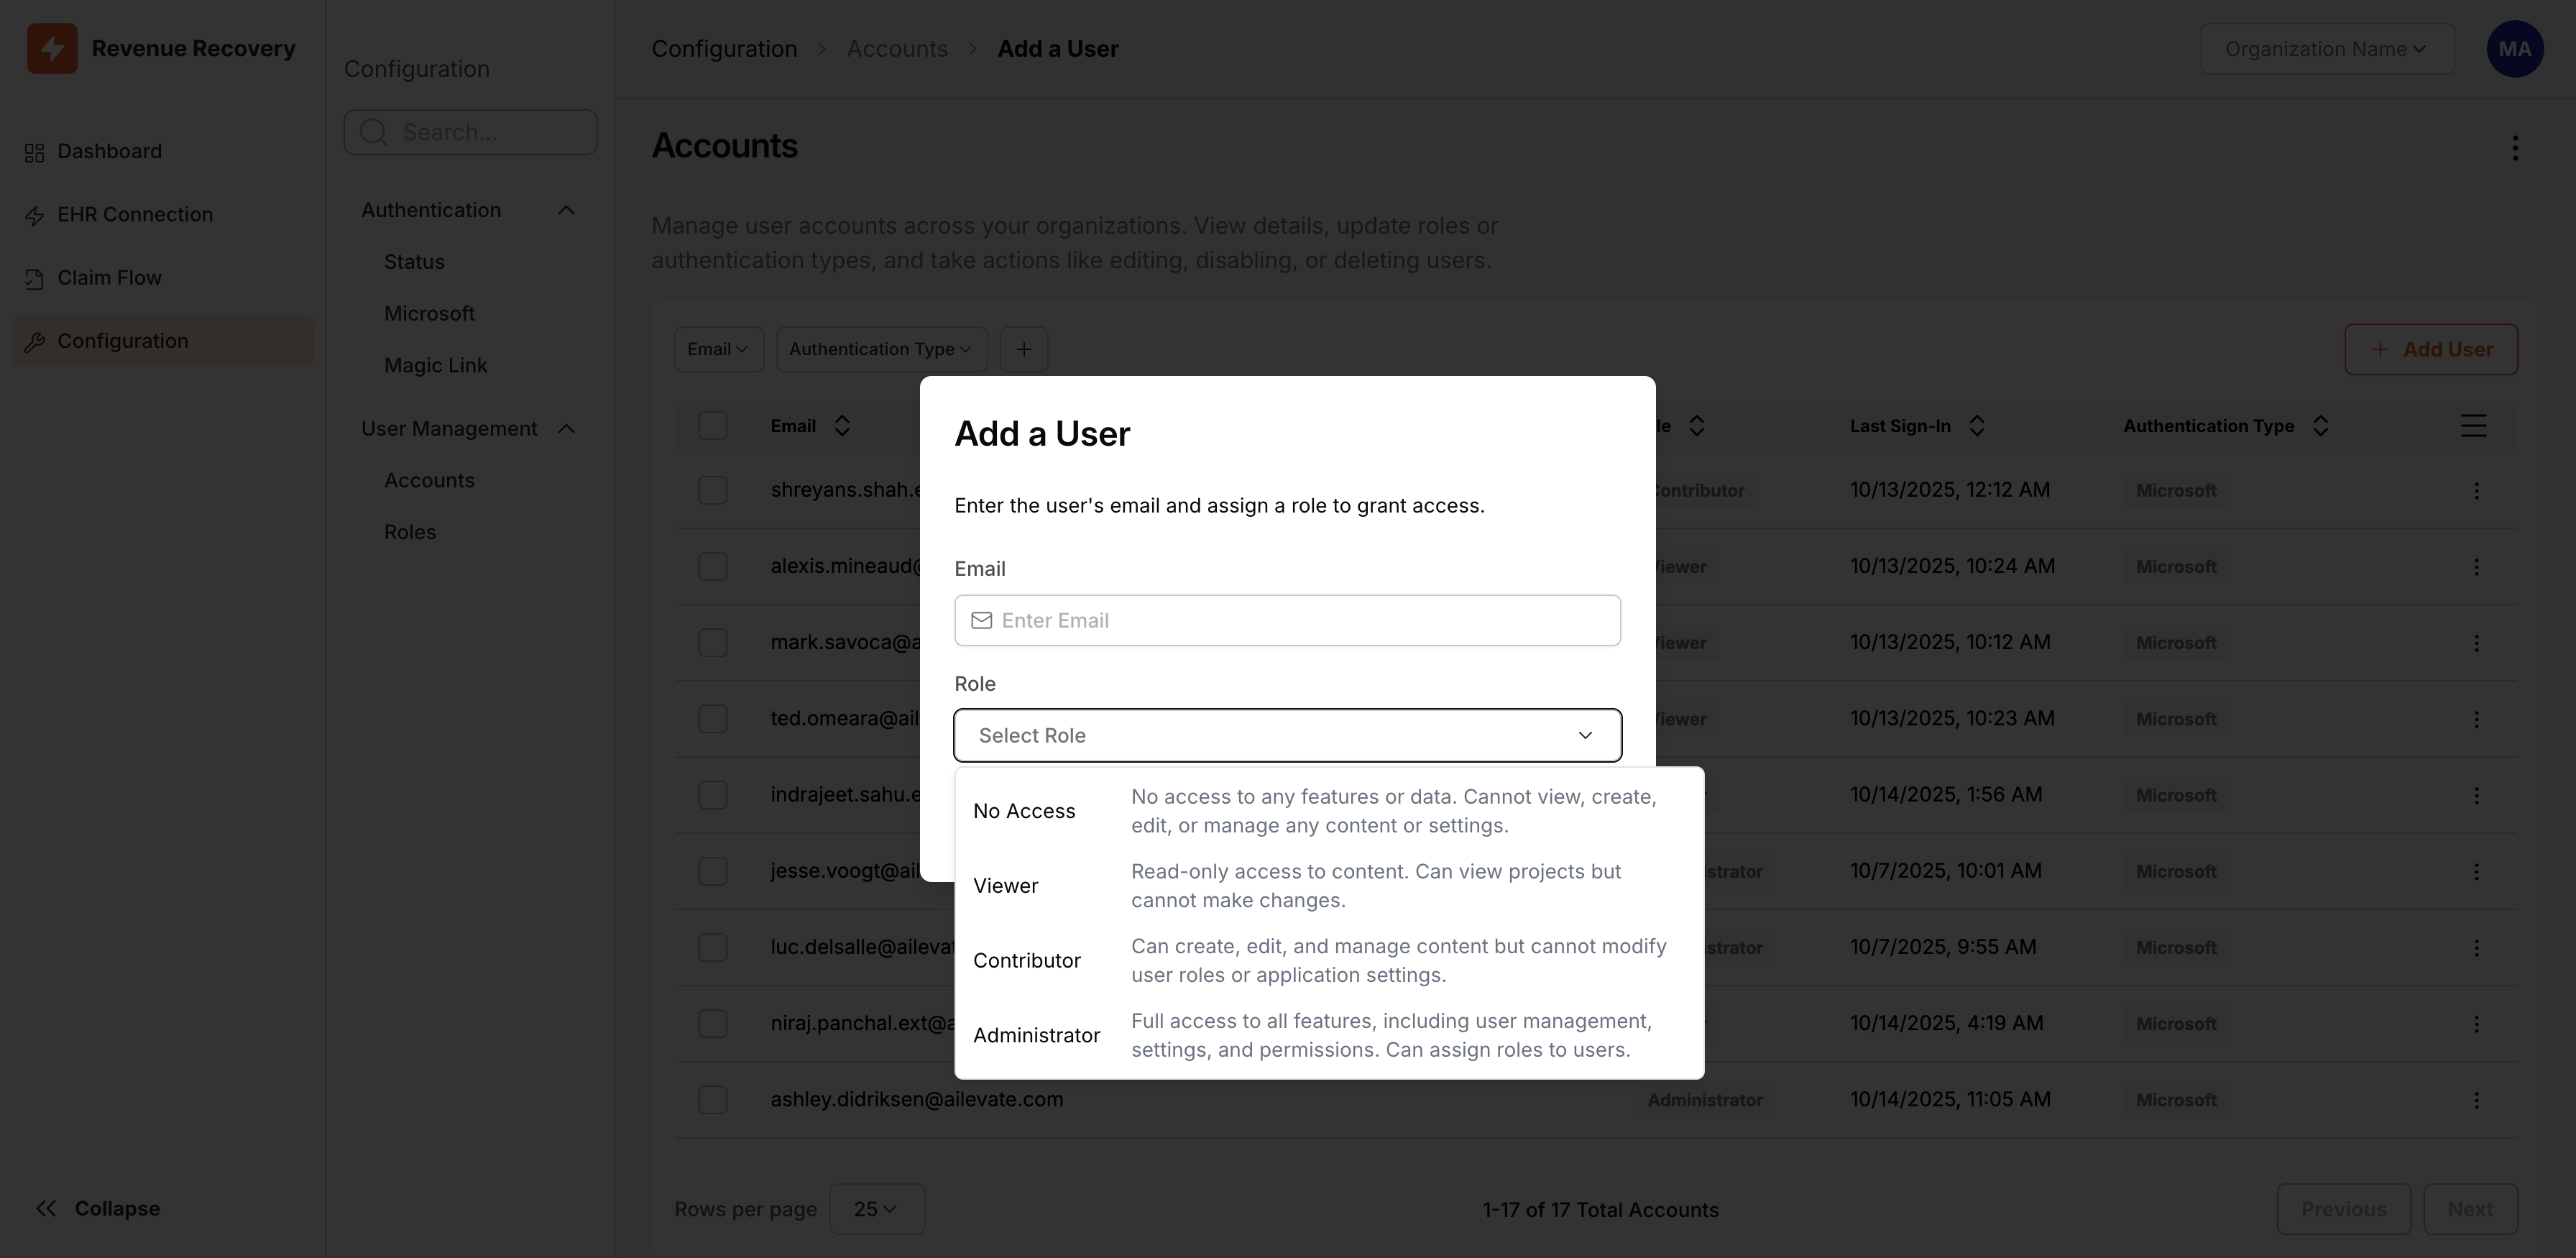
The Role dropdown showing all four available roles with their descriptions
5. Send the Invitation
Click the Add User button to send the invitation. The system creates the account and sends an email invitation immediately.
What Happens After You Invite Someone
Once you click Add User, here's what your new team member experiences:
- Email Arrives - They receive an email invitation to access Revenue Recovery
- First-Time Login - When they click the link, they'll authenticate using either Microsoft Entra ID SSO or Magic Link
- Account Activation - Once authenticated, their account becomes active and they can begin using the platform according to their assigned role
Helpful Tip: New users may need guidance on their first login. Consider sending them the Accessing the Platform guide.
Managing Existing Users
Adjust roles, temporarily restrict access, or remove users as your team evolves.
Changing User Roles
Adjust platform access quickly as team members' responsibilities change.
How to Change a User's Role:
- Navigate to Configuration > User Management > Accounts
- Locate the user and click the Menu button (⋮)
- Select Edit from the menu
- Click the Role dropdown and select the new role
- Click Save Changes
Important: Role changes take effect immediately when users refresh their browser or start a new session.
Common Role Change Scenarios:
| Situation | Action | Result |
|---|---|---|
| Promotion or new responsibilities | Upgrade from Viewer to Contributor or Contributor to Administrator | User gains ability to edit content or manage settings |
| Role transition | Change from Contributor to Viewer when someone moves to a different department | User retains visibility but can no longer edit |
| Temporary access restriction | Set role to No Access without deleting the account | User cannot access platform but account data is preserved |
| Security incident | Immediately change to No Access or Viewer | Quick access restriction while investigating issue |
Disabling User Accounts
Sometimes you need to temporarily restrict access without deleting an account—perhaps someone is on extended leave, or you're investigating unusual activity. The No Access role is perfect for this.
To temporarily disable access:
- Navigate to the user's details (Menu > Edit)
- Change the user's role to No Access
- Click Save Changes
The user will be unable to access the platform, but their account data is preserved. You can re-enable access later by assigning an active role (Viewer, Contributor, or Administrator).
Removing Users Permanently
When someone leaves your organization or no longer needs platform access, you can remove their account completely.
To delete a user:
- Locate the user in the Accounts table
- Click the Menu button (⋮) on the user's row
- Select Delete from the menu
- Confirm the deletion in the dialog
Warning: Deleting a user is permanent and cannot be undone. Consider using No Access instead if you might need to restore access later.
Assigning and Managing Roles
The Roles page provides a bird's-eye view of role distribution and bulk assignment capabilities.
Understanding the Roles Page
Navigate to Configuration > User Management > Roles to see all four roles with real-time user counts:
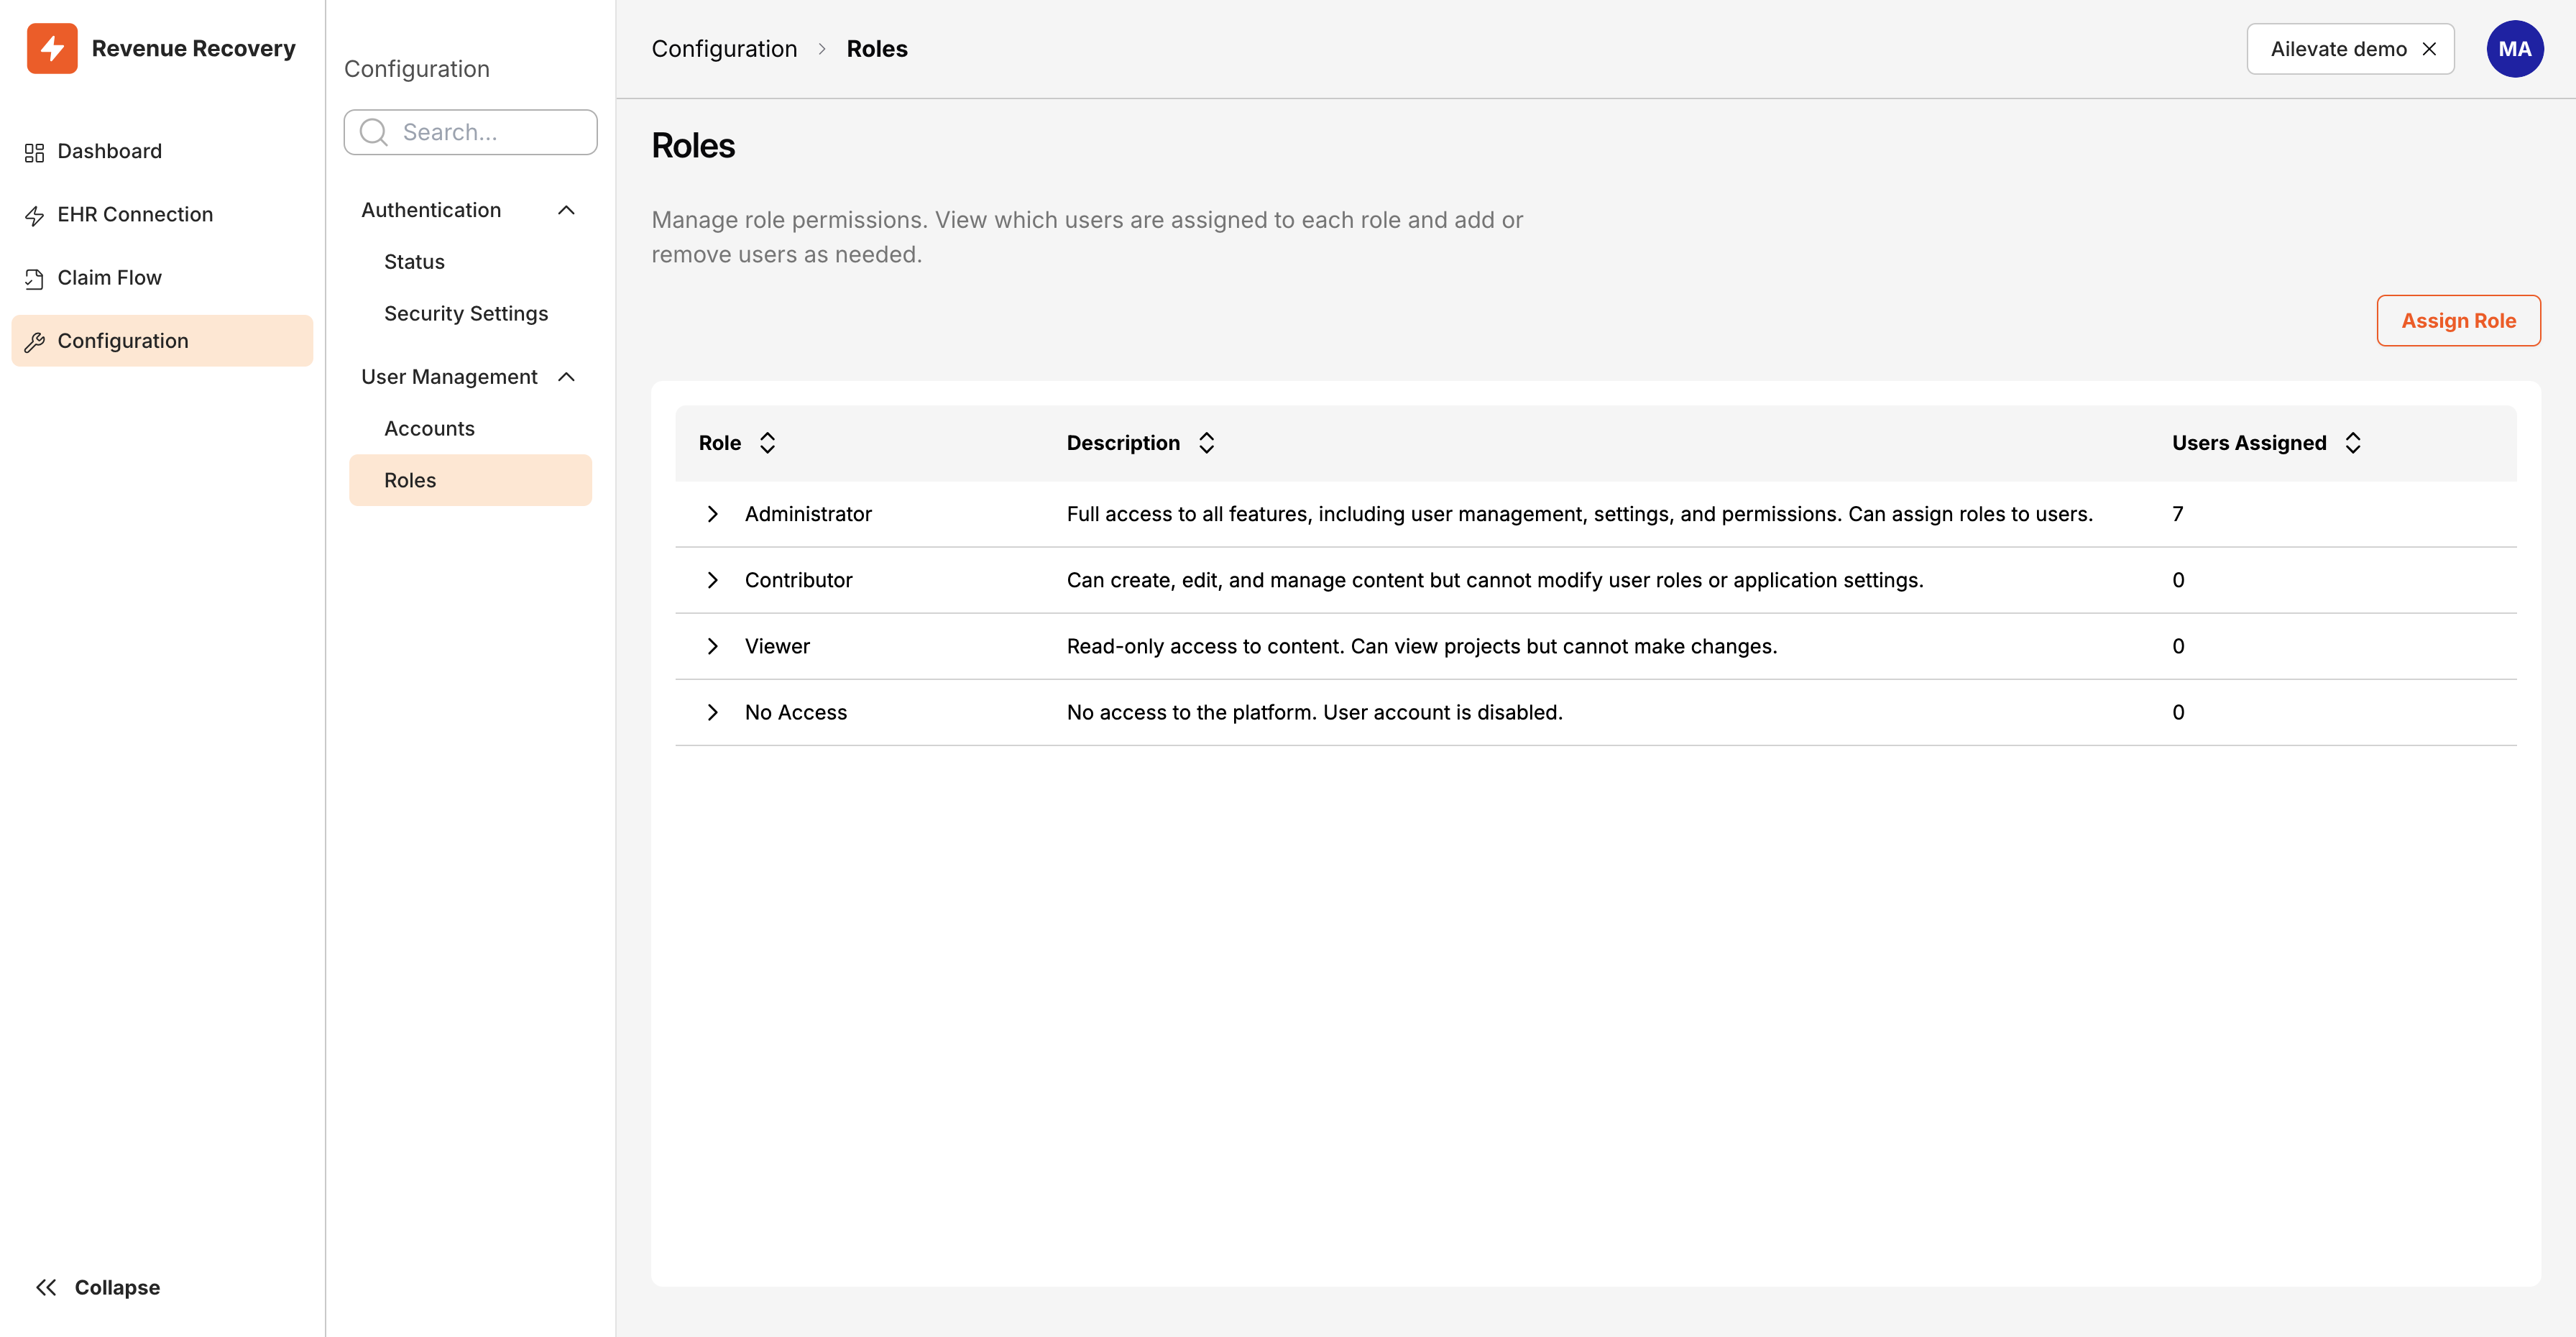
The Roles page showing all four roles with their descriptions and current user assignments
Each role card displays:
- Role Name - Administrator, Contributor, Viewer, or No Access
- Description - Brief explanation of what users with this role can do
- User Count - How many users currently have this role
Click on any role card to see a list of all users assigned to that role. This is particularly helpful for auditing who has administrator access or identifying users with no assigned permissions.
Using the Assign Role Button
Need to assign the same role to multiple users at once? The Assign Role button streamlines bulk role assignments, perfect for:
- Onboarding a new team or department
- Upgrading multiple contributors to administrator status
- Conducting quarterly access reviews and adjusting permissions
Microsoft Entra ID Group-Based Roles
If your organization uses Microsoft Entra ID authentication, you can map Azure AD groups to Revenue Recovery roles, automatically assigning permissions based on existing group memberships. This keeps your platform access in sync with your organization's identity management.
For complete details on setting up and managing Entra ID group-to-role mapping, including default role assignment and multi-group handling, see the Configuring Authentication guide.
Best Practices for User Management
Conduct Quarterly Access Reviews
Review user accounts every three months:
- Check Last Sign-In for inactive users (90+ days)
- Verify roles match current responsibilities
- Audit authentication methods
- Review No Access accounts for deletion or reactivation
Establish Clear Offboarding Procedures
Day of departure:
- Change user's role to No Access
- Document active work or pending claims
- Reassign responsibilities
30 days post-departure:
- Review audit logs for unusual activity
- Permanently delete account if no retention requirements exist
- Update role assignments if needed
Coordinate with Security Settings
- IP Allow Lists - Ensure remote users know about VPN requirements. See Security Settings.
- Trusted Domain Lists - Verify contractor email domains are approved for Magic Link authentication.
- Security Incidents - Use No Access role to quickly restrict suspicious accounts during investigation.
Troubleshooting
If you encounter issues while managing users, this quick-reference table helps you diagnose and resolve common problems.
| Error | Cause | Resolution |
|---|---|---|
| Invalid email format | Email address doesn't match standard format ([email protected]) | Double-check the email address for typos. Ensure it includes @ and a valid domain. |
| User already exists | An account with this email address is already in the system | Check the Accounts list to find the existing user. You can modify their role instead of creating a new account. |
| Insufficient permissions | You don't have Administrator role access | Only Administrators can manage users. Contact your organization's system administrator to request access. |
| Failed to send invitation | Email delivery issue or configuration problem | Verify the email address is correct. Check your authentication configuration. If the problem persists, contact Ailevate support. |
| User not receiving invitation email | Email may be in spam/junk folder or blocked by email filters | Ask the user to check their spam folder. Add @ailevate.com to your organization's email allowlist. |
Getting Additional Help
If issues persist after trying these solutions:
Check Authentication Configuration: Verify your authentication provider is properly configured at Configuration > Authentication > Status.
Review Permissions: Confirm you have Administrator role access. Only administrators can manage user accounts.
Contact Support
Reach out to Ailevate support with:
- Description of the issue
- Screenshots of any error messages
- Steps you've already tried
- Email address of the user you're trying to manage (if applicable)
For technical support, email [email protected] or contact your Ailevate representative.
Related Documentation
For Authentication Setup:
- Configuring Authentication - Set up Microsoft Entra ID or Magic Link authentication, including Entra ID group-to-role mapping
For Network Security:
- Security Settings - Configure IP Allow Lists and Trusted Domain Lists to restrict platform access
For New Users:
- Accessing the Platform - Authentication methods and first-time login help for end users
- First Login and Setup - Guide for new users getting started with the platform
Managing your team effectively means staying proactive—regularly review access, update roles as responsibilities change, and monitor activity through audit logs. Your diligence keeps the platform secure and ensures everyone has the right level of access for their role.
Updated 9 months ago